


26
Figure 3-1: Wall-mounting Bracket
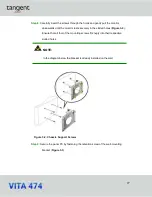
Step 6:
Insert the four monitor mounting screws provided in the wall mount kit into the
four screw holes on the real panel of the flat bezel panel PC and tighten until
the screw shank is secured against the rear panel (
Figure 3-2
).
WARNING:
Please use the M4 screws provided in the wall mount kit for the rear panel.
If the screw is missing, the thread depth of the replacement screw should
be not more than 4 mm.
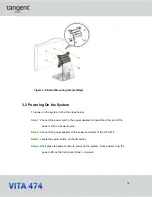
Step 7:
Align the mounting screws on the monitor rear panel with the mounting holes on
the bracket.
Содержание VITA 474
Страница 1: ...tan g ent USER MANUAL...
Страница 8: ...8 Chapter 1 Introduction...
Страница 20: ...20 Unpacking Chapter 2...
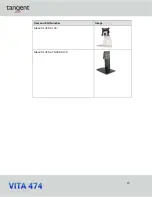
Страница 23: ...23 Item and Part Number Image Stand for VESA 100 Stand for VESA 75 VESA 100...
Страница 24: ...24 Installation Chapter 3...
Страница 34: ...34 BIOS Setup Chapter 4...
Страница 70: ...70 Appendix A Regulatory Compliance...
Страница 74: ...74 Appendix B Safety Precautions...
Страница 80: ...80 Appendix C Watchdog Timer...
Страница 83: ...83 Appendix D Hazardous Materials Disclosure...


