background image

10.  How to knit racking pattern of 

English  rib 

This garment 1s added  racking operation to 

English  rib knitting. 

The garment  ,s  not so elastrc 
The  example  is  knitted  with  medium 
thickness wool. 

CASTING-ON FOR RACKING PATTERN 

OF  ENGLISH  RIB 

( 1)  Set the racking indicator on No.  5. and 

cursors  on  the indicator  to  No  4 and 

No  5. 

(2)  The other steps are the same as for  1 X 

1  rrb. 

(3)  After kn1tt1ng the selvedge.  set the half 

pitch  lever  on  ··w 

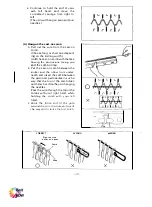
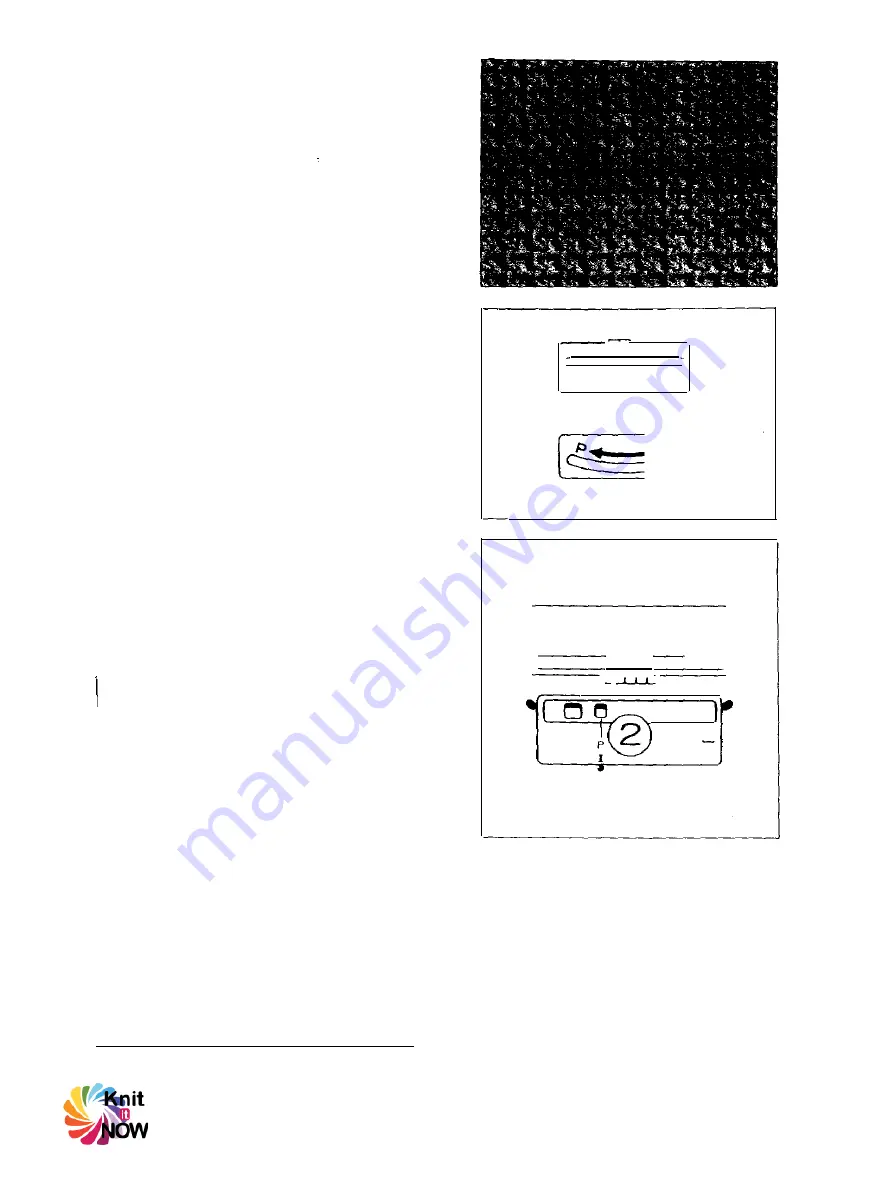
RACKING  PATTERN KNITTING 

( 1)  Set  the  carnage  as shown  ,n the  F,g 

(2)  Move  1he  connected  carriage  frorn 

right to left. (The plain needles knit and 

purl  needles  have  two loops each  on 

therr  hooks I 

(3)  Set the racking  ,nd,cator on  No  4 

(4)  Knit  two  rows. 

(5)  Set the  rack,ng  1nd,cator on  No  5 

(6)  Move the connected  carrrage from left 

to right  (One rmv) 

(7)  repeat  step  (2)  to  (6) 

I, 

- 35 -

. . .  

:v-; ..... 

■ 

0123(5618910 

� 

® 

�I 

Cl  0 

� I 

IPLAIN 

,1,1 

P.R 

.... 

Содержание TR-850

Страница 1: ...NG MC INSTRUCTION MANUAL TAITEXMA ENTERPRISE CORP iJ Mk IN f 9 13 0 aJ 2ND FL N0 18 1 LANE 90 YU MIN 6TH ROAD TAIPEI TAIWAN R O C IE El It rti cm o fili i 90 i t 18 1 5Cc 2 TEL 886 2 28219850 3 LINE F...

Страница 2: ...r knitting 30 6 How to kn t U style knilting 31 7 _ How to knit English rib 32 8 How to knit flsherman s rib 33 9 How to knit tucking pattern _ 3 4 1 0 How to knit racking pattern of English rib 35 11...

Страница 3: ...ing to the yarn or the pattern KR Change Knob R Slide Lever This lever has three positions I For looser stitch 1 J For Multi colour pattern II For firmer stitch These levers have two positions P R The...

Страница 4: ...Combj They are used for tilting the knitterto fixtheribber I Grip Handle _ _ _ IFine Knitting BarI It is used for helping to kint very thin yarn IWeights Large Small I Wire loop Type Weight Hangers I...

Страница 5: ...n accessory for the ribber 1 Insert the top of the thumb screws of the table clamps onto the holes on the back of the knitter 2 Fasten the screws 3 Secure the table clamps onto the table to tilt the k...

Страница 6: ...re that the stopper rests against the metal bed marked do not let the stopper slip under the bed Then tighten the screw up using the spanner Cross sectional view from right 3 Insert the shaft of the G...

Страница 7: ...sert the left bracket 5 Set up the reinforcing arms of the brackets and place the flat parts of the arms on the table 6 Using the clamps of KH fasten the arms to the table 7 Place the rear foot of the...

Страница 8: ...whether the KR carriage moves on the needle bed smoothly 9 Loosen both thumb screws of KH carriage and fit the Connecting Arm 1 0 Fasten the thumb screws 11 Move the KH carnage toward the KR camage sl...

Страница 9: ...te to the side on which the rear yarn gu de 1s set when you use the knitter without attaching the ribber 3 Insert the end of the rod into the stand hole at the center of the machine Look at the pictur...

Страница 10: ...m the KH carriage move the KR carriage to right end of the needle bed by keeping off the front foot from the needle bed as shown in the figure 3 Loosen the screws and take off the KH clamps 4 Hold up...

Страница 11: ...graduated from O to s each space between numbers being subd 1vrded into three parts The figure u denotes the tightest tensron re the smallest stitch and the g denotes the lo osest or largest stitch Th...

Страница 12: ...II II 1 11 Tension Dial 0 0 0 1 Selvedge Slide Lever II II II Tension Dial 0 1 3 5 1 3 2 4 1 2 4 6 4 5 Knitting Slide Lever I II I II I II I Medium Tension Dial 0 0 0 0 Cast on lex 4ply Slide Leve _ I...

Страница 13: ...er stitch ld1 For knitting Multi colour pattern by using KR Change Knob 3 KR Change Knob R L Use this Knob when you knit Multi eolour pattern 1 1 needle selection on KR nee dles using the Double Bed C...

Страница 14: ...or non knitting pos1 11on against the base of the needle grooves Pos1t1on B Knimng or working pos1t1on Pos1t1on D When the needlesare brought in this position from the position E thev 1 vi11 2iuto mat...

Страница 15: ...king the R 1ck1n9 patterns anrl Z1 _1za9 r 11terns r _ r_ 1ck1n9 ros111ori 1 1 J1 ate i on the f 1 ri 1n l1caror Bv turning 1h0 Gr1r r 1 lif r1t 1bFr bed 1s 1 0 d r1 1ht r left f r 1 ullv set 1he 1nd...

Страница 16: ...ome down Use this position when you knit thicker yarn more than 5 ply II you push back the ribber to Normal Position the levers will come downagain Middle Position 17 mm down Push down the levers from...

Страница 17: ...nd pull the Connectingarmtowardsyou by lifting arm up slightly 12 Taking off the KR Carriage After disconnecting the KR carnage from the KH carnage move the KR carriage to r ght end of the needle bed...

Страница 18: ...for picking up dropped stitches 4 Claw type weight hangers The claw typeweight hangers are used for hanging the small weights to give tension to the edge of thekn1tt1ngwork 5 End stitch presser plate...

Страница 19: ...ending on the knitting width Also you can use the Short cast on comb as a weight hanger as detailed below 1 Hold the Short cast on comb with points facing you Lift the presser bar up then pass the kni...

Страница 20: ...KH Carriage without removing the KR Setting Plates when you put away the machine 11 Put in the left side of KR Setting Plates 2 Loosen the left knob of KH Carriage and put around the axis 31 Insert t...

Страница 21: ...nage KH Change knob Tension dial Holding cam lever Pattern selector button Carriage KR Slide lever Tension dial Cam lever Tucking lever Holdrng cam lever 2 Needle arrangement NL 0 N PLAIN II 0 L N R N...

Страница 22: ...shown in the Fi g b Pass the yarn between both gate pegs and catch the end of yarn with left hand c Hold the yarn with rrght hand continue to hold the end of yarn with left hand pass to the yarn feed...

Страница 23: ...you and the comb on top b Put the cast on comb between the knitter and the ribber from under neath and insert the comb between the plain and p url needles in such a way that the top of the comb does n...

Страница 24: ...e from left to right The plain needles knit I The perfect selvedge has completed 1 x 1 RIB KNITTING After kn1tt1ng the selvedge set the carriages as shown 1n the Fig Then continue the kn1tt1ng Note Do...

Страница 25: ...2 X 2 RIB 1 Setting of carriage Carriage KH Change knob Tension dial Holding cam lever Pattern selector button Carriage KR Slide lever Tension dral Cam lever Tucking lever Holding cam lever 2 Needle a...

Страница 26: ...rn wrll hang on plain and purl needles I 4 Hang on the cast on comb This is in the same way as 1 X 1 rib a Hold the cast on comb with the face having the protrusions facing you and the comb on top b P...

Страница 27: ...of the 2 X 2 rib knitting a Set the half pitch lever to position P b Set the racking 1nd1cator on No 5 c By using the Double eyelet transfer needle transfer thestitch of left end purl needle to the le...

Страница 28: ...d 3 How to knit full needle rib Knitting method of full needle rib s the same as for 1 X 1 rib Difference s the needle arrangementonly In 1 X 1 rib every other needles are used but n full needle rib a...

Страница 29: ...ected carriage from right to left The yarn will hang on plain and purl needles 4 Hang on the cast on comb This is the same as 1 x 1 rib 5 Hang on the weights Hang the weights as per Standard weights c...

Страница 30: ...it stitch and purl stitch over purl stitch The following e arnple 1s knit1ed w11h rned1urn th1ckne55 cl You cart kn1I 3 X 3 r I l _ r l 4 1 _ r c r 1n 1 h CASTING ON FOR 5 x 5 RIB 1 Setting of carriag...

Страница 31: ...eft Only the pla n needles knit I C Move lhe connected carriage horn left tu right The 0url needles kn11 I 1 Movt the r onnectec1 ca 1 Jn r 1111 r 9 it lV ieli The OIJH needles kn t i 5 x 5 RIB KNITTI...

Страница 32: ...KR Slide lever Tension dial Cam lever Tucking lever Holding cam lever 2 Needle arrangement NL 0 N PLAIN I 0 ILi N IR N R ILi N RI N a Se tf p ra f pl 1 11 t r i o H b Arrange the plain an j purl n00d...

Страница 33: ...es as shown m the Fig Then contmue the knitting 6 How to knit U style knitting This garment 1s mad1 ol all _ l rn kn1tt1ng stJtches The knrtter s1dr and thf ricl er side are connected at o 1ly onP sid...

Страница 34: ...knit 2 rows 3 Repeat step 1 to 2 then you can make U style knitting 7 How to knit English rib English rib 1s a variety of 1 X 1 and knitter side is plain stitch but ribber side is tuck stitch The exam...

Страница 35: ...1n knitting English rib and fisherman s nb bnng forward the end needles to position E Position Din partial krnitmg 8 How to knit fisherman s rib Fisherman s rib s made of tucking stitches on both sid...

Страница 36: ...e knitting machine 2 After knitting the selvedge move the connected carriage from right to left Remarning the carriage settrng 3 Set the starting line of the punch card and card lock lever to 4 Set th...

Страница 37: ...The other stepsare the same as for 1 X 1 rrb 3 After kn1tt1ng the selvedge set the half pitch lever on w RACKING PATTERN KNITTING 1 Set the carnage as shown n the F g 2 Move 1he connected carriage fr...

Страница 38: ...he carnages as shown in the Fig 3 Move the connected carriage from right to left The plain and purl needles knit 4 Set the racking indicator on No 1 5 Move the connected carriage from left tci right 6...

Страница 39: ...he selvedge using the Doubel eyelet transfer needle transfer the part A s11tches to opposite plain ne_edles and return the empty needles to pos11ron A of KR bed 2 Set the carriages as shown in the fig...

Страница 40: ...Arrange the needles of KR side n even number You can see the number easrly by the even number marks on the Needle Position Indicator If you kn r with odd number needles you shall not able to knit any...

Страница 41: ...ows KH a Set the card lock lever at b Push both cam buttons for PART at the same time KR c Set the Cam Lever L R to 1 ply PR d Push KR Change Knob L R and turn to the lih mark The knobsremain pushed i...

Страница 42: ...X 1 rib 2 X 2 rib 5 X 5 rib full needle nb Medium 3ply Fine 2plyl 5 6 5 6 7 8 Fine Fine 3 4 4 5 6 7 5 6 Very line 1 ply Very fine 2 3 3 4 5 6 4 5 Super line Very fine 0 1 1 2 3 4 3 4 Set the Slide Lev...

Страница 43: ...d the main yarn to the right side of theYarnTension Unit andthe plating yarn to the left side of 11 5 Disconnect the KR carriage from the Connecting Arm Thread the main yarn into the Main Yarn Feeder...

Страница 44: ...ting In this pattern the Racking KR side stitches are d1stingu1shed from the ground as they are knrtted different colours You can enIoy a beautiful contrast pattern The e xample 1s knitted with the co...

Страница 45: ...re 4 Swrngthe r bber prtch by prtch rn every row After swinging ten pitch swing back the rrbber to No O again Repeat these steps Do not use End Strtch Presser Plate when you knit racking pattern K H K...

Страница 46: ...nto the yarn feeder and hang 11 around the Connecting pin as shown in the figure 4 Operate the Carnage slowly from right to left After you hear click stop the carriage and take the yarn off from the C...

Страница 47: ...y needle I Now second needle from the end becomes empty b Pick up either neighbouring lower loop and hook on the empty needle f2 Increasing more than two stitches on either side of the garment a Place...

Страница 48: ...end stitch to the needle j Put back the empty needle CD to posrt1on A b Take the empty needle out of actmn 2 Decreasing more than two stitches If you decrease more than two stitches decrease them at t...

Страница 49: ...s we mentioned on page 38 the number of KR needles should be even number INCREASING Increase one stitch at right side 1 Place the carnage on the side which vou vvanl to ncreaS In this c s e right s1 i...

Страница 50: ...decrease KR stitch this time 2 If you want to decrease one more stitch decrease KH stitch and two KR stitches by using the Transfer tool 3 Repeat these steps to decrease more stitches Hang the Weight...

Страница 51: ...er side in this case right side You can increase the stitches only at the side opposite to the carriage a Set the both carriages as shown in the figure b Bring the nonknitt1ng needles of KH and KR bed...

Страница 52: ...id a hole rn the knitting hook the yarn lying across on the needles on position E to the next needle to the knitting d Move the connected carriage from left to right e Repeat step a to di according to...

Страница 53: ...e plain needles on position E and purl needles on pos1t1on B knit and the yarn 1s across on the purl needles on posrt1on E e To avoid a hole in the knitting hook the yarn laying across on the purl nee...

Страница 54: ...purl needle to plain needle a Raise the plain needle from position A to B and open the latch b By using the transfer needle transfer the stitch on the purl needle to the empty plain needle 2 How to tr...

Страница 55: ...th waste yarn then brnd the last row by using the tapestry needle as shown in the figures The length of the yarn for binding Is 3 times the width of knitting 1X1rib 2X2rib 2X1rib YOU CAN TRANSFER THE...

Страница 56: ...cket levers and catch the lowest loop of the dropped stitches with latch tool b With the latch tool make the stitches and hang the final stitch on the empty needle Unravelling the rows if you have kni...

Страница 57: ...t from the front rail of KR needle bed And place the KR carnage at the same side of KH carriage 3 Connect both carriages 4 Work the corrections if required 5 Continue the knitting 3 How to use the kni...

Страница 58: ...of the ribber until the needle you wish to change is free c Bring forwardthe needle asfare as 11 will go d Push down the hook of the needles until the shank of the needle rises free of the needle bed...

Страница 59: ...Rails of the needle bed 3 Back side of the Carriage After clean up with cloth OJI the dotted line parts and the side of the Cam and d Wipe off sta ned oil e Keep your machine 1n a dry place When you u...

Отзывы: