background image

11

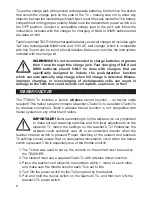
1.  Turn on the Tx. 

2.  Apply power to the Rx. 

3.  If the Rx LED fl ashes once and then stays on, the Rx is already bound to the 

Tx and you can skip to the next section. Otherwise, insert a small diameter 
screwdriver through the hole marked “BIND” and press the pushbutton until 
the Rx LED glows red and then turns off after about one second.

4.  Release the “BIND” button. 

5.  If the binding is successful, the Rx LED will fl ash once and then remain ON.

6.  Test for proper Tx / Rx functionality before use. If the radio doesn’t appear to 

have become properly bound, repeat steps 1– 6 above.

FAILSAFE FUNCTION

The included TR624 receiver has a failsafe feature which engages in the event that 
the radio signal from the transmitter somehow becomes interrupted. If radio contact 
is broken, this safety feature causes the servos to automatically move either to a 
certain position, or hold their last position so to prevent the model from moving in 
an erratic manner. Channels 1, 2, 4, 5, and 6 will enter a “hold” mode, whereby the 
servos will lock in their last recognized position.

The servo connected to channel 3, normally being the throttle control, will move to 
a pre-set position. The factory default failsafe position for channel 3 is to move to 

0% throttle

. Motor/prop movement should stop if the receiver loses signal from the 

transmitter. The throttle servo’s failsafe position can be manually re-set to any other 
position if desired, as follows:

IMPORTANT NOTE:

 Before manually resetting the failsafe, make sure the servo 

reversing switches are in the correct position for the application.

 1. 


Apply power to the Tx and Rx.

 2a.  

If using an ESC, do NOT arm the ESC. Do NOT attempt to adjust the throttle’s 
failsafe position if the ESC is armed.

 2b.  

If using a gas or glow powered engine, do NOT attempt to adjust the throttle’s 
failsafe position while the engine is operating.

 3. 


Move the Tx throttle stick to the desired position for the throttle control to move 
if the Rx goes to failsafe.

 4. 


Press and hold the “Bind” button on the receiver, and the Rx’s LED should blink 
twice. Release the Bind button, and the receiver’s LED should turn on (stop 
fl ashing). The Tx and Rx should now be bound, with the throttle failsafe in the 
new position as set above.

NOTE:

 If you’re using an ESC which has a signal loss feature, the pre-set failsafe 

position is irrelevant as the signal loss feature will cease the throttle operation if the 
signal is lost.

Содержание TTX600

Страница 1: ...eadthismanualinitsentiretybeforeuse Alsoreadandunderstand the instructions included with the model Damage resulting from misuse or modification will void your warranty FEATURES Trainer Switch CH5 Swit...

Страница 2: ...uired to power the Tx not included Non rechargeable 1 5V alkaline or 1 2V rechargeable nickel cadmium NiCd or nickel metal hydride NiMH cells can be used Do not mix cell types or old and new cells etc...

Страница 3: ...about the pitch axis an imaginary line extending through the center of both main wings from one wing tip to the other wing tip Position the elevator reversing switch so that pulling the elevator stick...

Страница 4: ...should now be reversed Repeat this process to again reverse the rotational direction of ch6 TRIMS A trim lever is included for each of the main controls located adjacent to the respective stick The ai...

Страница 5: ...rate switch in one position can allow for better control of the model while on the ground at low altitudes or while performing certain maneuvers Moving the switch to the opposite position can allow fo...

Страница 6: ...le cells can result in damage to the cells that could include cell rupture explosion or fire TRAINER FUNCTION The TTX600 Tx includes a built in wireless trainer function no trainer cable required This...

Страница 7: ...TAIL MIXING FUNCTIONS The TTX600 includes elevon and V tail mixing functions which can be turned on or off Elevon control consists of a mixture between the elevator and aileron channels and is useful...

Страница 8: ...for the model If the elevator and aileron functions or the rudder and elevator functions appear reversed at the control surfaces it may be necessary to swap the channel 1 and 2 servo plug positions f...

Страница 9: ...rvos make sure the pushrods are not too loose or bind in any way Pushrods should be capable of operating the full range of the servo This can be tested by moving the Tx sticks to maximum positions sev...

Страница 10: ...and the exhausts from a glow engine Cut a hole in the side of the fuselage large enough to allow the switch s lever to move freely and fully from end to end If the switch harness includes mounting scr...

Страница 11: ...the throttle control will move to a pre set position The factory default failsafe position for channel 3 is to move to 0 throttle Motor prop movement should stop if the receiver loses signal from the...

Страница 12: ...For example When the aileron trim lever is in the center position it s best that the trailing edge of the aileron is aligned with the trailing edge of the wing itself not above or below the wing s tra...

Страница 13: ...urn on the Tx power switch Turn on the power switch in the model or connect the flight battery 4 During the first flight it might be necessary to re trim the aileron elevator and rudder channels to al...

Страница 14: ...avoid flying in the proximity of full scale aircraft utilizing a spotter when appropriate 6 I will not fly my model aircraft unless it is identified with my name and address or AMA number inside or a...

Страница 15: ...y line must be established An area away from the safety line must be maintained for spectators Intentional flying behind the safety line is prohibited 5 I will operate my model aircraft using only rad...

Страница 16: ...t during the entire flight maintaining visual contact without enhancement other than by corrective lenses that are prescribed for the pilot No model aircraft shall be equipped with devices which allow...

Страница 17: ...itch Harness with Charge Plug Futaba J Plugs TACM2020 Tactic 4 Cell AA Battery Holder Futaba J TACM2100 Tactic Adjustable Neck Strap TACM4420 Tactic TTX404 and 600 Battery Door BATTERIES AND CHARGERS...

Страница 18: ...throttle all other channels hold Dimensions 1 77 0 98 0 5 45 25 13mm Weight 0 28 oz 8g Reversing switches Slide switches four channels Trims Analog for throttle digital for aileron elevator rudder An...

Страница 19: ...throttle stick to accidentally be moved away from the off or minimum position while the model s engine motor is moving ALWAYS range check the radio system before use ALWAYS make sure that all transmi...

Страница 20: ...area check your local R C club regarding local operation Rx located too closely to engine motor or servos or other moving mechanical parts which might be creating unwanted electrical noise relocate t...

Страница 21: ...equipment complies with FCC Rf radiation exposure limits set forth for an uncontrolled environment This equipment should be installed and operated with a minimum distance of 20 centimeters between the...

Страница 22: ...pment for recycling please contact your local city office your household waste disposal service or location where you purchased the product Declaration of Conformity Product Tactic TTX600 2 4GHz 6 Cha...

Страница 23: ...thin the stated warranty period Tactic will at its option repair or replace it for a service charge not greater than 50 of its then current retail list price Be sure to include your daytime telephone...

Страница 24: ...2010 Hobbico Inc TACJ2600 Mnl v1 2...

Отзывы: