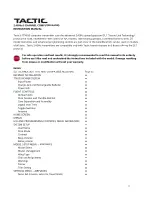
LCD
pushbuttons
carrying handle
each toggle switch
charge jack (left side, bottom)
firmware upgrade jack (left side, just above charge jack)
trim levers
SLT TECHNOLOGY, Tx-R, AND COMPATIBLE RECEIVERS
Tactic's custom SLT technology ensures that transmitters emit a strong, clear, frequency-hopping 2.4GHz signal,
and that your compatible receiver accepts no signal except
yours
. Binding Tactic brand receivers is as simple as
pushing a button, which creates a locked-in, interference free
link
. The TTX650 radio can store up to 20 models in
memory, making it perfect to control a full fleet of models with the super-affordable Tactic brand 2.4GHz receivers.
The TTX650 is also compatible with non-Tactic brand receivers which use the *SLT protocol, for the ultimate in
convenience and flexibility.
* Make sure optional receivers have the
genuine SLT protocol
before use with the TTX650.
The TTX650 is also compatible with all transmitter-ready aircraft bearing the "Tx-R" logo. Such aircraft include
receivers having the SLT protocol.
RECEIVER INSTALLATION
Always mount the optional receiver, servos, switch harness, battery, electronic speed control, etc. as explained in
the manual included with such equipment and/or the model. Keep the Rx and its antenna(s) as far away from the
engine/motor, servos, and ESC and other electronic items as much as possible. It may also be a good idea to
mount the Rx inside certain models using Velcro
®
, and wrap it in foam rubber to prevent damage from strong
vibrations or crash damage (except in extremely warm environments). It's best to have as few items surrounding
the receiver's antenna tips as possible inside the model, to allow for the most obstruction-free signal path to the
transmitter. Exposing the receiver's antenna tip outside the model is recommended if possible. For receivers with
two antennas, position the antennas at 90 degree angles with the tips resting at least 5 inches apart. If possible,
allow one antenna to point vertically above the receiver itself.
TTX650 POWER SYSTEM
INPUT POWER:
Four 1.5V "AA" alkaline cells (included) or 1.2V "AA" NiCd or NiMH cells supply power to the
TTX650. Do not mix cell types, or old and new cells, etc. Slide open the battery door to find the four "AA" cell
battery holder. Insert all cells with the proper polarity as shown inside the battery holder. Carefully tuck the wires
and battery holder inside the battery compartment so not to damage them when closing the battery door.
Alternatively, an assembled 4.8V NiCd or NiMH "AA" flat pack can be installed. Remove the alkaline cell holder
from the battery compartment and carefully observe the polarity of the wires before disconnecting the plug from
the Tx. Install the NiCd or NiMH battery by first inserting its connector into the jack in the battery compartment.
Make sure to observe proper polarity.
Battery voltage is shown on the LCD's home screen for easy monitoring. A "LOW BATTERY" warning will show
when battery power drops to the voltage value shown in the BATTERY ALARM screen as described on page xx.
3

