background image

T-Mobile myTouch 3G User Guide

68

May 19, 2009

5.2

Using Browser

Open Browser to start surfing the web. Browser is fully optimized and comes with advanced 
functionalities that let you enjoy Internet browsing on your phone.

Note

 You must have an active data (3G, GPRS), or Wi-Fi connection to access the Internet.

To open Browser

Do one of the following:

Press 

HOME

, then touch 

Browser

.

Press 

HOME

, then touch the Applications tab, and then touch 

Browser

.

Note

 Browser automatically opens when you touch a web link in an email or text message.

To go to a web page

1

On the Browser screen, press 

MENU

 and then touch 

Go

.

2

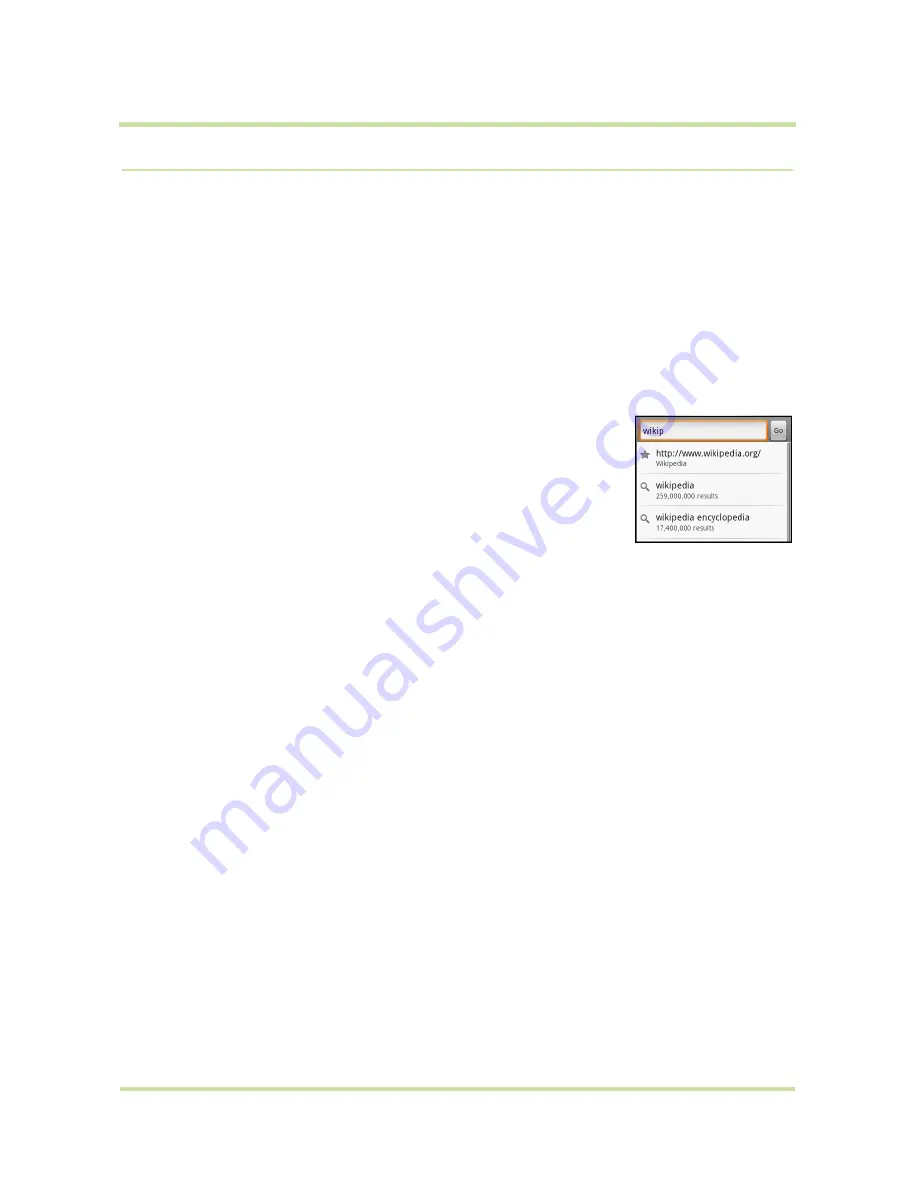
Enter the web page address using the keyboard. As you enter the 
address, matching web page addresses will appear on the screen. Touch 
an address to go directly to that web page or continue entering the web 
page address.

3

Touch 

Go

.

To set your home page

1

Press 

MENU

 and then touch 

More

 > 

Settings

 > 

Set home page

.

2

Enter the URL of the web site you want to use as your home page and then touch 

OK

.

View web pages

Browser offers a host of features that let you view web pages just like on a desktop computer.

To change the screen orientation to landscape view

Turn your phone sideways to view the web page in landscape mode. The screen orientation 
automatically adjusts to how you hold the phone. 

Note 

The

 Orientation 

check box in 

HOME > MENU > Settings > Sound & display

 needs to be selected 

for the screen orientation to automatically change. 

To navigate on a web page

You can roll the 

TRACKBALL

 or slide your finger on the screen in any direction to navigate and view 

other areas of the web page.
You can also use scale and scroll to magnify an area of the web page for easy viewing. To use scale 
and scroll:

1

On a web page, press the 

TRACKBALL

 twice. The web page zooms out to fit the height of the 

screen and the magnifying window appears.

Содержание myTouch myTouch 3G

Страница 1: ...T Mobile myTouch 3G with Google User Guide May 19 2009 Android mobile technology platform R1 5 0 TMUSUM 1 5 0 0 8...

Страница 2: ...r registered trademarks or trademarks of Microsoft Corporation in the United States and or other countries Bluetooth and the Bluetooth logo are trademarks owned by Bluetooth SIG Inc Wi Fi is a registe...

Страница 3: ...pply unit Other usage may be dangerous and will invalidate any approval given to this product SAFETY PRECAUTIONS FOR PROPER GROUNDING INSTALLATION CAUTION Connecting to an improperly grounded equipmen...

Страница 4: ...peration The phone should be only connected to products that bear the USB IF logo or have completed the USB IF compliance program Do not use a battery that appears damaged deformed or discolored or th...

Страница 5: ...the product should be turned off and the user should obey all signs and instructions Sparks in such areas could cause an explosion or fire resulting in bodily injury or even death Users are advised n...

Страница 6: ...al antenna Use of unauthorized or modified antennas may impair call quality and damage the phone causing loss of performance and SAR levels exceeding the recommended limits as well as result in non co...

Страница 7: ...uctions and should use a mounting accessory rec ommended by the manufacturer Avoid unstable mounting Do not place the product with an unstable base Use product with approved equipment This product sho...

Страница 8: ...apable of producing bright flashing lights Loud Noise This phone is capable of producing loud noises which may damage your hearing Emergency Calls This phone like any wireless phone operates using rad...

Страница 9: ...otate 21 Use the Trackball 21 1 6 Getting Started 22 Turn your phone on and off 22 Enter PIN 22 Set up your phone for the first time 22 Retrieve your Google password 23 Turn off the screen when not in...

Страница 10: ...e screen 44 Add myFaves contacts 45 Communicating with a myFaves contact 45 Edit myFaves contact 45 Change the order of myFaves contacts 45 Replace a myFaves contact 46 3 Managing Your Time 47 3 1 Usi...

Страница 11: ...eb pages 68 Manage links history and downloads 70 Manage bookmarks 72 Adjust Browser settings 72 5 3 Amazon MP3 73 5 4 Using Bluetooth 73 6 Getting Around with Maps 76 6 1 Using Maps 76 Enable Locatio...

Страница 12: ...naging your applications 98 8 7 Uninstalling an application 98 9 Managing Your Phone 99 9 1 Changing Basic Settings 99 Set the date time zone and time 99 Display settings 99 Ringer settings 100 Phone...

Страница 13: ...Touch 3G User Guide 13 May 19 2009 Exposure to Radio Frequency RF Signals 108 SAR Information 109 Telecommunications Internet Association TIA Safety Information 109 WEEE Notice 109 RoHS Compliance 110...

Страница 14: ...functions of the MENU HOME CALL END CALL POWER SEARCH and BACK buttons refer to Phone Controls on page 19 for more details For more information about the TRACKBALL refer to Use the Trackball on page 2...

Страница 15: ...set adapter Pouch 4GB microSD card Screen protector Speaker 3 2 Megapixel Camera See Using Camera and Camcorder on page 84 for details Back Cover VOLUME UP Press to increase the ringer or media volume...

Страница 16: ...h your thumb until it disengages from the phone SIM card The SIM card contains your phone number service details and phone book message memory Your phone supports both 1 8V and 3V SIM cards Note Some...

Страница 17: ...to 420 hours for GSM Note Battery life is subject to network and phone usage Warning To reduce risk of fire or burns Do not attempt to open disassemble or service the battery pack Do not crush punctur...

Страница 18: ...he storage card Insert the microSD card into the slot with its gold contacts facing down To remove the storage card Press the storage card to eject it from the slot Note If you want to remove the stor...

Страница 19: ...ing is indicated by a solid red light in the Notification LED As the battery is being charged while the phone is on the charging battery icon is displayed in the status bar of the Home screen After th...

Страница 20: ...act number or phone number is highlighted on the screen press to call the contact or phone number If you navigated to another application during a call press to display the ongoing call on the screen...

Страница 21: ...start to drag While dragging do not release your finger until you have reached the target position Flick Flicking the screen is similar to swiping except that you need to swipe your finger in light q...

Страница 22: ...e provider Refer to To restore a SIM card that has been locked out on page 101 to learn how to unblock the SIM card Set up your phone for the first time When you turn on the phone for the first time a...

Страница 23: ...the screen by pressing the END CALL POWER button Pressing any of the control buttons again or incoming calls will turn on your phone screen Note If you have set up a screen unlock pattern you will be...

Страница 24: ...tions tab to the Home screen touch and hold an application icon When the phone vibrates release the icon on an empty area on the Home screen Widgets Add a clock music player a picture frame the Google...

Страница 25: ...touch Wallpaper 2 Touch Pictures or Wallpaper gallery Touch Pictures to use a picture that you have captured using the camera or copied to your phone as a wallpaper You can crop the picture before set...

Страница 26: ...icons that may appear on the status area of the status bar Icons that appear in the boxed area New email message More not displayed notifications New SMS MMS Call in progress Problem with SMS MMS del...

Страница 27: ...ownward to open the Notifications panel If you have several notifications you can scroll down the screen to view more notifications EDGE connected No SIM card installed EDGE in use Vibrate mode 3G con...

Страница 28: ...ing green light even if there is a pending notification 1 9 Applications The Applications tab holds all applications on your phone All applications that you downloaded and installed from Android Marke...

Страница 29: ...34 for details Sound display Set the call and notification ring tones or set the screen brightness and screen timeout See Managing Your Phone on page 99 for details Data synchronization Select which...

Страница 30: ...tes and the vibrate mode icon appears in the status bar 3 While in Vibrate mode press VOLUME UP once to switch to silent mode The speaker mute icon displays in the status bar Tip To quickly switch you...

Страница 31: ...mplete and more To set onscreen keyboard options 1 Press HOME then press MENU and then touch Settings Locale text Android keyboard 2 Set the options you want to use for the onscreen keyboard Tip If yo...

Страница 32: ...easily using two thumbs Note The Orientation check box in HOME MENU Settings Sound display needs to be selected for the screen orientation to automatically change Entering numbers and symbols Switch...

Страница 33: ...the storage card when the phone is connected to a computer Refer to the next procedure to learn how to turn off USB storage To turn off USB storage 1 Open the Notifications Panel Refer to To open the...

Страница 34: ...dialer to enter the phone number If you touch a wrong number touch to erase digits one by one To erase the entire number touch and hold 2 Press the CALL button to place the call Tip During a call pres...

Страница 35: ...you want to call back For more information about the Call log tab refer to Using the Call Log on page 39 Add and call your contacts Add the phone numbers of your contacts so you can call them more eas...

Страница 36: ...ge appears on the screen when you touch and hold the number 1 key For more information on how to set up your voicemail number refer to Adjusting Phone Settings on page 40 2 2 Answering or Rejecting Ca...

Страница 37: ...ote If you are using the provided wired headset in a call you can press the button on the wired headset to mute the microphone Press the button again to unmute the microphone To turn the speakerphone...

Страница 38: ...he option of rejecting or accepting the call If you are already on a call and accept the new call you can choose to swap between the two callers Press the CALL button to take the second call and put t...

Страница 39: ...number in the list to open a screen that gives you options on what you can do with the contact Touch and hold a name or number in the list to display the options menu where you can call the contact vi...

Страница 40: ...The missed call number and or contact name is displayed To clear the Call log Do one of the following when viewing the Call log To remove a name or number touch and hold on the name or number then to...

Страница 41: ...ed 2 7 Creating and Managing Your Contacts Similar to an online address book the Contacts application gives you quick and easy access to the people you want to reach You can view and create contacts o...

Страница 42: ...heck box 3 When finished press MENU and then touch Done To import contacts from the SIM card You can add contacts saved on your SIM card to your phone s contacts list 1 In the contacts list press MENU...

Страница 43: ...by touching and holding a contact You can change the contact s default phone number 1 In the contacts list touch the contact to open the contact details screen 2 Touch and hold the phone number you wa...

Страница 44: ...en opens touch Email home Email work or another email option A compose screen opens for your new email Note If you have more than one email account set up on your phone you will be prompted to select...

Страница 45: ...you need to import an existing contact that has an email address Communicating with a myFaves contact You have different ways to communicate with a myFaves contact 1 On the myFaves panel select the my...

Страница 46: ...t 1 Press HOME and then touch myFaves on the Home screen 2 Select the myFaves contact by positioning the contact s circle in the center of the screen you want to replace 3 Press MENU and then touch Re...

Страница 47: ...lendar where you want to save the event Note You can create multiple calendars such as Personal Business or Family using Calendar on the web Depending on your synchronization settings these calendars...

Страница 48: ...ing editing or deleting that event or creating a new event Event reminders If you set a reminder for an event the upcoming event icon appears in the notifications area of the status bar when the remin...

Страница 49: ...ouch one of the available alarms 2 Touch Time to set the alarm time Adjust the time by touching or Touch AM to change to PM or vice versa then touch Set when finished 3 Touch Ringtone then select the...

Страница 50: ...de the clock display on the Alarm Clock screen press MENU then touch Hide clock Note To change the date and time format displayed in your alarms refer to Set the date time zone and time on page 99 Del...

Страница 51: ...e delivered as one but count as more than one message These are called concatenated messages Multimedia messages also known as MMS can contain text and a picture a recorded voice an audio file or a pi...

Страница 52: ...t or continue entering the recipient s phone number or email address Tip You can add a subject line by pressing MENU and then touching Add subject 3 Touch the text box that contains the text Type to c...

Страница 53: ...mple Slide 1 touch Add picture then select the picture you want to add to the slide You can also navigate to the text box and enter a caption for the picture Press MENU to preview the slide remove the...

Страница 54: ...ia messages refer to Adjust text and multimedia message settings on page 56 A new message icon also appears in the notifications area of the status bar to notify you of a new text or multimedia messag...

Страница 55: ...age size before you download it To reply to a text or multimedia message 1 In the message list touch a text or multimedia message thread to open it 2 Use the TRACKBALL to navigate to the text box at b...

Страница 56: ...automatically retrieve all your MMS messages completely When selected the MMS message header plus the message body and attachments will automatically download to your phone If you clear this check bo...

Страница 57: ...fresh to send or receive new emails and to synchronize your emails with your Gmail account on the web Create and send emails To create and send an email 1 In the Inbox press MENU and then touch Compos...

Страница 58: ...onscreen keyboard to create another line To view your sent messages In the Inbox press MENU and then touch View labels Sent Receive and read emails Depending on your notification settings the phone p...

Страница 59: ...arch Reply to or forward emails Do one of the following Press HOME then touch and hold the status bar and then slide down your finger on the screen to open the Notifications panel Touch the new email...

Страница 60: ...r archived messages in the Inbox press MENU then touch View labels All Mail Add star or Remove star to assign a star or remove the star on the conversation Mark read or Mark unread as desired Unread m...

Страница 61: ...ou want to set up is not in the phone s email database you will be prompted to manually enter the email account settings such as the email server protocol and more after touching Next Touch Manual set...

Страница 62: ...nt to edit then touch Account settings on the options menu Add more email accounts On the Your accounts screen press MENU and then touch Add account 4 4 Using Google Talk Google Talk is Google s insta...

Страница 63: ...nvitation the pending invitation disappears from the list To change your online status and message 1 Touch the online status icon beside your name then select the status you want on the menu 2 Touch t...

Страница 64: ...riends with names that match what you have entered To block a friend You can block a friend from sending you messages When blocked your friend is also removed from your Friends list 1 In the Friends l...

Страница 65: ...cations for new instant messages You can set the phone to play a sound vibrate or display a notification icon in the status bar each time you receive a new instant message 1 In the Friends list press...

Страница 66: ...n the APNs screen press MENU and then touch New APN 4 In the Edit access point screen enter the APN settings Touch the APN setting item to edit it 5 Press MENU and then touch Save when you finish sett...

Страница 67: ...the status bar whenever the phone detects an available wireless network within range Wi Fi networks On the Wireless controls screen touch Wi Fi settings then touch the wireless network that the phone...

Страница 68: ...address 3 Touch Go To set your home page 1 Press MENU and then touch More Settings Set home page 2 Enter the URL of the web site you want to use as your home page and then touch OK View web pages Bro...

Страница 69: ...ke it easier for you to switch from one web site to another You can open up to 8 browser windows To open a new window press MENU and then touch New window while browsing a web page A new browser windo...

Страница 70: ...ress MENU and then touch More Select text Tip Zoom out of the page before you select text 3 Position your finger at the start of the text you want to copy and then drag to the end of the text you want...

Страница 71: ...ress MENU and then touch Settings Applications 2 Select the Unknown sources check box 3 When the Attention dialog box opens touch OK Note All downloaded applications are saved to the storage card Befo...

Страница 72: ...To open a bookmark 1 On the Browser screen press MENU and then touch Bookmarks 2 On the Bookmarks tab do one of the following Touch the bookmark you want to open Touch and hold the bookmark you want t...

Страница 73: ...versa Discoverable Bluetooth is turned on and all other Bluetooth enabled devices can detect your phone Off Bluetooth is turned off In this mode you can neither send nor receive information using Blu...

Страница 74: ...ooth device that you want to pair with is set to discoverable mode Consult the Bluetooth device s documentation to learn how to set it to discoverable mode 3 Touch the hands free headset or car kit in...

Страница 75: ...sconnect a Bluetooth hands free headset or car kit 1 Press HOME then press MENU and then touch Settings 2 Touch Wireless controls Bluetooth settings 3 Navigate to the Bluetooth devices section then to...

Страница 76: ...open Maps and find your location or search for places of interest you must enable Location source 1 Press HOME press MENU and then touch Settings 2 Touch Security location 3 Navigate to the My Locatio...

Страница 77: ...location on the map 3 Touch Search 4 Touch a place in the list to show its location on the map Tip On the map roll the TRACKBALL left or right to view the location of the previous or the next place in...

Страница 78: ...ide your finger on the screen in any direction to view other areas of the map To change a map mode When viewing a map you can switch to another map mode Press MENU and then touch Map mode Select from...

Страница 79: ...res the best imagery available most of which is approximately one to three years old Traffic mode available only in selected areas Real time traffic conditions are displayed over roads as color coded...

Страница 80: ...e then touch Clear map to reset the map Your destination is automatically saved in the Maps history Distance and time to destination Touch to show the location on a map Next turn information Touch to...

Страница 81: ...can see your location Invite friends To share your location with friends and request to see their locations 1 In Latitude press MENU and then touch Add friends 2 Choose how to add friends Select from...

Страница 82: ...display your friend s name then touch the balloon right above his or her icon To see other friends touch either one of the arrow buttons next to the balloon List view To show a list of your friends i...

Страница 83: ...then touch OK Change your photo Change the picture which is also shared across other Google products and features After you touch Change your photo you can either take a picture of yourself with the...

Страница 84: ...ng the camera To open the Camera or Camcorder Press HOME touch the Applications tab and then touch Camera if you want to capture photos or Camcorder if you want to shoot videos The screen automaticall...

Страница 85: ...video you have just captured appears at the upper left corner of the screen Touch the thumbnail to open the post capture icons The post capture icons let you view the file in Gallery set a photo as a...

Страница 86: ...ed on the storage card it may take a while to load all your photos on the screen To close Gallery While in the Gallery screen press HOME or BACK to close the application Note If you opened Gallery fro...

Страница 87: ...icture in the album or in the pictures list To zoom in or out on a picture Touch the screen to activate the zoom control To view a picture in landscape orientation Turn your phone sideways to view the...

Страница 88: ...attached to your email Compose your message then touch Send For more information on how to create and send emails refer to Using Gmail on page 57 To send a picture using Messaging 1 While viewing a p...

Страница 89: ...e is a 3MB limitation on the size of a video file that can be shared If you want to share a video that you captured using the phone this is approximately 1 minute of high quality or 2 minutes of low q...

Страница 90: ...atured Most popular Most viewed Top rated and more To close YouTube While on the YouTube screen press HOME or BACK to close YouTube Watch YouTube videos 1 On the YouTube screen select a video to watch...

Страница 91: ...n also create and use folders to organize your music inside the Music folder you have created 4 Copy the music into the folder you have created 5 After copying music unmount or eject the drive as requ...

Страница 92: ...navigate to the artist album or song that you want to add in the playlist 3 Touch and hold the artist album or song then touch Add to playlist on the options menu 4 In the Add to playlist window touch...

Страница 93: ...e list of songs on your phone Your phone will simplify the names and will not include track numbers or file extensions for example mp3 3 Save the playlist file using m3u as the file name extension for...

Страница 94: ...cation that you find objectionable or incompatible with your phone To open Android Market 1 Press HOME then touch the Applications tab and then touch Market 2 When you open Android Market for the firs...

Страница 95: ...ncludes a list of item applications by category a list of games a link to search and a link to My downloads Scroll horizontally through the featured items or select a category to browse its contents t...

Страница 96: ...ead it carefully Be especially cautious with applications that have access to many functions or a significant amount of your data Once you select OK on this screen you are responsible for the results...

Страница 97: ...d so set up a screen lock to secure your phone Refer to Protect your phone with a screen lock on page 101 for more details 4 If your Google Checkout account has multiple credit card accounts select th...

Страница 98: ...uch My downloads to go to the screen 8 7 Uninstalling an application To uninstall an application You can uninstall any application that you have downloaded and installed from Android Market 1 On the M...

Страница 99: ...t dates to display on your phone The selected date format also applies to the date displayed in the Alarm Clock Note For details on how to set an alarm refer to Using Alarm Clock on page 49 Display se...

Страница 100: ...own the screen 3 Select the Audible touch tones and or Audible selection options To choose the notification ring tone You can select the ring tone to play when your phone receives new notifications 1...

Страница 101: ...nge PIN code Tip Emergency calls can be placed at any time without requiring a PIN To restore a SIM card that has been locked out If you enter the wrong PIN more times than the maximum number of attem...

Страница 102: ...E then press MENU and then touch Settings Security location Change unlock pattern When you fail to draw the correct unlock pattern on the screen after five attempts you will be prompted to wait for 30...

Страница 103: ...stall programs you downloaded from Android Market that you no longer use Refer to To uninstall an application on page 98 for more details 9 4 T Mobile My Account T Mobile My Account lets you quickly v...

Страница 104: ...or Calendar Synchronize the Google application information you want to keep up to date To select which application to synchronize 1 Press HOME then press MENU and then touch Settings Data synchronizat...

Страница 105: ...sed you can download and install them again on the phone Refer to Purchasing an application on page 97 for more details To reset the phone 1 Press HOME then press MENU and then touch Settings 2 Scroll...

Страница 106: ...y and data speed are operator dependent Device control Trackball with Enter button GPS Internal GPS antenna Connectivity Bluetooth 2 0 with Enhanced Data Rate and A2DP for wireless stereo headsets Wi...

Страница 107: ...th the instructions may cause harmful interference to radio communications However there is no guarantee that interference will not occur in a particular installation If this equipment does cause harm...

Страница 108: ...age and health The exposure standard for wireless mobile phones employs a unit of measurement known as the Specific Absorption Rate or SAR The standard incorporates a substantial margin of safety to...

Страница 109: ...rs Should ALWAYS keep your phone more than six inches from their pacemaker when your phone is turned on Should not carry your phone in a breast pocket Should use the ear opposite the pacemaker to mini...

Страница 110: ...allow us to help conserving natural resources Moreover proper recycling of the electronic and electrical waste equipment will ensure safety of human health and environment For more information about e...

Страница 111: ...Bookmarks 72 a web page 72 edit 72 open 72 Browser 68 change the settings 72 open 68 to copy text 70 to find text 70 to switch browser windows 69 C Calendar 47 create events 47 open 47 Calendar views...

Страница 112: ...item from Android Market 96 International call 35 Internet 66 L Language settings 101 Links 70 Location source 76 M Making Calls 34 Map mode 78 Map mode 78 Satellite mode 79 Street View 79 Traffic mo...

Страница 113: ...ime 99 Time zone 99 T Mobile My Account 103 To prevent the screen orientation from automatically changing 99 To remove a Home screen item 25 To reposition a Home screen item 25 Touch tones 100 Trackba...

Отзывы: