SystemAir SYSCONTROL WC 90 Скачать руководство пользователя страница 23

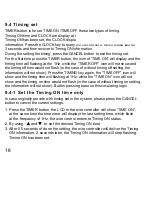
4. By using       and        to set the desired Timing OFF time. 

2. By using       and        to set the desired Timing ON time. 

9.4-2 Set Timing ON and OFF 

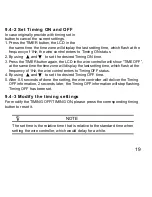
9.4-3 Modify the timing settings 

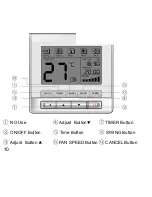
1. Press the TIMER button, the LCD in the wire controller will show “TIME ON”, at  
    the same time the time zone will display the last setting time, which flash at the  
    frequency of 1Hz, the wire control enters to Timing ON status. 

5. After 0.5 seconds of done the setting, the wire controller will deliver the Timing  
    OFF information, 2 seconds later, the Timing OFF information will stop flashing.  
    Timing OFF has been set. 

For modify the TIMING OFF/TIMING ON, please press the corresponding timing  
button to reset it. 

The set time is the relative time that is relative to the standard time when  
setting the wire controller, which would delay for a while. 

3. Press the TIMER button again, the LCD in the wire controller will show “TIME OFF”,  
    at the same time the time zone will display the last setting time, which flash at the
    frequency of 1Hz, the wire control enters to Timing OFF status. 

In case originally provide with timing set in the system, please press the CANCEL  
button to cancel the current settings.

19

NOTE


Содержание SYSCONTROL WC 90

Страница 1: ...SYSCONTROL WC 90 INSTALLATION OWNER S MANUAL GB...

Страница 2: ......

Страница 3: ...cautions that should be brought to your attention during operation In order to ensure correct service of the wire controller please read this manual carefully before using the unit For convenience of...

Страница 4: ...tallation method 4 4 Wiring diagram for wiring wire controller with air conditioner 7 5 Specification 8 6 General functionler 8 7 Name and operation of the button on the wire controller 9 8 Indicators...

Страница 5: ...ay lead to personal injury or property loss WARNING CAUTION Please entrust the distributor or professionals to install the unit Installation by other persons may lead to imperfect installation lectric...

Страница 6: ...to the wire controller current Otherwise electric leakage or heating may occur and result in fire The specified cables shall be applied in the wiring No external force may be applied to the terminal O...

Страница 7: ...ction do not employed tramegger to detect the insulation 2 The wire controller working in low voltage loop circuit Forbid to directly contact the cable of 220Vcommercial electricity or of 380V high vo...

Страница 8: ...agram Indoor unit display panel Transmitting tube Indoor unit Display panel Connective wires for the display panel accessory The shielded 5 core wire pre embedded into wall Employ shielded 5 core wire...

Страница 9: ...Fig 3 4 Fig 3 3 The shielded 5 core wire pre embedded into wall If there is no terminal the 5 core wire should be connected directly 5...

Страница 10: ...all the bottom cover to centralized controller See fig 3 5 Over tighten the screw would cause rear cover deformed and LCD damage When installation please maintain the screws and wire controller at the...

Страница 11: ...anel Indoor unit electric cabinet 10 cored connective wires Display panel Shielded 5 core cable See Installation preparation sheet 1 for the specification The rear side of wire controller Electric con...

Страница 12: ...roller as follows Connect with indoor unit via the five ports of A B C D E All the pictures in this manual are for explanation purpose only Your wire controller may be slightly different The actual sh...

Страница 13: ...MODE CLOCK TIMER CANCEL SWING SPEED 9 MODE Select Button ON OFF Button Adjust Button Adjust Button Time Button TIMER Button FAN SPEED Button SWING Button CANCEL Button...

Страница 14: ...10 CLOCK TIMER CANCEL SWING SPEED NO Use ON OFF Button Adjust Button Adjust Button Time Button TIMER Button FAN SPEED Button SWING Button CANCEL Button...

Страница 15: ...TEMP P TEM TEMP P MODE MODE SWING SWING TEM TEMP P TEM TEMP P MODE MODE SWING SWING TEM TEMP P TEM TEMP P MODE MODE SWING TEMP TEMP MODE SWING TEMP TEMP MODE SWING SWING TEM TEMP P TEM TEMP P MODE MOD...

Страница 16: ...as been set it concel this setting then send instruction to stop the machine Press this key to increase the indoor temperature settings 1 degree to be increased for every once press Press this key to...

Страница 17: ...would display 12 00 when the first time power to the wire controller or reset the wire controller Press this key lasting for 4 seconds the clock will flashing at the frequency of 0 5 Sec by using and...

Страница 18: ...AUTO COOL DRY HEAT FAN TIME ON TIME OFF SPEED TEMP SET Operation mode indication Time ON indication Time indication Time OFF indication Fan speed indication Temperature display zone 14...

Страница 19: ...OFF or after set the Timing OFF the LCD would display TIME OFF During setting the Timing ON or after set the Timing ON the LCD would display TIME ON Time indication Temperature display zone Display th...

Страница 20: ...unit operation 9 1 AUTO operation 9 2 COOL HEAT FAN operation 1 Press MODE to select COOL HEAT or FAN In the AUTO mode the air conditioner can logically choose the mode of COOL FAN by sensing the diff...

Страница 21: ...nditioner starts to operate in the DRY mode Push the ON OFF button again to stop this unit operation Due to the difference of the set temperature of the unit and the actual indoor temperature the Air...

Страница 22: ...he 1Hz while the TIMER OFF icon will not show and the timing off time would not flash in the case of without timing off setting the information will not show Press the TIMING key again the TIME OFF ic...

Страница 23: ...ation 2 seconds later the Timing OFF information will stop flashing Timing OFF has been set For modify the TIMING OFF TIMING ON please press the corresponding timing button to reset it The set time is...

Страница 24: ...The design and specifications are subject to change without prior notice for product improvement Consult with the sales agency or manufacturer for details...

Отзывы: