— 6 —
SMART TOILET
MAINTENANCE & USAGE
USAGE
1. Manual Flushing
· Press the knob to manually activate a full flush.
2. Activating Foot Sensor Flushing
· To turn on foot-sensor flushing, press the “STOP” and
the “FULL FLUSHING” button on the remote
simultaneously. Repeat to turn off.
· This function will not work while the user is sitting.
3. Knob Functions
· Rotate clockwise to start rear cleaning, rotate counterclockwise to start front cleaning. Rear and front
cleaning will automatically enter drying mode after completion.
· If user is not seated and the knob is rotated clockwise, manual nozzle cleaning will begin.
· After starting the rear and front cleaning, turn the knob clockwise to move the spray rod forward, and
counterclockwise to move the spray rod backwards. Hold down the knob to switch to the water
pressure adjustment mode. Turning the knob clockwise in this mode will increase the water pressure,
and counterclockwise will decrease the water pressure. Hold the knob again to switch back to spray
rod position adjustment mode.
· After starting the drying function, turning the knob clockwise will increase the wind temperature, and
counterclockwise will decrease the wind temperature.
· Press the knob at any time to stop the current function. Pressing the knob after functions stop will
flush the toilet.
· Hold down the knob after use to turn off the toilet and put it in standby mode, the light will turn off. In
power saving mode, the light will breathe.
· If the toilet is in standby mode, press the knob to enter normal working mode.
4. Battery Installation & Replacement
· Pull out the power plug and turn of water supply.
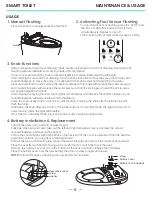
· Fully open the seat and cover, take out the left and right decorative covers, unscrew the screws
counterclockwise, and take out the gasket.
· Pull up the cover slightly with both hands so the back end of the cover is separated from the ceramic
positioning column, you may hear a “clicking” sound.
· Pull out the plug-in connecting line, loosen the water inlet pipe and remove the whole seat and cover.
· Place the seat flat with bottom facing up, be careful not to scratch the top of the seat.
· Remove the battery box cover from the bottom of the seat to install or replace the 9V battery.
· Place the battery cover over the new battery then turn on water supply and power.
NOTE:
Optional for back up flushing use only, battery not included.
screw
battery cover
battery (not included)
screw
decorative cover
washer
Knob


