background image

—  9  —

SMART TOILET 

  SAFETY

IMPORTANT SAFETY INSTRUCTIONS


1. Do not install or use the product in wet places as steam room etc.
2. It is recommended to use water-proof electrical outlet which should be lnstalled in the place 

    where is not easily got wet.

3. This product should be used with 110V-120V,50/60Hz electrical current only,load current 

    is at least 15A. Power plug must be equipped with ground fault circuit interrupter or ground 

    fault electrical leakage protector or similar high sensitive, rapid type leakage switch 

   (Rated sensitive current under 6mA).

4. When it thunders,it is strongly recommended to pull out the power plug.

5. Do not stand on ceramic toilet.

6. Ceramic toilet must install floor fixing bolt.

7. Do not stand on product unit,seat and cover.

8. Do not lean against the seat cover when using the product,to avoid damage.

9. This product is equipped with soft-closing seal cover.Heavy pressing or pushing may damage 

    the soft-closing damper.

10. Do not use lacquer thinner,petrol,liquid medicine,detergent,insecticide,toilet cleanser and 

      scrubbing brush to clean the product.

11.Exposure to direct sunlight is prohibited.

12.Only use tap water or potable water;otherwise it may cause chafing.

13.Do not connect water supply to heater outlet.Make sure inlet water temperature at 

14.When the room temperature is under zero degree,please dry up the water tank, to avoid freezing. 

15.Raise rest room temperature to prevent the toilet from damage due to freezing.

16.When move the product from cold or wet environment into normal room temperature,wait for

     2 hours until the condensation water is fully volatilized.Doing so can prevent the product from

     electrical short-circuit.

17.When not using the product over three(3) days,drain the water out of the container and pull 

     the electrical plug from the wall outlet.

18.Stop using the product and shut off the power when product malfunctions,please contact the 

     service people for professional service.

 CAUTION -  Failure to follow the instruction may cause injury or property damage.  

GROUNDING INSTRUCTIONS

This product should be grounded. In the event of an electrical short circuit, grounding reduces 

the risk of electric shock by providing an escape wire for the electric current. This product is 

equipped with a cord having a grounding wire with a grounding plug. The plug must be plugged

into an outlet that is properly installed and grounded.

 DANGER - Improper use of the grounding plug can result in a risk of electric shock.  

If repair or replacement of the cord or plug is necessary, do not connect the grounding wire to

either flat blade terminal. The wire with insulation having an outer surface that is green with or

without yellow stripes is the grounding wire.
This product is factory equipped with a specific electric cord and plug to permit connection to a

proper electric circuit. Make sure that the product is connected to an outlet having the same

configuration as the plug. No adapter should be used with this product. Do not modify the plug

provided — if it will not fit the outlet, have the proper outlet installed by a qualified electrician. If

the product must be reconnected for use on a different type of electric circuit, the reconnection

should be made by qualified service personnel.

.

37.4~95  F

Содержание Avancer Smart Toilet

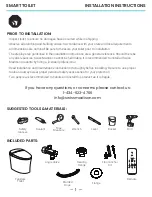
Страница 1: ...www swissmadison com 1 434 623 4766 info swissmadison com INSTALLATION INSTRUCTIONS Avancer Smart Toilet SwissMadison WellMadeForever TOUCHLESS technology w e l l m a d e f o r e v e r ...

Страница 2: ...hould there be any discrepancies Swiss Madison cannot be held liable It is recommended to install all Swiss Madison products by hiring a licensed professional Read installation and maintenance instructions thoroughly before installing Be sure to use proper tools and always wear proper personal safety accessories for your protection Two people are recommended to handle and install this product as i...

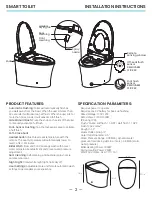
Страница 3: ...Self Cleaning Self cleaning anti bacterial spray nozzle anti bacterial seat Night Light Smart white night light normally off User Settings Adjustable male and female automatic wash settings to personalize your experience PRODUCT FEATURES SPECIFICATION PARAMETERS Requires power to operate Requires one 9V battery for back up flushing Rated Voltage 110V 120V Rated Power 1200 1400W IP Rating IPX4 Flus...

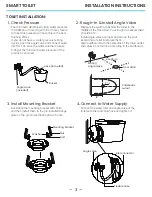
Страница 4: ...this pressure will not achieve the best flushing effect If you do not have a water pressure testing device open the angle valve and connect water inlet for 10s once the water volume is above 0 66 gal the minimum water pressure of the product is ensured Angle valve included Hose included Bucket Nut Bolt 3 Install Mounting Bracket Assemble the mounting bracket with bolts and then install them to the...

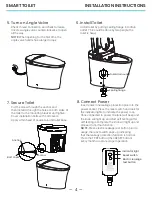
Страница 5: ... then RESET button every month to assure proper operation 6 Install Toilet Install toilet by putting sealing flange into drain outlet This sould be done by two people the toilet is heavy 5 Turn on Angle Valve Check thread connection and check for leaks Unscrew angle valve counterclockwise to open all the way NOTE When opening for the first time the angle valve handle has a larger torque 7 Secure T...

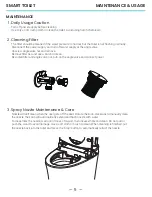
Страница 6: ...Remove filter net and use a brush to clean Re install filter and angle valve nut turn on the angle valve and connect power 3 Spray Nozzle Maintenance Care Nozzle will self clean when the user gets off the seat Rotate the knob clockwise to manually clean the nozzle the knob will automatically extend and flush nozzle with water To dissemble the nozzle wait until it moves forward then disassemble and...

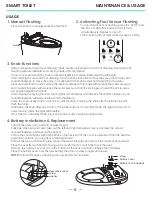
Страница 7: ... wind temperature and counterclockwise will decrease the wind temperature Press the knob at any time to stop the current function Pressing the knob after functions stop will flush the toilet Hold down the knob after use to turn off the toilet and put it in standby mode the light will turn off In power saving mode the light will breathe If the toilet is in standby mode press the knob to enter norma...

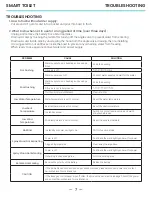
Страница 8: ...ausing a block Solve the buckling Fill valve is not fully turned on Low Water Temperature Water temperature is set to normal Reset the water temperature Low Seat Temperature Seat temperature is set to normal Reset the seat temperature In standby mode Switch to normal function mode and wait 3 minutes before use Low Wind Temperature Wind temperature is set to normal Reset the wind temperature No Win...

Страница 9: ...ed cord or plug if it is not working properly if it has been dropped or damaged or dropped into water Return the product to a service center for examination and repair Keep the cord away from heated surfaces Never use while sleeping or drowsy Never drop or insert any object into any opening or hose Do not use outdoors operate around aerosol spray products or where oxygen is being administered Conn...

Страница 10: ...mal room temperature wait for 2 hours until the condensation water is fully volatilized Doing so can prevent the product from electrical short circuit 17 When not using the product over three 3 days drain the water out of the container and pull the electrical plug from the wall outlet 18 Stop using the product and shut off the power when product malfunctions please contact the service people for p...

Страница 11: ...te The product has been subjected to improper maintenance abuse misuse excessive use of chemicals accidents or other damages etc Swiss Madison makes no implication that its products comply with any local building or plumbing codes It is the consumer s responsibility and obligation to determine local code compliance prior to and during installation This warranty extends only to the original purchas...

Страница 12: ... www swissmadison com 1 434 623 4766 info swissmadison com INSTALLATION INSTRUCTIONS Avancer Remote SwissMadison WellMadeForever w e l l m a d e f o r e v e r ...

Страница 13: ...ep guidelines in the installation instructions are a general reference Should there be any discrepancies Swiss Madison cannot be held liable It is recommended to install all Swiss Madison products by hiring a licensed professional Read installation and maintenance instructions thoroughly before installing Be sure to use proper tools and always wear proper personal safety accessories for your prote...

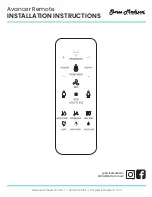
Страница 14: ...Instruction 1 Remote control illustration 05 2 Rear Front cleaning operation 06 3 Dry operation 05 4 Water volume adjustment 07 5 Full flush Half flush 07 6 Spray nozzle position adjustment 07 7 Energy saver 08 8 Auto function 08 9 Temperature adjustment 09 10 Night light 09 11 User code 10 ...

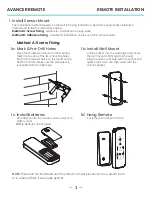
Страница 15: ...ut the anchor into the wall holes and ensure the wall mount is tight against the wall Align the wall mount hole with the anchor and tighten the screw and then cover with the silicone gasket NOTE Please do not install and use the product in moist places such as a steam room or in a place where it can easily get wet 1 Install Sensor Mount The installation method depends on the wall it is being insta...

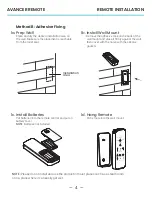
Страница 16: ...wall Make sure the placement is reachable from the toilet seat 1b Install Wall Mount Remove the adhesive tape on the back of the wall mount and place it firmly against the wall then cover with the holes with the silicone gaskets 1c Install Batteries Put batteries into the remote control and put on battery cover NOTE Batteries not included 1d Hang Remote Put remote into the wall mount Installation ...

Страница 17: ...nt cleaning massage Water reducing Drying Auto rear cleaning Indicator light only visible when the light is on Dryer temperature Water temperature Night light Nozzle moving forward Nozzle moving backward Auto front cleaning Stop Energy saver Seat temperature Half flush Full flush ...

Страница 18: ... button the indicator light will be on to show the current water temperature level and it will begin front cleaning Press the FRONT MOVE button again to shift to massage cleaning the nozzle will move forward and backward The cleaning will last for one cycle and will stop automatically To stop before the cycle is complete press the STOP button Drying Operation Press the DRY button the indicator lig...

Страница 19: ...le position adjustment has 5 levels Spray Nozzle Position Adjustment Press the FULL FLUSH button to activate a full flush Press the HALF FLUSH button to activate a half flush Hold the FULL FLUSH button to turn on off the auto flush function Toilet will automatically flush as you walk away from the bowl When the user sits less than 60 seconds it will activate a half flush When the user sits for mor...

Страница 20: ...bidet wash You can custom set the water volume nozzle position water temperature and air temperature After the setting is complete hold the automatic user setting button for 3 seconds to save the settings Your settings will be saved for the next time you press the programmed button You are able to set the automatic function to enable cleaning and drying The automatic function mode will be off if y...

Страница 21: ...evel from 0 to 5 during a cycle The indicator will show the dryer temperature level if it s on When the indicator is off the dryer temperature level is 0 Seat Temperature Press the SEAT TEMP button to adjust the seat temperature level from 0 to 5 during a cycle The indicator will show the seat temperature level if it s on When the indicator is off the seat temperature level is 0 Temperature Adjust...

Страница 22: ...tically and return to previous states Quite Mode Hold the SEAT TEMP button to turn on off quite mode Foot Sensor Firstly press and hold the STOP key and press the FULL FLUSH key to turn the foot sense function on or off In the seated status foot sense function is invalid NOTE The buzzer will BEEP when the user presses one button which means the main unit received the signal and will conduct the op...

Страница 23: ...te The product has been subjected to improper maintenance abuse misuse excessive use of chemicals accidents or other damages etc Swiss Madison makes no implication that its products comply with any local building or plumbing codes It is the consumer s responsibility and obligation to determine local code compliance prior to and during installation This warranty extends only to the original purchas...

Отзывы: