background image

18


Tube Cutting Tool

 User’s Manual

Cutting the Tube

 

WARNING


Allow the machine to run until it stops rotating after 
cutting tube to avoid injury 

 

WARNING


Do not touch the saw blade while the tool is in 
operation 

 

WARNING


Eye protection must be worn while operating or 
working near the equipment 

 

WARNING


Do not operate the cutting tool without the saw 
blade guard in place 

 

CAUTION


Support long pieces of tubing with suitable fixtures 
to avoid injury from tilting tool and/or falling tubing 


NOTICE


The tool can be damaged by incorrect setup or a 
tube not cut at a right angle  Verify there is space 
between the tool and the tube to prevent damage  

1.  Mount the saw blade in the desired position according to 

Mounting the Saw Blade

.

2.  Adjust for the tube size as necessary according to 

Adjusting for Tube Size

3.  Mark the cut location on the tube.
4.  Insert the tube in the cutting tool vise and move until cut 

location is centered. Clamp the tube by turning the clamping 
jaw adjustment wheel until it stops.

5.  Set the tool speed range according to 

Adjusting the 

Speed

.

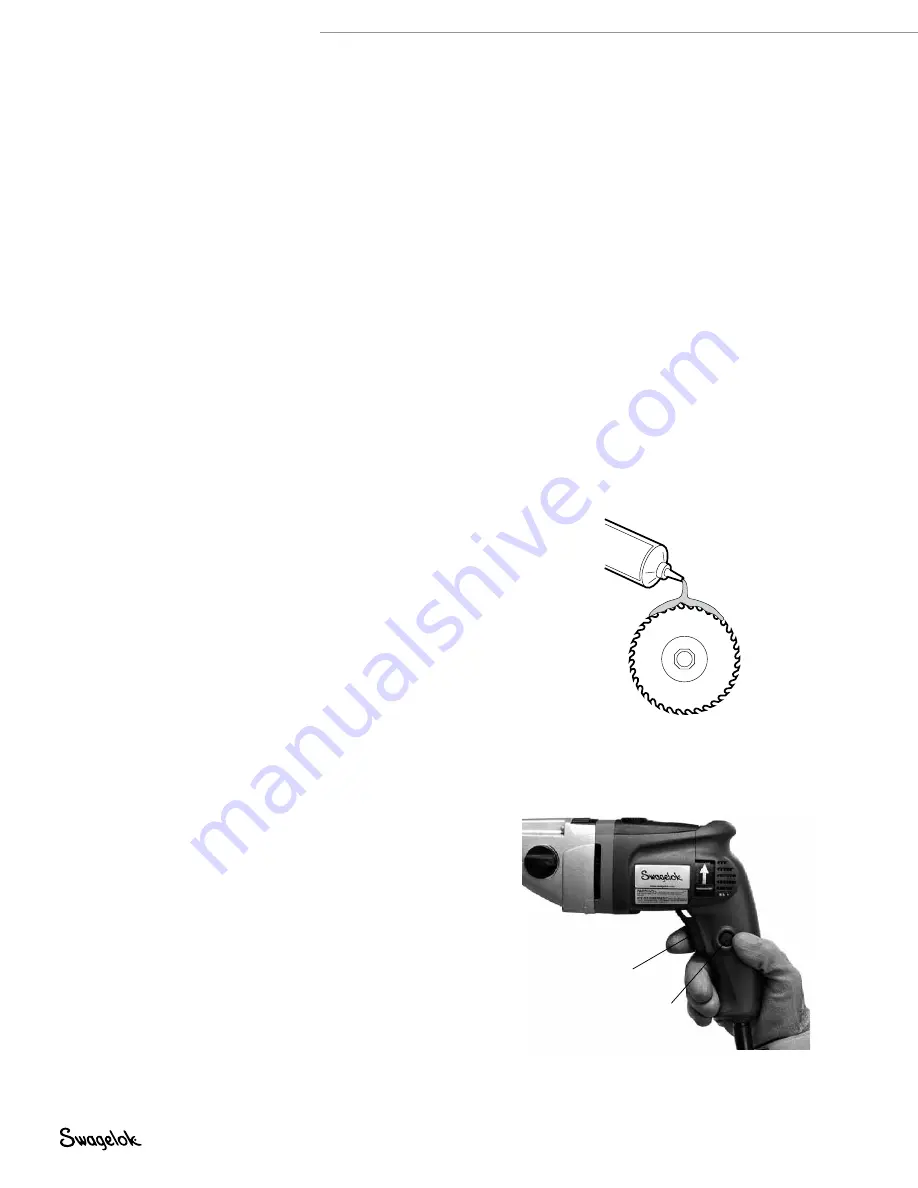
6.  Apply cutting lubricant to the saw blade (Fig. 24).
7.  Plug the cutting tool into a power outlet.
8.  Press the ON/OFF switch to turn the tool on. The switch can 

be locked into place with the ON/OFF lock (Fig. 25).

9.  Hold the cutting tool by the motor grip and slowly turn the 

cutting tool clockwise until the tube wall is pierced.

Fig 24 Lubricating the Saw Blade

Fig 25 ON/OFF Switch and Lock

ON/OFF switch

ON/OFF lock

Содержание TC72 series

Страница 1: ...utting Tool This manual contains important information for the safe and effective operation of the Swagelok TC72 series tube cutting tool Users should read and understand its contents before operating...

Страница 2: ...2 Tube Cutting Tool User s Manual...

Страница 3: ...ube materials 10 Technical data 10 Setup 11 Description 11 Unpacking the Tube Cutting Tool 12 Storage and Transport 12 Mounting the Tube Cutting Tool 13 Mounting the Clamping Jaws to the Vise 14 Mount...

Страница 4: ...4 Tube Cutting Tool User s Manual...

Страница 5: ...indicate a hazardous situation which if not avoided could result in damage to the equipment or other property Safety alert symbol indicating a potential personal injury hazard Safety alert symbol indi...

Страница 6: ...omponents are not waterproof Do not use electric tools in a damp or wet environment WARNING Fire or Explosion Do not use in close proximity to flammable liquids or gases WARNING Danger of being injure...

Страница 7: ...d let it run until the blade stops rotating Environmental Protection Disposal Dispose of chips and used gear lubricant oil according to local regulations Electric tools and accessories contain a large...

Страница 8: ...ex key not shown 2 Saw blade position 1 10 Motor 3 Saw blade position 2 11 Speed adjustment dial 4 Clamping screw cover 12 Slide 5 Blade adjustment wheel 13 Saw blade housing 6 Saw blade guard 14 Vise...

Страница 9: ...nting plate can be attached to the bottom of the tube cutting tool to aid in mounting the tool to a bench Use the four included socket screws to attach the mounting plate to the tool Tripod This optio...

Страница 10: ...presentative for information on additional materials Technical data Characteristic TC72 Tube Cutting Tool Dimensions in mm 20 4 W 9 1 H 23 6 L 518 230 H 600 L Weight Without Accessories lb kg 52 23 6...

Страница 11: ...positions to allow cutting of both straight tubing and elbows A variable speed electric motor with restart protection Low maintenance gearing A quick change system for saw blades Self centering vise...

Страница 12: ...or laser 1 Tool bag 1 User manual Report any missing or damaged parts to your authorized Swagelok sales and service representative immediately Storage and Transport Storage To properly fit the tube cu...

Страница 13: ...our provided socket screws See Fig 11 Mounting to a Work Bench with Quick Mounting Plate 1 Set the quick mounting plate on the work bench 2 Tighten the two screw clamps of the mounting plate See Fig 1...

Страница 14: ...is in operation WARNING Switch off the tool and remove the plug from the power outlet before changing tooling performing maintenance or transporting the tool WARNING Never mount a saw blade in both b...

Страница 15: ...the provided wrench Saw Blade Position 2 1 Remove the clamping screw cover Fig 18 2 Loosen the clamping screw using the provided 8 mm hex key 3 Clean the saw blade shaft and the surrounding area with...

Страница 16: ...the saw blade until it is right in front of the blade Clamp the tube by turning the clamping jaw adjustment wheel Fig 21 3 Rotate the motor to the cutting position approximately 45 clockwise 4 Adjust...

Страница 17: ...ed Range Adjusting the Speed Set the speed by turning the speed adjustment dial TC72 Series Level Tube material Spindle Speed rpm E and G Stainless steel 114 to 160 B C D E Nickel chrome molybdenum al...

Страница 18: ...nt damage 1 Mount the saw blade in the desired position according to Mounting the Saw Blade 2 Adjust for the tube size as necessary according to Adjusting for Tube Size 3 Mark the cut location on the...

Страница 19: ...ockwise to the original position 12 Unlock the ON OFF lock and turn off the cutting tool 13 Apply cutting lubricant to the saw blade after each cut Fig 24 Operating in Space Restricted Environments 1...

Страница 20: ...ntenance WARNING Allow the tool to run to a stop and unplug the tool before changing tooling maintaining or transporting the tool Remove any chips and dirt from the saw blade between the saw blade and...

Страница 21: ...is not turning The tube dimension has not been set correctly Set the tube dimension according to Adjusting for Tube Size The saw blade is slipping through but is not cutting The hex nut on the saw bla...

Страница 22: ...Swagelok Company Printed in U S A OM April 2011 R0 MS 13 216 Warranty Information Swagelok products are backed by The Swagelok Limited Lifetime Warranty For a copy visit swagelok com or contact your a...

Отзывы: