background image

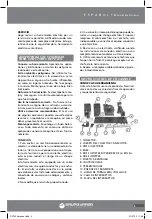
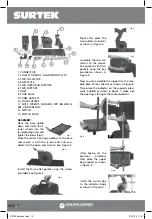
1. CONNECTOR.
2. COLLECTOR BODY & FAN/MOTOR ASSY.
3. TWO COLLECTOR.
4. BASE PLATE.
5. TWO UPPER BAG SUPPORT.
6. TWO SUPPORT.
7. INLET.
8. FOUR BAGS.
9. THREE GASKETS.
10. FOUR CASTERS.
11. NUTS, SCREWS, WASHERS, SPR ING WASH-
ERS, AND WRENCH.
12. SWITCH.
13. SWITCH PLATE.

ASSEMBLY

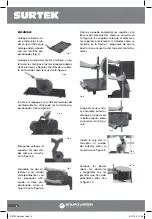
Place the base upside 
down and install the 4 
caster wheels into the 
corresponding holes and 
tighten the screws (Fig.1).
Place the motor housing assembly to the base 
and secure it with the screws and nuts pro-
vided. Use the open end wrench. See Figure 2.

Install the fan outlet gasket using the screws 
provided. See Figure 3.

Right after place the 
two outlets connector 
as shown in figure 4.

Assemble the two col-
lectors to the respec-
tive outputs with their 
gaskets using the key 
provided as shown in 
Figure 5.

Now you can assemble the supports to the mov-
able base of the collector as shown in Figure 6. 
Then place the collector on the supports previ-
ously installed as shown in Figure 7, make sure 
the opening is facing at the motor/collector.

After having set the 
previous assembly 
step, place the upper 
bag support as shown 
in figure 8.

Install the switch box 
to the collector body 
as shown in Figure 9.

10

Fig.2

Fig.3

Fig.4

Fig.5

Fig.6

Fig.7

Fig.9

Fig.8

Fig.1

1

9

10

11

12

13

6

2

3

4

8

5

7

RP743A manual.indd   10

01/07/15   11:47

Содержание RP743A

Страница 1: ...er s Manual and Warranty ATENCIÓN Lea entienda y siga las instrucciones de seguridad contenidas en este manual antes de operar esta herramienta WARNING Read understand and follow the safety rules in this manual before operating this tool RP743A manual indd 1 01 07 15 11 46 ...

Страница 2: ...Utilización y cuidados de las herramientas eléctricas Advertencias de seguridad para colectores de polvo Instrucciones de ensamble Instrucciones de operación Mantenimiento Especificaciones técnicas Garantía 8 8 8 9 9 10 11 11 11 12 3 3 3 4 5 5 7 7 7 12 CONTENIDO CONTENT SIMBOLOS SYMBOLS PELIGRO ADVERTENCIA PRECAUCIÓN Indica un riesgo personal o la posibilidad de un daño DANGER CAUTION WARNING Indi...

Страница 3: ...d El agua que entre en la herramienta aumentará el riesgo de choque eléctrico No abuse del cable No usar nunca el cable para llevar levantar o desenchufar la herramienta eléctrica Mantenga el cable lejos del calor aceite cantos vivos o piezas en movimiento Los cables dañados o enredados aumentan el riesgo de choque eléctrico Cuando maneje una herramienta eléctrica en el exterior use una prolongaci...

Страница 4: ...ponsable de su segu ridad Los niños deben supervisarse para ase gurar que ellos no empleen los aparatos como juguete UTILIZACIÓN Y CUIDADOS DE LAS HERRAMIENTAS ELÉCTRICAS No fuerce la herramienta eléctrica Use la he rramienta eléctrica correcta para su aplicación La herramienta eléctrica correcta hará el tra bajo mejor y más seguro al ritmo para la que fue concebida No use la herramienta eléctrica...

Страница 5: ...aplica ciones y limitaciones asi como los peligros re lacionados a esta máquina Evite ambientes peligrosos No utilice las he rramientas eléctricas en la presencia o cerca de gasolina o alguna otra fuente inflamable asi como en lugares húmedos No lo exponga a la lluvia Mantenga el área de trabajo bien iluminada No fuerce la herramienta Se desempeñará me jor y más seguro si la utiliza solamente para...

Страница 6: ...ondientes con sus empaques utili zando la llave pro porcionada como se muestra en la figura 5 Ahora ya puede ensamblar los soportes a la base móvil del colector como se muestra en la figura 6 En seguida coloque el colector a los soportes previamente instalados como se muestra en la figura 7 asegúrese de que la abertura se encuentra del lado del motor co lector Luego de tenere listo el ensamble ant...

Страница 7: ...UENCIA ENTRADA DE AIRE DIMENSION DE LA BOLSA POTENCIA DE SUCCIÓN FLUJO DE SUCCIÓN POTENCIA AMPERAJE VELOCIDAD DE ROTACIÓN PESO 120 V 60 Hz 2 x 4 101 6 mm 19 6 x 33 4 50 cm x 85 cm 2 782 Pa 2 300 CFM 42 15 m min 3 HP 18 A 3 400 r min 59 kg 130 lb 7 ESPECIFICACIONES TÉCNICAS Fig 11 Fig 12 Utilice solamente accesorios originales o bien recomendados por el distribuidor NOTA Es más eficiente para recog...

Страница 8: ...dren with re duced physical sensory or mental capabilities GENERAL SAFETY RULES Your DUST COLLECTOR has many features that will make your job faster and easier Safety performance and reliability have been given top priority in the design of this tool qualities to make easy to maintain and to operate WARNING Read and understand all in structions Failure to follow all indications list ed below may r...

Страница 9: ...ledge unless such persons are su pervised or trained to operate the product by a person responsible for their safety Children should be supervised to ensure they do not use the devices as toys TOOL USE AND CARE Do not force the power tool Use the correct tool for the application The correct tool will do the job better and more safely at the rate that it was designed to work at Do not use tools if ...

Страница 10: ...g the screws provided See Figure 3 Right after place the two outlets connector as shown in figure 4 Assemble the two col lectors to the respec tive outputs with their gaskets using the key provided as shown in Figure 5 Now you can assemble the supports to the mov able base of the collector as shown in Figure 6 Then place the collector on the supports previ ously installed as shown in Figure 7 make...

Страница 11: ... collect the waste NOTE The filtering bag should be cleaned each time the dust bag is changed MAINTENANCE The dust collector should be cleaned each time the collection bag is changed Damaged filters and bags must be replaced immediately in order to minimize dust disper sion in the work area MOTOR Excessive dust can cause the engine to over heat Each effort should be made to prevent foreign matter ...

Страница 12: ...modified by unauthorized or unqualified person Urrea Herramientas Profesionales S A de C V garantiza este producto por el termino de 1 año en sus piezas componentes y mano de obra con tra cualquier defecto de fabricación a partir de la fecha de entrega Fecha de venta ____ ____ ____ Producto ___________________ Marca ______________________ Modelo ____________________ ______________________________ ...

Отзывы: