background image

11

E N G L I S H •

User's manual

• Watch out for flying sparks. Hold the tool so 
that any sparks will fly away from the operator 
and other persons. Keep all flammable materi-
als away when using this drill.
• Do not touch the workpiece immediately 
after operation. It may be extremely hot, and 
could burn the skin.

FEATURES

KNOW YOUR TOOL

Before attempting to use this hammer drill, be-
come familiar with all of its operating features 
and safety requirements.

 WARNING: Do not allow familiarity with 

the hammer drill to cause carelessness.
Remember that a fraction of a second of care-
lessness is enough to inflict severe injury.

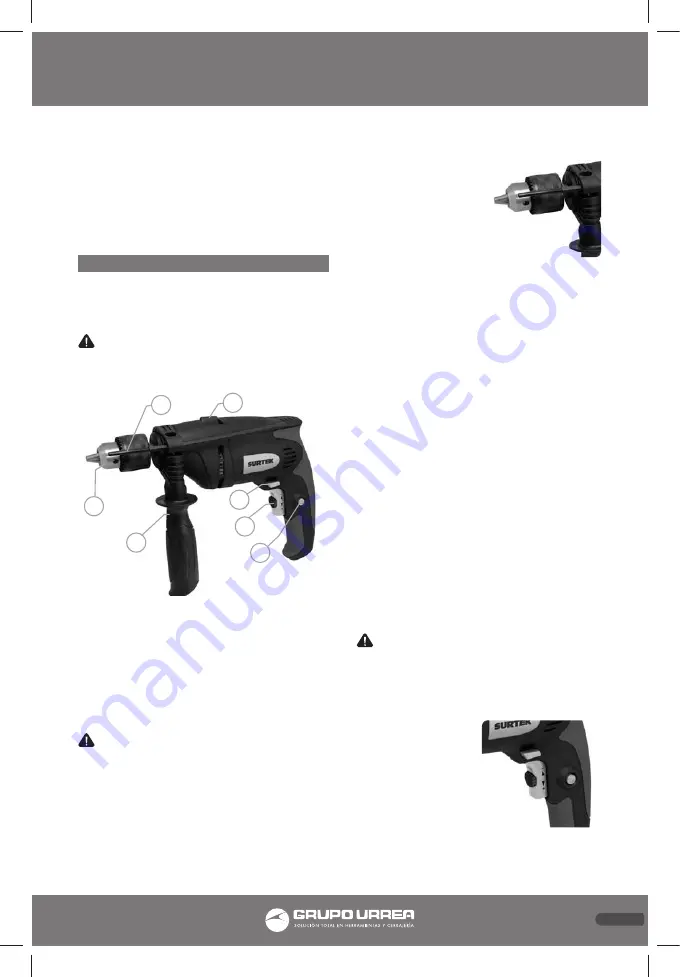
1. HAMMER DRILL/DRILL SWITCH
2. TRIGGER SWITCH WITH VARIABLE SPEED
3. LOCK-ON BUTTON
4. FORWARD/REVERSE SWITCH
5. AUXILIARY HANDLE
6. CHUCK
7. DEPTH GAUGE

ADDITIONAL HANDLE AND DEPTH GAUGE

 CAUTION: Make sure that the power tool is 

OFF and unplugged before making any adjust-
ment. Turn the auxiliary handle counter clock-
wise to loosen the collar and allow the depth 
gauge passes over the chuck, set the proper 
position for the work to be performed.
Set the depth gauge if required and adjust the 
handle to secure in its place.

The side handle can be 
rotated 360 degrees 
to find a position that 
offers better comfort 
and eases the opera-
tion. The depth gauge 
helps to set the correct 
depth if you need to 
measure a drilled hole. 
To change the position of depth gauge, turn the 
handle clockwise until the depth gauge is loose 
enough to slide through the hole. Set the depth, 
check it with a metal rule for a more accurate 
measurement, and then readjust the grip of 
the handle to set the depth guide into position.

INSTALLING AND REMOVING DRILL BITS

TO INSTALL:
1. To open the chuck jaws, place the chuck key 
in one of the three holes located on the chuck. 
Turn the key counter-clockwise.
2. Insert the bit into the chuck jaws. Centre the 
bit in the chuck jaws, and tighten the bit by 
hand to align the chuck jaws.
3. To close the chuck jaws, place the chuck key 
in one of the three holes in the chuck. Turn the 
chuck key clockwise until the chuck is tight-
ened securely.

TO REMOVE:
1. Insert the chuck key into one of the holes in 
the chuck.
2. Turn the chuck key counter-clockwise to 
loosen the chuck.
3. Remove the bit.

 WARNING: Do not attempt to tighten the 

chuck by gripping the front part and turning 
the drill on. Damage to the tool and personal 
injury may result. Be sure to tighten the chuck 
with the chuck key.

VARIABLE SPEED 
SWITCH

Your hammer drill has 
a variable speed dial 
on switch. The speed 
is regulated by the 
pressure applied to 
the switch.
Variable speed is particularly useful when 
starting the hammer drill. Also allows you to 
set an optimal speed for any kind of job. 

2

3

4

5

6

7

1

RM612C-RM612CK manual.indd   11

15/03/17   15:00

Содержание RM612C

Страница 1: ...te manual antes de operar esta herramienta WARNING Read understand and follow the safety rules in this manual before operating this tool RM612C RM612CK Rotomartillo Hammer Drill Manual de Usuario y Garantía User s Manual and Warranty RM612C RM612CK manual indd 1 15 03 17 15 00 ...

Страница 2: ...antenimiento Solucionador de problemas Especificaciones técnicas Notas Garantía 9 9 9 10 10 11 12 13 14 14 15 16 3 3 3 4 5 6 7 8 8 8 15 16 CONTENIDO CONTENT SÍMBOLOS SYMBOLS PELIGRO ADVERTENCIA PRECAUCIÓN Indica un riesgo personal o la posibilidad de un daño Herramientas tipo II Doble aislamiento protege las herramientas eléctricas Lea el manual de usuario Lea las instruc ciones contenidas en este...

Страница 3: ... choque eléctrico si su cuerpo está puesto a tierra No exponga las herramientas eléctricas a la llu via o a condiciones de humedad El agua que entre en la herramienta aumentará el riesgo de choque eléctrico No abuse del cable No usar nunca el cable para llevar levantar o desenchufar la herramienta eléctrica Mantenga el cable lejos del calor aceite cantos vivos o piezas en movimiento Los cables dañ...

Страница 4: ...xperiencia o conocimiento a menos que dichas personas reciban una supervisión o capacitación para el funcionamiento del apa rato por una persona responsable de su segu ridad Los niños deben supervisarse para ase gurar que ellos no empleen los aparatos como juguete UTILIZACIÓN Y CUIDADOS DE LAS HERRAMIENTAS ELÉCTRICAS No fuerce la herramienta eléctrica Use la he rramienta eléctrica correcta para su...

Страница 5: ...e instalación del accesorio Siempre utilice abrazaderas o un tornillo de banco para sostener la pieza de trabajo Siempre apague el rotomartillo antes de de jarlo o dejar de utilizarlo Asegúrese que tenga una luz adecuada para tener una buena observación de la operación No haga presión en la herramienta de tal forma que disminuya la fuerza del motor Para obtener mejores resultados y para alargar la...

Страница 6: ...s localizados en el broquero Gire la llave en sentido a las ma necillas del reloj PARA REMOVER 1 Inserte la llave de mandril en uno de los tres hoyos del broquero 2 Gire la llave en sentido contrario a las mane cillas del reloj para aflojar el broquero 3 Remueva la broca PRECAUCIÓN No intente apretar el bro quero tomándolo por la parte delantera en cendiendo el rotomartillo Puede resultar en daños...

Страница 7: ...mento bloque de ceniza etc utilice brocas con punta de car buro Asegúrese que el material a ser taladrado este anclado firmemente Si taladra un material delgado utilice un res paldo para prevenir daños al material PARA INICIAR EL PERFORADO 1 Cuando inicie un hoyo haga una marca en la superficie de la pieza de trabajo y en seguida perfore un pequeño hoyo 2 Sostenga firmemente el rotormartillo con a...

Страница 8: ...der El uso de aire comprimido puede ser el más efectivo método de limpieza Siempre utilice lentes de seguridad cuando limpie herramientas con aire comprimido PRECAUCIÓN Sostenga las herramientas con cuidado Mantenga las brocas afiladas y limpias El adecuado mantenimiento en las he rramientas con brocas afiladas las hace menos probable que se atasquen y más fáciles de con trolar PRECAUCIÓN Revise l...

Страница 9: ...N CORDS Replace damaged cords immediately The use of damaged cords can shock burn or electric shock If an extension cord is necessary a cord with adequate size conductors should be used to prevent excessive voltage drop loss of pow er or overheating The table below shows the correct size to use depending on cord length and nameplate amperage rating of tools In case of doubt use the next heavier ga...

Страница 10: ...ools in good condition with sharpened edges are less likely to stuck in workpieces or easier to control Is recommendable to use a safety device suit able such a thermal and differential switch when you are using an electric equipment SERVICE Tool service must be performed only by quali fied repair personnel Service or maintenance performed by unqualified personnel could re sult in a risk of injury...

Страница 11: ...e helps to set the correct depth if you need to measure a drilled hole To change the position of depth gauge turn the handle clockwise until the depth gauge is loose enough to slide through the hole Set the depth check it with a metal rule for a more accurate measurement and then readjust the grip of the handle to set the depth guide into position INSTALLING AND REMOVING DRILL BITS TO INSTALL 1 To...

Страница 12: ...ON Hold the drill comfortably with your finger on the trigger switch Use the auxiliary handle whenever possible in order to gain extra con trol and to prevent fatigue NOTE Use sharp drill bits only For wood use twist drill bits spade bits power auger bits or hole saws For metal use high speed steel twist drill bits or hole saws For masonry brick cement cinder block etc use carbide tipped drill bit...

Страница 13: ...m pressed air may be the most effective cleaning method Always wear safety goggles when cleaning tools with compressed air WARNING Do not let brake fluid gasoline petroleum based products penetrating oil etc come in contact with plastic parts These substances contain chemicals that can damage weaken or destroy plastic WARNING When servicing use only identi cal replacement parts Use of any other pa...

Страница 14: ...14 Notas Notes RM612C RM612CK manual indd 14 15 03 17 15 00 ...

Страница 15: ...15 Manual de usuario User s manual Notas Notes RM612C RM612CK manual indd 15 15 03 17 15 00 ...

Страница 16: ...modified by unauthorized or unqualified person Urrea Herramientas Profesionales S A de C V garantiza este producto por el termino de 2 años en sus piezas componentes y mano de obra con tra cualquier defecto de fabricación a partir de la fecha de entrega Fecha de venta ____ ____ ____ Producto ___________________ Marca ______________________ Modelo ____________________ ______________________________...

Отзывы: