70
Chapter 6: Optional Components
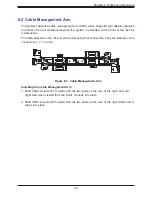
Figure 6-2. Installing the Connectors
3. Slide CMA connector #3 forward onto the two posts on the rear of the left middle rail. It
snaps into place.
4. For CMA connector #4, align the metal tabs with the slots on the rear of the left outer
rail and push it forward. It snaps into place.
5. Route the cables through the holding brackets, leaving enough slack.
1
2
1
4
3
Removing the Cable Management Arm
1. Remove cables from the CMA,
2. For CMA connector #4, pull the metal release tab toward the center of the rack and slide
the connector toward the rear to release it.
3. For CMA connectors #3, #2, and #1, depress the front edge of the yellow plastic rocker
lock and slide the connector toward the rear to release it.


