


Chapter 2: Server Installation
21
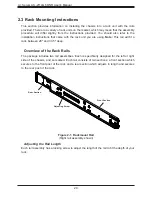
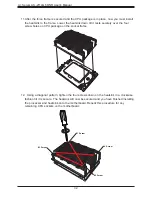
Installing the Rails on a Rack
1.
Loosen the adjusting screw to allow the rear section to slide in the front section.
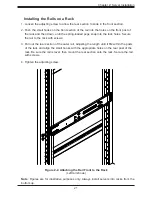
2. Push the small hooks on the front section of the rail into the holes on the front post of
the rack and then down, until the spring-loaded pegs snap into the rack holes. Secure
the rail to the rack with screws.
3.
Pull out the rear section of the outer rail, adjusting the length until it fits within the posts
of the rack and align the small hooks with the appropriate holes on the rear post of the
rack. Be sure the rail is level, then mount the rear section onto the rack. Secure the rail
with screws.
4.
Tighten the adjusting screw.
Figure 2-2. Attaching the Rail Front to the Rack
(Left rail shown)
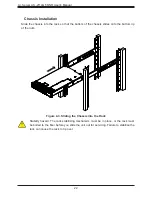
Note
: Figures are for illustrative purposes only. Always install servers into racks from the
bottom up.
Содержание A+ AS -2114GT-DNR
Страница 1: ...USER S MANUAL Revision 1 0 A Server AS 2114GT DNR...
Страница 46: ...A Server AS 2114GT DNR User s Manual 46 Figure 3 7 Riser F Expansion Card Figure 3 8 Riser B Expansion Card...
Страница 47: ...47 Chapter 3 Maintenance and Component Installation Figure 3 9 Riser FR Expansion Card...


