background image


27

Chapter 4 - Controlling Devices 

The  SRC-93  SERIES  is  designed  to  be  simple  and  straight 
forward to operate. This chapter explains how to use the 
SRC-93 SERIES to control all your devices.   


This Chapter assumes you have already setup the SRC-
93 SERIES and assigned Infrared codes to different 
buttons. See 

Chapter 3-Setting Up the SRC-93 SERIES 

to Control a Device

 on page 13 for more information on 

assigning codes. 

Selecting Device to Control 

1.


Press one of the eight device 
buttons to pick the device.


Press the same device button 

again to cycle through 
different devices in that bank. 


Changing Touch Screen Page 

2.


Press the 

 Page Button to 

alternate between page 1 and 

page 2 of available Touch 

Screen buttons. 


Содержание SRC-3310

Страница 1: ...SRC 9310 9320 Touch Screen Remote Control User Manual 031021...

Страница 2: ...ectness of the contents The information in this document is subject to change without notice Copyright Copyright 2003 This document contains proprietary information protected by copyright All rights a...

Страница 3: ...creen On 8 Touch Screen Precautions 8 Touch Screen Buttons 9 Rubber Buttons 9 Menus 10 Setup Menu 11 Delete Menu 12 Macro Menu 12 Chapter 3 Setting Up the SRC 93 SERIES to Control a Device 13 Choosing...

Страница 4: ...32 Chapter 6 Other Features 33 Using Timers 33 Setting Up a New Timer 34 Using Quick Channel Lists 35 Setting up Quick Channel Lists 36 Deleting Channels from a Quick Channel List 37 Using Quick Chan...

Страница 5: ...ly configure each device in your household or office bye learning eye You can quickly configure each device in your household or office In addition the advanced macro function enables you to initiate...

Страница 6: ...anufacturer s codes for many models User programmable buttons for each device include seven rubber buttons the device key and forty eight soft buttons Optional PC Interface for connection to a persona...

Страница 7: ...e at the device you want to operate Touch Screen The Touch Screen panel enables you to configure and operate your devices by touching the screen Tap the screen once to turn on the SCR 93 series Learni...

Страница 8: ...lights the different sections of the SRC 93 SERIES Figure 2 SCR 93 SERIES Overview Function Keys SETUP Menu DELETE Menu MACRO Menu UART Port LCD Indicators Beep On Battery Low Infrared OK Error Page1...

Страница 9: ...held down for two seconds you will see the date and year then week Learning Eye This is an infrared sensor used to detect other remote controls infrared signals Aim your existing remote control here...

Страница 10: ...re not included Batteries must be inserted before you can operate the SRC 93 SERIES To insert the batteries refer to the following illustration Figure 3 Installing Batteries 1 Turn the remote over pus...

Страница 11: ...fresh batteries Alkaline batteries are recommended Do not mix different types of batteries Be sure that the positive and negative polarities of the batteries match the diagram shown in the compartment...

Страница 12: ...en to activate it It will turn itself off after the user programmable power down time period To change the time see Power Down Time Period in Chapter 7 Changing SRC 93 SERIES Parameters Figure 5 Touch...

Страница 13: ...nd your external devices Use these buttons to program codes from your existing remotes control your devices and set up command sequences called macros You will hear a beep when you press a button To a...

Страница 14: ...it quickly will turn on the backlight while holding it down for two seconds will enter the SLEEP Menu Menus In order to use the menu buttons as SETUP DELETE and MACRO you will first need to press and...

Страница 15: ...t the backlight time period 41 DBUG Collect unrecognizable un learnable infrared codes The SRC 93 SERIES cannot learn 100 of all existing codes so it may be necessary to collect the some codes and ema...

Страница 16: ...ice 25 RST Resets the SCR 9310 back to factory settings 42 Q CH Allow you to erase any channel that is stored in one of the Quick Channels NEWS SPORTS MOVIES EDUCTION or KIDS 35 Macro Menu Menu Item D...

Страница 17: ...a new TV DVD or VCR etc You will give this specific device a name label on the SRC 93 SERIES There are two ways to do this based on what starting point you want to work from Create new Device Use thi...

Страница 18: ...n be four digits long Press the OK button 3 Select one device attribute to load the default device screen Use the UP and DOWN arrows to choose 4 Press the OK button to confirm Modifying an Existing De...

Страница 19: ...es you to customize the SRC 93 SERIES s Touch Screen display to match your existing remote controls The following steps show you how to make the display on the SRC 93 SERIES correspond to an existing...

Страница 20: ...l buttons Press the Power button to show all possible LCD choices 2 Touch the button that you wish to change You may change as many buttons as you wish 3 Each time you touch the button its appearance...

Страница 21: ...sing pre programmed manufacturer codes however not 100 of codes can be learned and it may be necessary to collect unrecognized codes and send them to SUNWAVE See page 24 for more information on unreco...

Страница 22: ...corner of the screen ex Press TV button There are two ways to program the manufacture codes Manual Entry Directly enter the code go to step 2 Automatic Search The SRC 93 SERIES will search known codes...

Страница 23: ...search Automatic Search 5 Make sure the SRC 93 SERIES is pointing at the device you want to control and press the AUTO button The AUTO button will flash while the SRC 93 SERIES automatically cycles th...

Страница 24: ...SRC 93 SERIES You may need to first collect the codes see page 24 for more information and then email them to SUNWAVE New system software will then be sent to you allowing your SRC 93 SERIES to learn...

Страница 25: ...h other Be sure to point your device s remote control at the SRC 93 SERIES s learning eye which is located at the bottom of the unit Do not use the other eye located at the top of the SRC 93 SERIES Yo...

Страница 26: ...the device you want to program Make sure the other remote control is pointed directly at the SRC 93 SERIES s Learning eye Keep them 2 4 inches apart 5 10 cm Rubber Keys The first screen shown represen...

Страница 27: ...page it will automatically switch to the next page You can also directly select the next button to program by touching it or press the Page Key to go to page 1 of the Softkeys SoftKey Page 1 This scre...

Страница 28: ...recognize the codes SUNWAVE service email address is support sun wave com All unrecognized codes should be sent to this address Every time when you enter the DBUG mode the SRC 93 SERIES will replace...

Страница 29: ...KEY and then press the OK button 1 Select the device that has the key that you want to erase ex Press TV button 2 Select the key you want to erase 3 If you want to erase more keys you may select them...

Страница 30: ...uttons on the Touch Screen to select BANK and then press the OK button 1 Use the Arrow keys to chose CODE Erase infrared codes only but keep Touch Screen display the same ALL Erase both codes and Touc...

Страница 31: ...assigned Infrared codes to different buttons See Chapter 3 Setting Up the SRC 93 SERIES to Control a Device on page 13 for more information on assigning codes Selecting Device to Control 1 Press one o...

Страница 32: ...SRC 93 SERIES s Record Button Must Be Held Down for 2 Seconds As a safety feature the record button needs to be pressed for 2 seconds This is to prevent accidentally pressing the VCR record button an...

Страница 33: ...any of the 8 Device keys the Page Date key the Backlight Sleep key the three functions keys SETUP DELETE MACRO or the five Channel Classification keys Creating a Macro Sequence The following example...

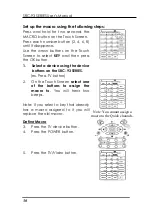
Страница 34: ...and then press the OK button 1 Select a device using the device buttons on the SRC 93 SERIES ex Press TV button 2 On the Touch Screen select one of the buttons to assign the macro to You will hear two...

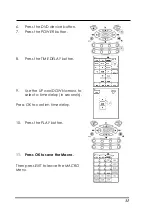
Страница 35: ...ss the POWER button 8 Press the TIME DELAY button 9 Use the UP and DOWN arrows to select a time delay in seconds Press OK to confirm time delay 10 Press the PLAY button 11 Press OK to save the Macro T...

Страница 36: ...with valid Macros will be shown During the Macro transmission all commands will be shown on the Touch Screen as they are sent Deleting a Macro Deleting a Macro is actually simply a matter of deleting...

Страница 37: ...ws channels DEBUG Used to collect unrecognized codes that can later be emailed to SUNWAVE for analysis System Setup Transmission Can be used to transmit system setup to either a personal computer or a...

Страница 38: ...IMR and then press the OK button 1 Choose one of the eight available timers by pressing the number on the Touch Screen 2 Use the arrow keys to select the timer type 3 Press OK to confirm timer type OF...

Страница 39: ...Screen pages Use the button At the selected time and date the SRC 93 SERIES will send the infrared code or start the macro associated with the key selected in step 6 When finished press the EXIT key...

Страница 40: ...to select a Touch Screen page 2 Use the number keys to enter a channel number 0 9 10 ENTER Some devices may need you to also press ENTER if they normally require you to press ENTER after a channel cha...

Страница 41: ...press the OK button 1 Use the device keys to select a device and the Page button to select a Touch Screen page 2 Select the Quick channel you want to delete The selected classification will flash 3 P...

Страница 42: ...system setup to a personal computer or another SRC 93 SERIES The following information can be transferred using the TRAN selection in the SETUP Menu PROG MCU Program DATA Flash Memory Data Preprogramm...

Страница 43: ...SLEEP key for two seconds 2 Use the arrow keys to specify the sleep timeout period 24 hours maximum 3 Press OK to confirm Select the Device using the device keys 4 Please refer to Macro setup the step...

Страница 44: ...SRC 93 SERIES parameters can be changed This chapter explains the different customizations you can make Date and Clock To change the date and clock use the DTAE selection in the SETUP Menu Enter the...

Страница 45: ...keys to set the power down time Press OK when finished and EXIT to leave to the SETUP Menu Backlight On Time Period This setting specifies how long the SRC 93 SERIES will keep the backlight on after...

Страница 46: ...se the OK button to toggle the beep from ON to OFF Resetting to Factory Defaults This setting will erase all user specified settings ex PWDN LITE and reset the SRC 93 SERIES back to factory defaults A...

Страница 47: ...2 pages 24 keys total 48 keys Hard Buttons 7 usable 7 usable Backlighting Brilliant blue LED LCD Brilliant blue LED LCD Learning Frequency 10kHz 455KHZ Pulse 10kHz 455KHZ Pulse Memory 256KB flash memo...

Страница 48: ...and Preprogrammed code Upgrade Memory Memory include Preprogrammed code User s setup data When you upgrade all flash memory the Preprogrammed code will be renew and user s setup will be replace into f...

Страница 49: ...n t operate a device Make sure that the desired device screen on the SRC 93 SERIES LCD panel has been selected Move closer to the device The maximum operating distance is approximately 30 feet Ensure...

Страница 50: ...gram more than one remote for a given device Make sure the two remotes are not too close or too far apart and are aiming directly at each other keep apart between 2 4 inches 5 10cm You see ERROR displ...

Страница 51: ...to turn the SRC 93 SERIES back on again You can also reset the Power Down time period page 41 IR LEARNING cannot be made successfully Replace batteries in the SRC 93 SERIES and the remote you are try...

Отзывы: