


46
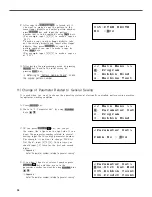
(2) Setting up the Range of Sewing Speed Change
A. By using FORW, BACK keys, move to the
start point (R1) of section that the sewing
speed is supposed to change.
B. After pressing CODE key,
input three digit numbers if you know the
pattern programming related function code, but
if you don’t know it press ENTER key and
move to the “012: STI SPD”by using direction
keys , then press ENTER again.
C. By using digit keys, input the sewing speed you
want to change, then press ENTER key.
(For example, if you want to change the speed
into 500spm, input [0][5].)
D. By using FORW, BACK keys, move to the end
point (R2) of section that the sewing speed is
supposed to change.
Then after pressing PNT SET key, press EXE
key.
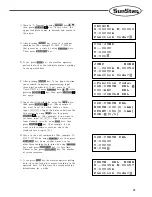
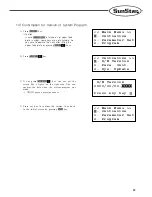
L I N E
X : - 0 3 5 0 A N : 0 0 0 7 5
Y : 0 0 3 0 0 A
F u n c t i o n C o d e ?
< F u n c t i o n C o d e >
C O D E N o : 0 1 2
0 1 2 : S T I S P D
S T S P M : 0 5 [ 1 0 0 s p m ]
< R A N G E S E T T I N G >
X : 0 0 3 6 0 A N : 0 0 0 9 9
Y : 0 0 3 0 0 A
F u n c t i o n C o d e ?
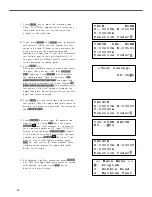
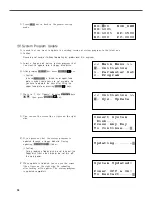
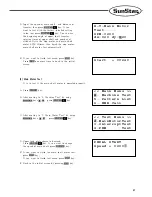
(3) Test Sewing
A. Press Test key.
After moving to the origin, the upper feed plate
moves to the sewing start point, then ascends
and the READY LED turns on. After adjusting
proper test sewing speed by pressing SPEED
key, if you press down once the foot plate on
the right side, the upper feed plate descends,
and if press down once the foot plate on the left
side, the test sewing is performed.
After completing the test sewing, the upper feed
plate moves to the sewing start point, then
ascends.
< T e s t S e w i n g >
S P : 1 2 0 0
Содержание SPS/A-3020 5030 SERIES
Страница 119: ...119 17 Air System Circuit Diagram ...
Страница 130: ...5 Electronic Circult Diagram SPS A 5030 HS 130 ...


