


13
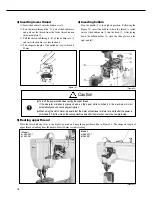
8) Installation and adjustment of synchronizer
(for automatic trimming type)
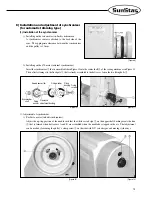
(1) Installation of the synchronizer
Installing on the servo motor (in-built synchronizer)
A synchronizer sensor is attached to the back side of the
arm. The appropriate clearance between the synchronizer
and the pulley is 1.2mm.
Installing on the 470 motor (external synchronizer)
Insert the synchronizer
①
that is assembled like in Figure 10 into the center shaft
②
of the sewing machine as in Figure 11.
Then, after fastening it to the fixed pole
③
that is already assembled to the belt cover, fasten the two fixing bolts
④
.
Speed sensor film
Fixing washer
Fixing
bushing Fixing
screws
Synchronizer
shaft
Fixing
washer
Clearance
adjustment bushing
[Figure 9]
[Figure 10]
[Figure 11]
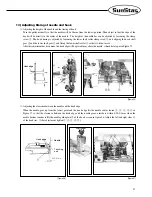
⑵
Adjustment of synchronizer
For Servo motor (in-built synchronizer)
Adjust the up-stop position of the needle such that the white carved sign
②
on the upper shaft bushing meets the line
③
that is formed when belt covers A and B are assembled when the needle has stopped in the air. That adjustment
can be made by loosening the pulley
’
s clamp screw
①
on the side with N.U carved signs and moving it sideways.
[Figure 13]
[Figure 12]
Содержание KM-957 Series
Страница 31: ...31 5 Table Drawing 1 KM 967 ...
Страница 32: ...32 2 KM 967 7 ...