


12
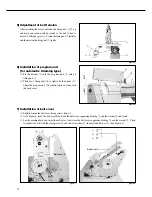
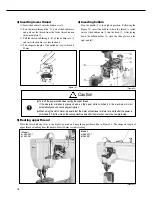
6) Installation of program unit
(for automatic trimming type)
⑴
Fix the bracket
②
onto the program unit
①
, using 4
fixing nuts
③
.
⑵
Then, use 2 fixing bolts
④
to tightly fix the bracket
②
,
where the program unit
①
has been attached, along with
the back cover.
[Figure 6]
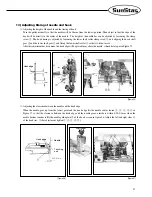
7) Installation of belt cover
⑴
Slightly loosen the belt cover fixing screws (four)
①
.
⑵
As in Figure 8, insert the belt cover B between the belt cover supporting bushing
②
and the washer
③
and fasten.
⑶
Lay the machine back and insert the belt cover A between the belt cover supporting bushing
②
and the washer
③
. Then,
fasten belt cover B with the clamp screw
④
and the two washers
⑤
, then fasten belt cover A. (See Figure 8.)
[Figure 7]
[Figure 8]
5) Adjustment of belt tension
After installing the motor, unfasten the fixing nuts
①
,
②
up
and down and tension will be created to the belt
④
due to
motor
③
falling by gravity. Fasten the fixing nut
①
initially
and then fasten the fixing nut
②
tightly.
[Figure 5]
④
④
①
②
③
⑤
Belt cover B
Belt cover A
③
①
②
Содержание KM-957 Series
Страница 31: ...31 5 Table Drawing 1 KM 967 ...
Страница 32: ...32 2 KM 967 7 ...