7
We value your experience using Sunny Health and Fitness products. For assistance with parts or
troubleshooting, please contact us at [email protected] or 1-877-90SUNNY
(877-907-8669).
STEP 5:
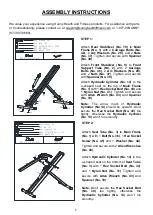
Remove 1
Outer Hexagon Bolt (No.
26)
,
1
Flat Washer (No. 28)
and 1
Nylon Nut (No. 27)
from
Main Frame
(No. 1)
using
Spanner (No. 38)
and
Spanner (No. 39)
.
Attach
Middle Post Tube (No. 7)
to
Main Frame (No. 1)
with 1
Outer
Hexagon Bolt (No. 26)
,
1
Flat
Washer (No. 28)
and 1
Nylon Nut
(No. 27)
. Tighten and secure with
Spanner (No. 38)
and
Spanner (No.
39)
.
Attach the
Connection Tube (No. 5)
to the u-shaped seat on the bottom of
Middle Post Tube (No. 7)
with 1
Hex
Socket Bolt (No. 33)
,
2
Washers (No.
30)
and 1
Nylon
Nut (No. 31)
. Tighten
and secure with
Allen Wrench (No.
43)
and
Spanner (No. 39)
.
Align the
Left Pedal (No. 13L)
with the
left side of the
Pedal Connecting
Tube (No. 6)
at 90°and gently insert
the
Left Pedal
(No. 13L)
into the
Pedal Connecting Tube (No. 6)
. Turn
the
Left
Pedal
(No.
13L)
counter-clockwise
as tightly as you can
with your hand. Then tighten and
secure with
Spanner (No. 39)
.
Align the
Right Pedal (No. 13R)
with
the right side of the
Pedal Connecting
Tube (No. 6)
at 90°and gently insert
the
Right Pedal (No. 13R)
into the
Pedal Connecting Tube (No. 6)
. Turn
the
Right Pedal (No. 13R)
clockwise
as tightly as you can with your hand.
Then tighten and secure with
Spanner
(No. 39)
.
#
26 M12*165 1PC
#
28 Φ24*Φ13.5*2.5 1PC
#
27 M12 1PC
#
30 Φ16*Φ8.5*1.5 2PCS
#
31 M8 1PC
#
43 S6
#
39 S13,S15,S17,S19
#
38 S17,S19
7
1
26
28
27
33
3031
5
13L
13R
6
Содержание SF-A020052
Страница 13: ......


