SunFounder Pironman
sudo python3
/
opt
/
pironman
/
main
.
py
6.4 Cooling Fan
Note:
The Cooling Fan is connected to GPIO6 (BCM).
The working status of the Cooling Fan is decided by the CPU temperature. When the CPU temperature reaches the
set threshold, the fan spins, and if it is 2 degrees Celsius below the threshold, the fan is stopped.
• Set the temperature unit,
C
: Celsius,
F
: Fahrenheit.
pironman
-
u C
• Set the temperature at which the fan starts, for example, 40 degrees Celsius (the unit is set by you).
pironman
-
f
40
6.5 WS2812 RGB Strip
Note:
The WS2812 RGB Strip is connected to GPIO12.
The WS1812 RGB Strip is a light strip with 8 RGB LEDs that can be used to display Pironman’s status. You can use
commands to make it turn on or off, or to modify its color (default is blue), display mode and change rate.
• Turn on the WS2812 RGB Strip.
pironman
-
rw on
• Turn it off.
pironman
-
rw off
• Change its color, using hexadecimal color values.
pironman
-
rc fe1a1a
• Changing the display mode, there are four modes to choose from:
breath
,
leap
,
flow
,
raise_up
.
pironman
-
rs leap
• Change the speed of change (0 ~ 100%).
pironman
-
rb
80
• Above are the effects we preset for WS2812 RGB Strip, if you want it to display other effects, you can open
/opt/pironman/ws2812_RGB.py
to modify and run it.
Open this python script and modify its contents.
6.4. Cooling Fan
31
Содержание Pironman
Страница 1: ...SunFounder Pironman www sunfounder com Nov 01 2022 ...
Страница 2: ......
Страница 4: ...ii ...
Страница 6: ...SunFounder Pironman 2 CONTENTS ...
Страница 10: ...SunFounder Pironman 6 Chapter 2 2 Component List and Assembly Instructions ...
Страница 14: ...SunFounder Pironman your Raspberry Pi Step 7 Click the WRITE button 10 Chapter 3 3 Installing the OS ...
Страница 17: ...SunFounder Pironman 13 ...
Страница 18: ...SunFounder Pironman 14 Chapter 3 3 Installing the OS ...
Страница 30: ...SunFounder Pironman 26 Chapter 5 5 Set up the Pironman ...
Страница 33: ...SunFounder Pironman 6 2 Main Board About the Jumper Caps 6 2 Main Board 29 ...
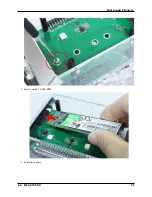
Страница 38: ...SunFounder Pironman 2 Remove the screw for the M 2 SATA SSD 34 Chapter 6 6 About Hardware ...
Страница 39: ...SunFounder Pironman 3 Insert your M 2 SATA SSD 4 Screwed in place 6 8 M 2 SATA SSD 35 ...
Страница 46: ...SunFounder Pironman Step 4 Double click the connection just created 42 Chapter 7 7 Appendix ...
Страница 47: ...SunFounder Pironman Step 5 Enter Username pi and Password raspberry by default 7 1 Remote Desktop 43 ...
Страница 48: ...SunFounder Pironman Step 6 Now you can see the desktop of the Raspberry Pi 44 Chapter 7 7 Appendix ...
Страница 66: ...SunFounder Pironman 2 Select Samba SMB Server 3 Select Install 62 Chapter 7 7 Appendix ...

