SunFounder Pironman
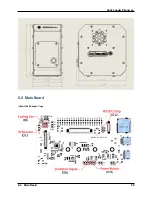
There are 5 jumper caps on the Main Board, each jumper cap corresponds to a function, if you do not need the
function and want to use the pin elsewhere, you can unplug the jumper cap. The following is a detailed explanation of
the functions of the five jumper caps.
•
Cooling Fan (IO6)
: The fan is always spinning when this jumper cap is unplugged. You can unplug the fan
wires or remove the fan if you don’t need it.
•
IR Receiver (IO13)
: If you pull out this jumper cap, the IR Receiver will not work.
•
WS2812 Strip (IO12)
: If you pull out this jumper cap, the WS2812 Strip will not work.
•
Shutdown Signal (IO26)
: The Main board powers on/off depending on the level of the
State
pin; when
State
is low, it powers on, and when
State
is high, it powers off.
–
You can only turn off the main board by pressing and holding the power button for 10 seconds if you
connect GND and state with a jumper cap.
–
If you connect
State
and IO26 with a jumper cap, after configuration, the Raspberry Pi can control the
State
pin through IO26. When Raspberry Pi is on,
State
will be set to low level, when Raspberry Pi is
off,
State
will be set to high level, so the motherboard and Raspberry Pi can power on/off synchronously.
•
Power Button (IO16)
: If you pull out this jumper cap, the power button will not work. Besides, the power
button is also used to wake up the OLED screen in Sleep Mode.
Power Cut Memory
When the Pironman suddenly loses power, the chip of the Main Board will record this state and will automatically
power on the next time.
6.3 OLED Screen
After installation, the script will start automatically and the OLED screen will display the CPU, RAM and ROM
Usage, CPU Temperature and IP Address of the Raspberry Pi.
In order to extend the life of OLED screen, OLED will turn off after 60 seconds by default, and will light up by
pressing the power button shortly. You can enable/disable this feature with the following command.
• set to sleep mode: “al” means to “always on”. In sleep mode, short press the power button to wake up.
pironman
-
al off
• set to always on mode:
pironman
-
al on
• Set the duration in seconds,
pironman
-
s
60
• The above are what we set for OLED screen, if you want to make OLED screen display other information and
effects, you can open
/opt/pironman/main.py
to modify and run it.
Open this python script and modify its contents.
sudo nano
/
opt
/
pironman
/
main
.
py
Press
Ctrl+X
->
Y
->
Enter
to save and exit editing.
Run it.
30
Chapter 6. 6. About Hardware
Содержание Pironman
Страница 1: ...SunFounder Pironman www sunfounder com Nov 01 2022 ...
Страница 2: ......
Страница 4: ...ii ...
Страница 6: ...SunFounder Pironman 2 CONTENTS ...
Страница 10: ...SunFounder Pironman 6 Chapter 2 2 Component List and Assembly Instructions ...
Страница 14: ...SunFounder Pironman your Raspberry Pi Step 7 Click the WRITE button 10 Chapter 3 3 Installing the OS ...
Страница 17: ...SunFounder Pironman 13 ...
Страница 18: ...SunFounder Pironman 14 Chapter 3 3 Installing the OS ...
Страница 30: ...SunFounder Pironman 26 Chapter 5 5 Set up the Pironman ...
Страница 33: ...SunFounder Pironman 6 2 Main Board About the Jumper Caps 6 2 Main Board 29 ...
Страница 38: ...SunFounder Pironman 2 Remove the screw for the M 2 SATA SSD 34 Chapter 6 6 About Hardware ...
Страница 39: ...SunFounder Pironman 3 Insert your M 2 SATA SSD 4 Screwed in place 6 8 M 2 SATA SSD 35 ...
Страница 46: ...SunFounder Pironman Step 4 Double click the connection just created 42 Chapter 7 7 Appendix ...
Страница 47: ...SunFounder Pironman Step 5 Enter Username pi and Password raspberry by default 7 1 Remote Desktop 43 ...
Страница 48: ...SunFounder Pironman Step 6 Now you can see the desktop of the Raspberry Pi 44 Chapter 7 7 Appendix ...
Страница 66: ...SunFounder Pironman 2 Select Samba SMB Server 3 Select Install 62 Chapter 7 7 Appendix ...


