SunFounder Pironman
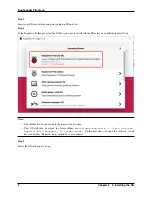
Step 6
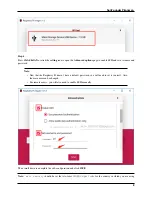
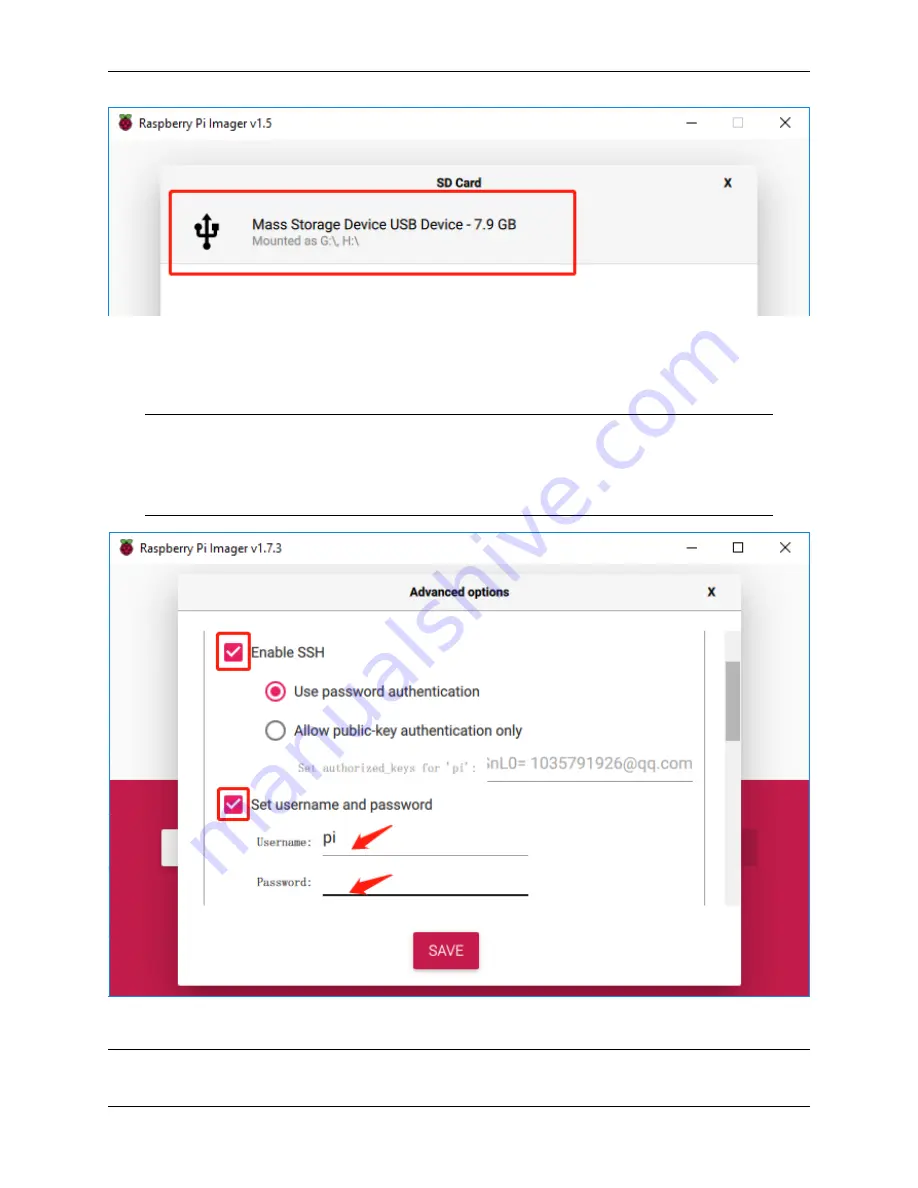
Press
Ctrl+Shift+X
or click the
setting
icon to open the
Advanced options
page to enable SSH and set username and
password.
Note:
• Now that the Raspberry Pi doesn’t have a default password, you will need to set it yourself. Also,
the username can be changed.
• For remote access, you will also need to enable SSH manually.
Then scroll down to complete the wifi configuration and click
SAVE
.
Note:
wifi country
should be set the two-letter
for the country in which you are using
9
Содержание Pironman
Страница 1: ...SunFounder Pironman www sunfounder com Nov 01 2022 ...
Страница 2: ......
Страница 4: ...ii ...
Страница 6: ...SunFounder Pironman 2 CONTENTS ...
Страница 10: ...SunFounder Pironman 6 Chapter 2 2 Component List and Assembly Instructions ...
Страница 14: ...SunFounder Pironman your Raspberry Pi Step 7 Click the WRITE button 10 Chapter 3 3 Installing the OS ...
Страница 17: ...SunFounder Pironman 13 ...
Страница 18: ...SunFounder Pironman 14 Chapter 3 3 Installing the OS ...
Страница 30: ...SunFounder Pironman 26 Chapter 5 5 Set up the Pironman ...
Страница 33: ...SunFounder Pironman 6 2 Main Board About the Jumper Caps 6 2 Main Board 29 ...
Страница 38: ...SunFounder Pironman 2 Remove the screw for the M 2 SATA SSD 34 Chapter 6 6 About Hardware ...
Страница 39: ...SunFounder Pironman 3 Insert your M 2 SATA SSD 4 Screwed in place 6 8 M 2 SATA SSD 35 ...
Страница 46: ...SunFounder Pironman Step 4 Double click the connection just created 42 Chapter 7 7 Appendix ...
Страница 47: ...SunFounder Pironman Step 5 Enter Username pi and Password raspberry by default 7 1 Remote Desktop 43 ...
Страница 48: ...SunFounder Pironman Step 6 Now you can see the desktop of the Raspberry Pi 44 Chapter 7 7 Appendix ...
Страница 66: ...SunFounder Pironman 2 Select Samba SMB Server 3 Select Install 62 Chapter 7 7 Appendix ...


