2
Sundance Spas Gazebos Installation Instructions WillowWood
3
4
9
10
13
20
8
5
6
7
1
12
11
14
19
18
15
16
17
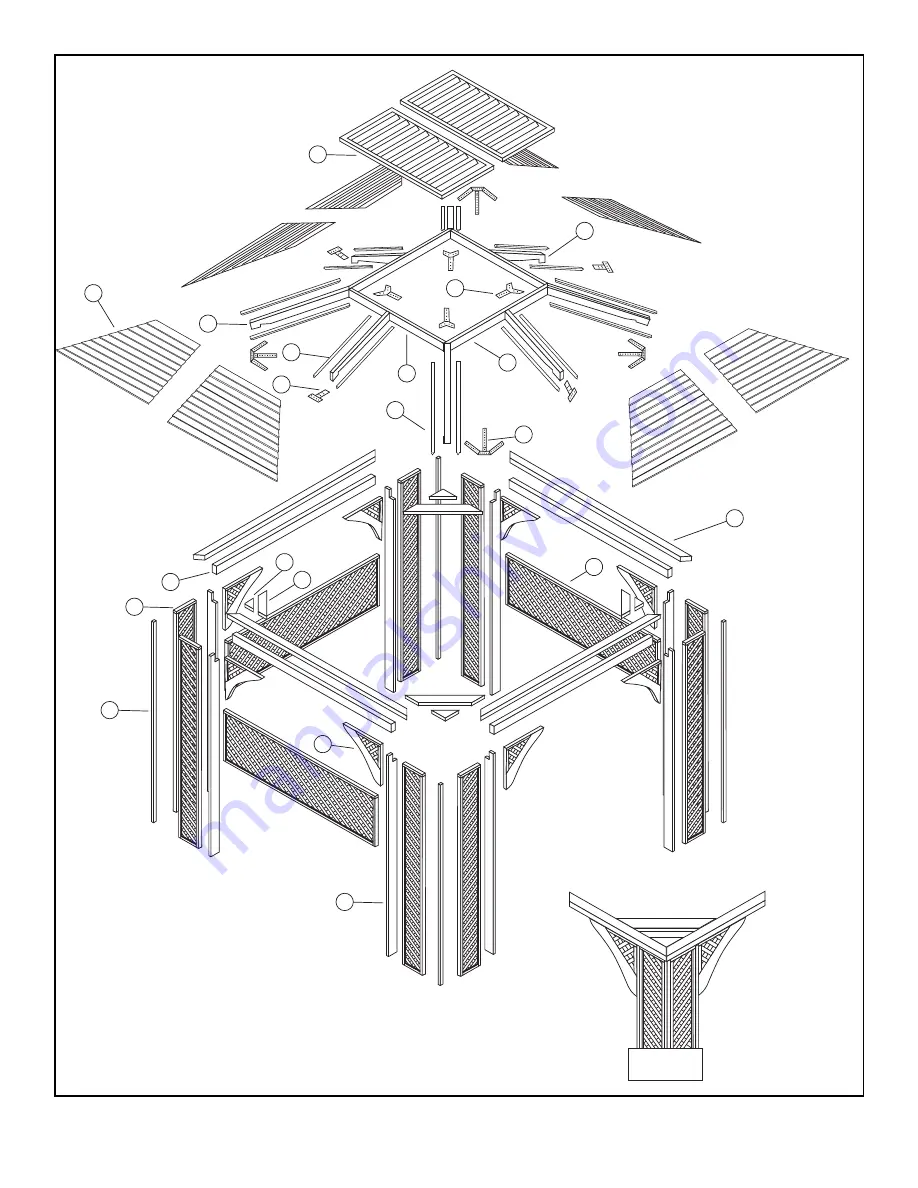
NOTE:Inner and Outer Sway Bracesare to be attached to the insideof the Tie Plates.
Страница 1: ...2001 Sundance Spas Inc Document Number 6530 188 Rev B Installation Instructions WillowWood Fits models 7 7 x 7 7 and smaller Accommodates the Cover Breeze cover lift...
Страница 2: ...fter the part name and are shown in brackets We have also included Pro Tips along the way that give you professional pointers on making the assembly and installation easier and cleaner Tools Space and...
Страница 3: ...2 Sundance Spas Gazebos Installation Instructions WillowWood 3 4 9 10 13 20 8 5 6 7 1 2 12 11 14 19 18 15 16 17 NOTE Inner and Outer Sway Braces are to be attached to the inside of the Tie Plates...
Страница 4: ...6472 115 18 4 6472 119 19 4 6472 116 20 2 Items Not Shown in Diagram Left 21 100 22 150 23 200 24 1 W O _ ___________________________ Packaged b by _ _________________________ Inspected b by _ _______...
Страница 5: ...edge of each lattice panel as shown in Diagram 3 The notches in the uprights should be face up Make sure that the top of the uprights are flush with the top of the lattice zpanels Attach the uprights...
Страница 6: ...ches Secure each lattice panel to the header with two 2 1 2 screws as shown Step 7 Attach the Corbels 9 to the wall units with four 2 1 2 screws as shown in Diagram 7 Make sure the corbel is flush wit...
Страница 7: ...ll assembly if the wall sections are not joined properly Step 10 Once the wall sections are properly positioned have your assistant hold the sections in place Join the wall sections by attaching the c...
Страница 8: ...the next step Step 12 Squaring the Gazebo Walls The completed wall assembly must be square for the roof assembly to fit properly To check if the assembly is squared measure diagonally between opposite...
Страница 9: ...her Step 14 Attach the small sway brace to the Tie Plates using two 2 1 2 screws through the pre drilled holes as shown in Diagram 14 Step 15 Attach the large sway brace to the Tie Plates using two 2...
Страница 10: ...using two 2 1 2 screws allowing for the 1 8 overhang Do not try to align or square anything at this time That will be done in The next step Step 17 Align the tie plate assembly with the wall assembly...
Страница 11: ...on a flat surface as shown in Diagram 19 Moon Lid cleats should be facing the inside of the box Attach the roof box headers with two 2 1 2 screws at each corner as shown Step 20 Square the roof box as...
Страница 12: ...an assistant hold a hip rafter in place while you align it flush with the upper edge of the roof box header assembly Attach each hip rafter to the roof box with two 2 1 2 screws as shown in Diagram 22...
Страница 13: ...ill need an assistant for this next step Step 25 Position yourself and your assistant on opposite sides of the roof box hip rafter assembly Grasp the roof header box Lift the assembly and carefully fl...
Страница 14: ...emporary alignment and safety Pro Tip Safety Precaution Do not add any additional weight to the roof assembly at this point Step 28 From the inside of the wall assembly position the tongue portion of...
Страница 15: ...eader Step 30 Center a Mid Rafter 12 on the mark you made on the roof header box The bottom of the mid rafter should be flush with the bottom of the roof header box and the pre cut notch should fit sq...
Страница 16: ...corner of the roof panel to secure it temporarily on the hip rafter side long rafter Do not fully attach roof panels at this time Align the top edge of the roof panel with the roof header box Adjust t...
Страница 17: ...short for mid rafters and long for hip rafters triangular Ridge Caps 14 15 Begin with the mid rafters Align a ridge cap next to the sec tion of rafter that sits above the roof panel and attach to the...
Страница 18: ...roof header box for a completely enclosed roof Step 36 Attaching the Lattice Privacy Panels Pro Tip You will need an assistant for this step Position a Lattice Privacy Panel 8 in the space between two...
Страница 19: ...weather conditions such as extreme UV sun exposure extreme moisture etc In general wooden surfaces should be cleaned lightly sanded and restained every six months Metal roofs should be cleaned with w...
Страница 20: ...Sundance Spas Inc 14525 Monte Vista Ave Chino CA 91710 U S A Phone 909 606 7733 Fax 909 606 0195 Website http www sundancespas com 6530 188 Rev B 2001 Sundance Spas Inc Printed in U S A...