40
Sun Enterprise 10000 Dual Power Grid Installation Guide • March 2000
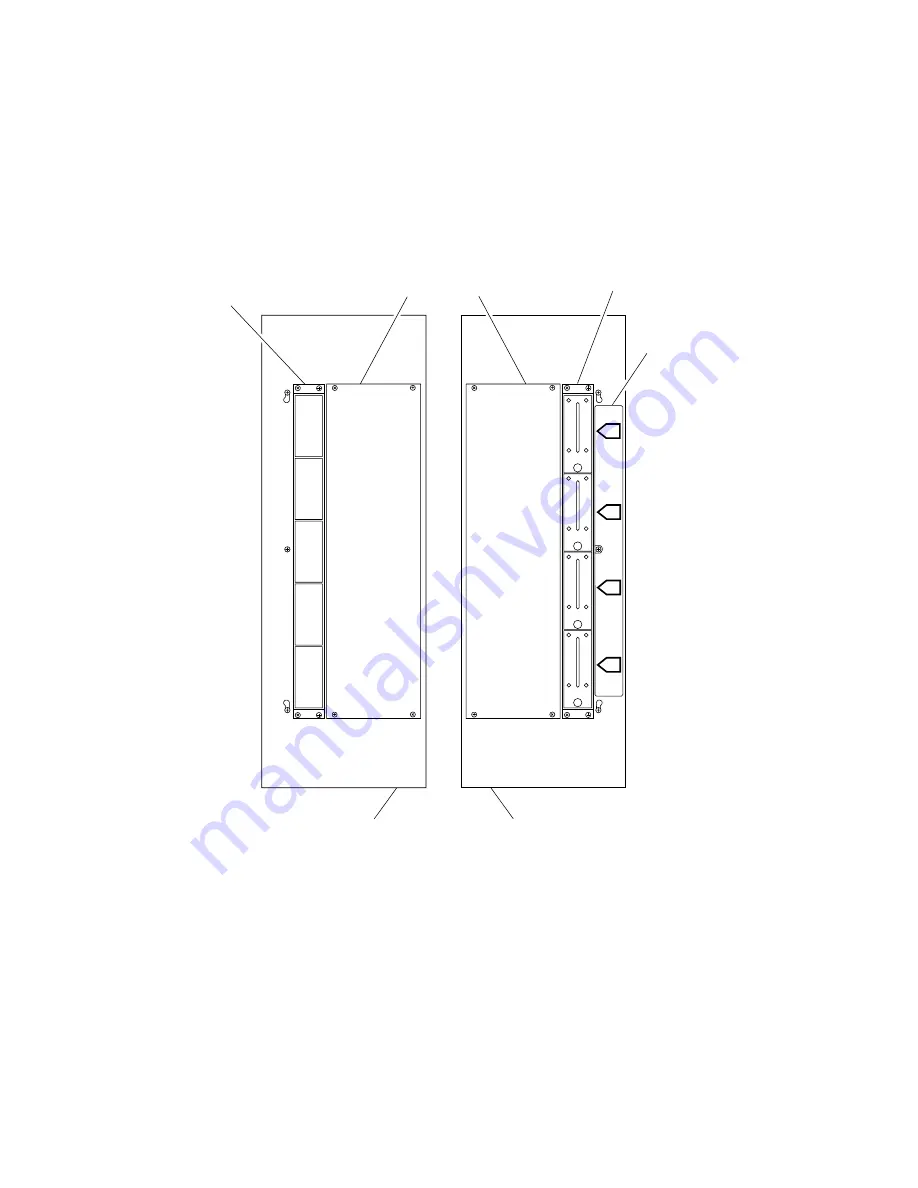
FIGURE 22
Alternate 4U Panel Installations
Remote power
Status module
Blank panel
Front 4U panel
Rear 4U panel
control shelf
tray overlay
tray assembly
Страница 1: ... 94303 4900 USA 650 960 1300 Fax 650 969 9131 Sun Microsystems Inc Part No 806 1861 11 March 2000 Revision A Sun Enterprise 10000 System Dual Grid Power Option Installation Guide Send comments about this document to docfeedback sun com ...
Страница 2: ...00 Sun Microsystems Inc 901 San Antonio Road Palo Alto CA 94303 4900 Etats Unis Tous droits réservés Ce produit ou document est protégé par un copyright et distribué avec des licences qui en restreignent l utilisation la copie la distribution et la décompilation Aucune partie de ce produit ou document ne peut être reproduite sous aucune forme par quelque moyen que ce soit sans l autorisation préal...
Страница 3: ...wer option SSP version installed that supports dual power grid installation Internal boot disks and other peripheral devices except hub AC sequencer and Remote Power Control Module RPCM Shelf relocated to external cabinet Five additional NEMA L6 30Rs for North America from another power source available four if no AC sequencer is installed ...
Страница 4: ...ks Make sure the following tasks are completed during the night before the installation of the dual power option to ensure a smooth and timely installation procedure Sun Enterprise 10000 system is shut down Sun Enterprise 10000 internal circuit breakers are turned off Circuit breakers to the power cords are turned off The necessary floor tiles are removed All power cords from the receptacles are d...
Страница 5: ... to install the dual power system Screwdriver 2 Phillips with 6 inch shank Screwdriver 2 Phillips with short stubby shank and small diameter handle Note A powered driver handle with a 2 Phillips tip is suggested for greater ease of installation Portable light to facilitate viewing inside the chassis ...
Страница 6: ... plate 2 Data extension cable 2 Data extension cable screw lock 4 Latch strike bracket 2 Blank panel 2 Hot swap status module assembly 1 Cable Kit 1 Dual Power Label Set 1 3 16 inch wrench 1 TABLE 2 Hardware and Quantity Hardware Quantity 10 32x1 2 screws 16 M4 washer square cone 18 M4x10 panhead screw 18 M4x12 Phillips flathead 32 M5x10 black Phillips flathead 6 M4x6 Phillips panhead 2 ...
Страница 7: ...e the existing power shelves Leave the brackets in place 4 Set aside the existing hardware for use in reassembly Remove and Install Power Cables and Install Ground Cables 1 Install labels POWER GRID A to the upper inside of the existing power shelves FIGURE 1 The labels must also be placed so they are visible when the inside of the chassis is viewed from the front or back 2 Remove the existing pow...
Страница 8: ...8 Sun Enterprise 10000 Dual Power Grid Installation Guide March 2000 FIGURE 1 Apply Power Grid Labels to Power Shelves Typical Power grid labels Power shelves ...
Страница 9: ...llation Procedure 9 FIGURE 2 Power Connectors on Existing Power Shelf Typical FIGURE 3 Screw Lock Retention at Back of Power Shelf J1 J9 J2 J10 Back of power shelf 3 16 inch wrench Loose hardware Screw lock ...
Страница 10: ...nstall the outer connectors first then the inner connectors 5 Attach the straight connector ends of the red DC power cables to the upper horizontal connectors J1 and J2 on the existing power shelves FIGURE 2 Install the outer connectors first then the inner connectors 6 Attach a ground cable to each vertical rail on the left side of the chassis FIGURE 4 Install with a M4x10 screw in the hole that ...
Страница 11: ... 1 Install only the front 4U panel on the RETMA rail near the existing power shelf with 10 32x1 2 screws in holes 8 23 and 38 counting from the bottom up Leave the screws loose FIGURE 5 Note The top of the 4U panel is even with the top of the existing power shelf door when it is installed correctly ...
Страница 12: ...rid Installation Guide March 2000 FIGURE 5 Front 4U Panel Installed 2 Place the status module tray all the way to the right side of the 4U panel 3 Fasten the status module tray with four 10 32 screws and tighten them fully Front 4U panel ...
Страница 13: ...ble labeled A REAR J11 to the open connector J11 5 Modify the rear J12 data cable a Remove the data cable from J12 below J11 connector on the back of the existing power shelf that is in the rear of the chassis b Attach the label SYSTEM REAR J12 to the free end of the cable as in Step 4 c Attach the status module tray assembly cable labeled SYSTEM REAR J12 to the free end of the data cable from Ste...
Страница 14: ... is in the front of the chassis b Attach the label SYSTEM FRONT J12 to the free end of the cable as in Step 4 c Attach the status module tray assembly cable labeled SYSTEM FRONT J12 to the free end of the data cable from Step 7a d Attach the status module tray assembly cable labeled A FRONT J12 to the open connector J12 8 Lay the free ends of the four remaining data cables on the top of the card c...
Страница 15: ...nel brackets rails and trim parts FIGURE 6 1 Install the rear 4U panel on the RETMA rail near the existing power shelf with three 10 32x1 2 screws in holes 8 23 and 38 counting from the bottom up Leave the screws loose FIGURE 6 Note The top of the 4U panel is even with the top of the existing power shelf door when it is installed correctly ...
Страница 16: ...d Installation Guide March 2000 FIGURE 6 4U Panel Brackets Rails and Trim Parts Chassis front Chassis rear Horizontal rails Corner bracket Trim angle 4U panel Trim plate Bus box Horizontal rails 4U panel Trim plate Corner bracket Trim angle ...
Страница 17: ...and 38 FIGURE 6 and FIGURE 7 a Install the first screw in hole 38 with approximately three turns Let the bracket hang b Install the two remaining screws c Leave all three screws loose Repeat this step on the opposite side of the chassis FIGURE 7 Corner Bracket Installed on RETMA Rail RETMA rail typical Corner bracket installed typical ...
Страница 18: ...rails while they are being installed Note The trim plate is hidden from view above the 4U panel when installed properly FIGURE 8 Trim Plate Installation Typical 4 Install two horizontal rails to the corner brackets with four M4x10 flathead screws for each horizontal rail Leave the screws loose FIGURE 6 5 Install two horizontal rails to the 4U panel with M4x10 flathead screws Leave the screws loose...
Страница 19: ...h M4x10 flathead screws Leave the screws loose FIGURE 9 Repeat this step on the opposite side of the chassis FIGURE 9 Trim Angle Installation 7 Install two M4x10 flathead screws in the remaining holes of the trim plate and the upper horizontal rails Leave the screws loose FIGURE 8 Repeat this step on the opposite side of the chassis Trim angle ...
Страница 20: ...ly FIGURE 10 Repeat this step on the opposite side of the chassis FIGURE 10 Power Shelf Door and Hardware Installation 9 Tighten all of the screws that were installed in Step 4 Step 5 Step 6 and Step 7 Tighten the screws for the horizontal rails first then the screws for the trim plates and trim angles to keep the structure square 10 Tighten all of the screws that were installed in Step 1 and Step...
Страница 21: ...ten the screws and do not install the bottom screws at this time 3 Install the screws in the bottom of the bus box and the lower rail Fully tighten all of the screws that attach the bus box to the horizontal rails 4 Connect the DC power cables from the existing power shelves to the bus box Install the power cables in a criss cross pattern that is front power shelf cables to rear facing connectors ...
Страница 22: ...milar position as on the existing power shelves FIGURE 1 6 Install the option power shelf in the front of the chassis with the AC input module toward the outside of the chassis so that it is a mirror image to the power shelf next to it Install one screw in the lower hole of the outer flange Do not install the other screws at this time Note Only one screw is installed to secure the power shelf whil...
Страница 23: ...the lower connectors 10 Connect two data cables to the front option power shelf a Attach the data cable from the status module tray labeled B FRONT J11 to J11 on the back of the front option power shelf b Attach the data cable from the status module tray labeled B FRONT J12 to J12 on the back of the front option power shelf FIGURE 12 11 Install the DC power cables on the remaining rear power shelf...
Страница 24: ...e connectors J11 and J12 a Attach the data cable from the status module tray labeled B REAR J11 to J11 on the back of the rear option power shelf b Attach the data cable from the status module tray labeled B REAR J12 to J12 on the back of the rear option power shelf 14 Attach the four remaining power cables to the bus box Use the criss cross method described in Step 4 and attach the connectors as ...
Страница 25: ...Installation Procedure 25 FIGURE 12 Back of Option Power Shelf Typical J1 J2 J9 J10 J12 J11 ...
Страница 26: ...e power and data cables are installed and connected correctly 1 Make sure that the red positive power cables connect to the top group of bus box connectors 2 Make sure that the black negative power cables connect to the bottom group of bus box connectors 3 Make sure that all data cables are connected and tightened ...
Страница 27: ... Doors AC Input Modules Power Supplies Power Cables and Trim Channels 1 Install cable anchors in eight places on the front of the chassis and eight places on the rear of the chassis FIGURE 13 Fasten each cable anchor with a M4x10 screw and cone washer ...
Страница 28: ...28 Sun Enterprise 10000 Dual Power Grid Installation Guide March 2000 FIGURE 13 Cable Anchor Installation Typical ...
Страница 29: ...screws so that it is a mirror image of the door next to it FIGURE 14 Adjust the door and or the latch bracket as necessary to allow correct latching action Tighten the screws fully 4 Install the remaining screws in the power shelves Tighten them fully FIGURE 14 Install Power Shelf Door Typical Latch bracket Power shelf Power shelf door Chassis corner ...
Страница 30: ...ls to the existing power shelves and POWER GRID B labels to the option shelves FIGURE 15 Power Grid Label on Power Shelf 6 Install four AC Input Modules ACIM in the power shelves Insert the ACIMs fully and carefully so that the EMI gaskets on the sides of the ACIMs are not damaged Tighten the 1 4 turn captive fasteners on the ACIMs 7 Insert the power supplies fully and tighten the 1 4 turn captive...
Страница 31: ...so that the white tab does not obscure any part of the label c Remove the assembled label from the backing paper and attach it to the correct position on the cable assembly Note A Power Grid labels are also provided and may be applied to the existing four AC power supply cable assemblies in the same location as shown for B Power Grid in FIGURE 16 FIGURE 16 AC Power Supply Cable Assembly Labels B P...
Страница 32: ... through the appropriate slots in the top trim channel Use cable ties to securely fasten the cables to the cable anchors installed in Step 1 11 Install the top left trim channel in the front of the chassis FIGURE 17 a Route the AC power supply cables through the appropriate slots and attach the top trim channel with a black M5 screw tightened fully b Remove the upper power supply cable connector f...
Страница 33: ...M5 screw and one M4 screw and at the bottom with one black flat head M5 screw FIGURE 18 Bottom Trim Channel Installation 13 Fasten the AC power supply cables to the cable anchors in the rear of the chassis Fasten the cables as described in Step 10 14 Install the top right and the bottom right trim channels on the rear of the chassis as described in Step 11 and Step 12 Flat head screw Pan head scre...
Страница 34: ...rlay Make sure the overlay is aligned correctly and clear of any mounting screws Press firmly and make sure that air bubbles are worked out 3 Connect one end of the AC line cord into J6 on the rear panel of the AC sequencer 4 Install the AC sequencer next to the status module tray assembly in the 4U panel Install the bottom of the AC sequencer first then swing the top into position Fasten the AC s...
Страница 35: ...is structure c Fasten the cable at the bottom with a cable clamp using an available M4 tapped hole FIGURE 20 Note The front and rear AC sequencers should not be connected to the same power grid FIGURE 19 Equipment Installation in the Front 4U Panel RJ 45 connectors AC sequencer Hub Status module Status module Input power Ground cable cable assembly tray assemly overlay Status module tray assemly ...
Страница 36: ...36 Sun Enterprise 10000 Dual Power Grid Installation Guide March 2000 FIGURE 20 AC Sequencer Cable Location Typical Cable Clamps ...
Страница 37: ...GURE 21 2 Install the hub all the way to the right in the 4U panel Fasten the hub with 10 32 screws and tighten them fully 3 Retrieve the loose end of the ground cable and let it hang out of the 4U panel 4 Connect the free end of the AC line cord into J6 on the rear panel of the AC sequencer 5 Install the AC sequencer next to the hub Install the bottom of the AC sequencer first then swing the top ...
Страница 38: ...the cable ties in the lanced loops of the chassis structure c Fasten the cable at the bottom with a cable clamp using an available M4 tapped hole FIGURE 20 Note The front and rear AC sequencers should not be connected to the same power grid FIGURE 21 Equipment Installation in the Rear 4U Panel Remote power AC sequencer RJ 45 connectors Input power Hub Ground cable control shelf cable assembly ...
Страница 39: ...ith four 10 32 screws and tighten them fully 2 Install four status modules in the status module tray assembly Push the status module in firmly to engage the connector on the back of the module Press in and fully tighten the thumbscrew 3 Install the adhesive overlay Make sure the overlay is aligned correctly and clear of any mounting screws Press firmly and make sure that air bubbles are worked out...
Страница 40: ... 10000 Dual Power Grid Installation Guide March 2000 FIGURE 22 Alternate 4U Panel Installations Remote power Status module Blank panel Status module Front 4U panel Rear 4U panel control shelf tray overlay tray assembly ...
Страница 41: ...2 Turn on all switches and circuit breakers 3 Make sure that the ACIM DC ON LEDs are green and all others are amber 4 Verify that the Hostview display on the SSP indicates green for the control boards and green for the Grid A power supplies Note Future SSP revisions will indicate the status of Grid B power supplies ...
Страница 42: ...42 Sun Enterprise 10000 Dual Power Grid Installation Guide March 2000 ...