background image

4

English

Français

Deutsch

Italiano

Nederlands

Español

 7  Restoring of removed parts of vehicle and operation checking

Recheck the connection, setting, and fixing of installed navigation, etc.
After the work is completed, restore the removed parts reversing the procedure for removal.
Check if the electric parts of the vehicle (lamps, switches, instruments) and the navigation system operate normally. 

 CAUTION

When bolts and nuts are tightened, they should be securely tightened using tools of right size.  Tighten them to the specified torque if 
specified.  Otherwise, the bolts/nuts may be damaged or removed.

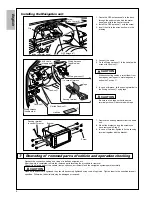
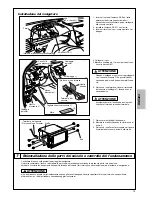
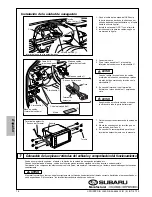
Installing the Navigation unit

4.  Connect the cable.
5.  Fix the Wiring harness 

w

 to the vehicle-side 

wires with Cushion 

y

.

7.  Remove the existing brackets from the audio 

unit.

8.  Mount the brackets using the screws you 

have removed in Step 6.

9.  In case of Forester, tighten to fix the sensing 

terminal together with the bracket.

When connecting cables, protect them from 
damage by moving parts, metal edges and 
bolts with Cushion 

y

.

GPS Antenna

e

Screw
(ø5 x 14 mm)

r

Inside the meter panel

Clip

AUX cable 
(If equipped)

Wiring harness

w

Wiring harness 
(Vehicle-side)

Wiring harness 
(Vehicle-side)

Cushion

y

Cut the Cushion

y

.

Half size

Cushion

y

Screw

Bracket

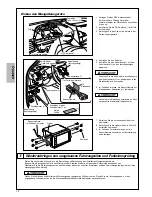
1.  Route the GPS antenna cable to the back 

through the upper hole behind the meter 
panel and wire to the center console.

2.  Install the GPS antenna 

e

 with the screw.

3.  Insert the clip to the wires as shown in the 

drawing.

 CAUTION

* In case of Impreza

Tape

Sensing terminal

Sensing terminal

* In case of Forester

6.  In case of Impreza, fix the sensing terminal to 

the Wiring harness 

w

 using tape.

Be sure to wind tape so that the entire 
terminal portion will be covered with tape.

 CAUTION

Содержание H001ASC000

Страница 1: ...s e NAVIGATIONSBAUSATZ Seite 8 10 INSTALLATIONSHANDBUCH Geeignete Modelle Impreza Modelle 08MY F r Fahrzeuge mit Rechtslenkung gestaltet sich die Installation spiegelbildlich Geeignete Modelle Foreste...

Страница 2: ...t in a fire or other accident To cut the coating of a cord and take the power supply of other equipment is strictly prohibited The current capacity of the lead wire will be exceeded and a fire or elec...

Страница 3: ...w Vehicle side AUX cable If equipped Vehicle side FM AM antenna cable 15P connector White Vehicle side Audio unit Center panel Screw Screw Lower cover of instrument panel Side panel Meter visor Meter...

Страница 4: ...he audio unit 8 Mount the brackets using the screws you have removed in Step 6 9 In case of Forester tighten to fix the sensing terminal together with the bracket When connecting cables protect them f...

Страница 5: ...e branch s conform ment au manuel d instructions Un mauvais branchement peut provoquer un incendie ou autre accident Couper la gaine d un cordon ou prendre l alimentation lectrique d un autre quipemen...

Страница 6: ...icule C ble AUX le cas ch ant Connecteur 15 broches blanc c t v hicule Unit audio Panneau central 1 Otez le panneau central en rel chant 5 fixations et 7 attaches 2 Otez les 4 vis de la console et tez...

Страница 7: ...ntrale 2 Installez l antenne GPS e avec la vis 3 Ins rez la fixation sur les c bles comme cela est repr sent sur le dessin Antenne GPS e C ble AUX le cas ch ant Faisceau de c bles w Vis 5 x 14 mm r Fa...

Страница 8: ...on falls diese Komponenten nicht ordnungsgem arbeiten Das Produkt darf nicht zerlegt oder modifiziert werden Andernfalls besteht Unfall Brand oder Stromschlaggefahr Wenden Sie sich bez glich Pr fung R...

Страница 9: ...abel falls vorhanden Fahrzeugseitiges UKW MW Antennenkabel 15P Stecker wei fahrzeugseitig Audioger t Mittelblende 1 Nehmen Sie die Mittelblende ab durch L sen von 5 Clips und 7 Verriegelungen 2 Nehmen...

Страница 10: ...Installieren Sie die GPS Antenne e mit Hilfe der Schraube 3 Befestigen Sie den Clip am Kabel wie in der Zeichnung dargestellt GPS Antenne e AUX Kabel falls vorhanden Kabelstrang w Schraube 5 x 14 mm...

Страница 11: ...li incendi Non effettuare nessuna estensione utilizzando altri oggetti che non siano il cavo del sistema elettrico del veicolo La protezione del cavo si pu danneggiare facilmente generando possibili i...

Страница 12: ...nnettore 15P bianco veicolo Unit audio Pannello centrale 1 Rimuovere il pannello centrale staccando 5 fermi e 7 blocchi a scatto 2 Rimuovere le 4 viti dalla console e togliere l unit audio 3 Rimuovere...

Страница 13: ...trale 2 Installare l antenna GPS e con la vite 3 Inserire il fermo nei cavi come mostrato nel disegno Antenna GPS e Vite 5 x 14 mm r Interno del pannello contachilometri Fermo Nastro bloccante y Tagli...

Страница 14: ...dicadores los parabrisas etc funcionan con normalidad Si alguno de ellos no funciona con normalidad corrija la instalaci n No desmonte o modifique el producto Puede producirse un accidente un incendio...

Страница 15: ...Blanco Lateral del veh culo Unidad de audio Panel central 1 Suelte el panel central soltando los 5 clips y los 7 pasadores 2 Suelte los 4 tornillos de la consola y retire la unidad de audio 3 Retire e...

Страница 16: ...l cable hasta la consola central 2 Instale la antena del GPS e con el tornillo 3 Introduzca el clip para los cables seg n se muestra en la figura Antena del GPS e Cable AUX si est equipado Tornillo 5...

Отзывы: