background image

Installation and connection

5.2

Installing with foundation

NOTE

Material damage due to distortion of base plate.

Position the base plate as follows on the foundation and
attach.

5.2.1

Place pump unit on the foundation

Aids, tools, materials:

Anchor bolts (

installation drawing)

Steel shims

Mortar casting compound, no shrinkage

Spirit level

1. Lifting the pump unit

(

4.1 Transport, Page 12).

2. Hook anchor bolts in the mounting holes on the base plate

from below.

Observe manufacturers information when using the fixing
material.

3. Position the pump unit on the foundation. When doing so

lower the anchor bolts into the prepared anchoring holes.

3

2

1

2

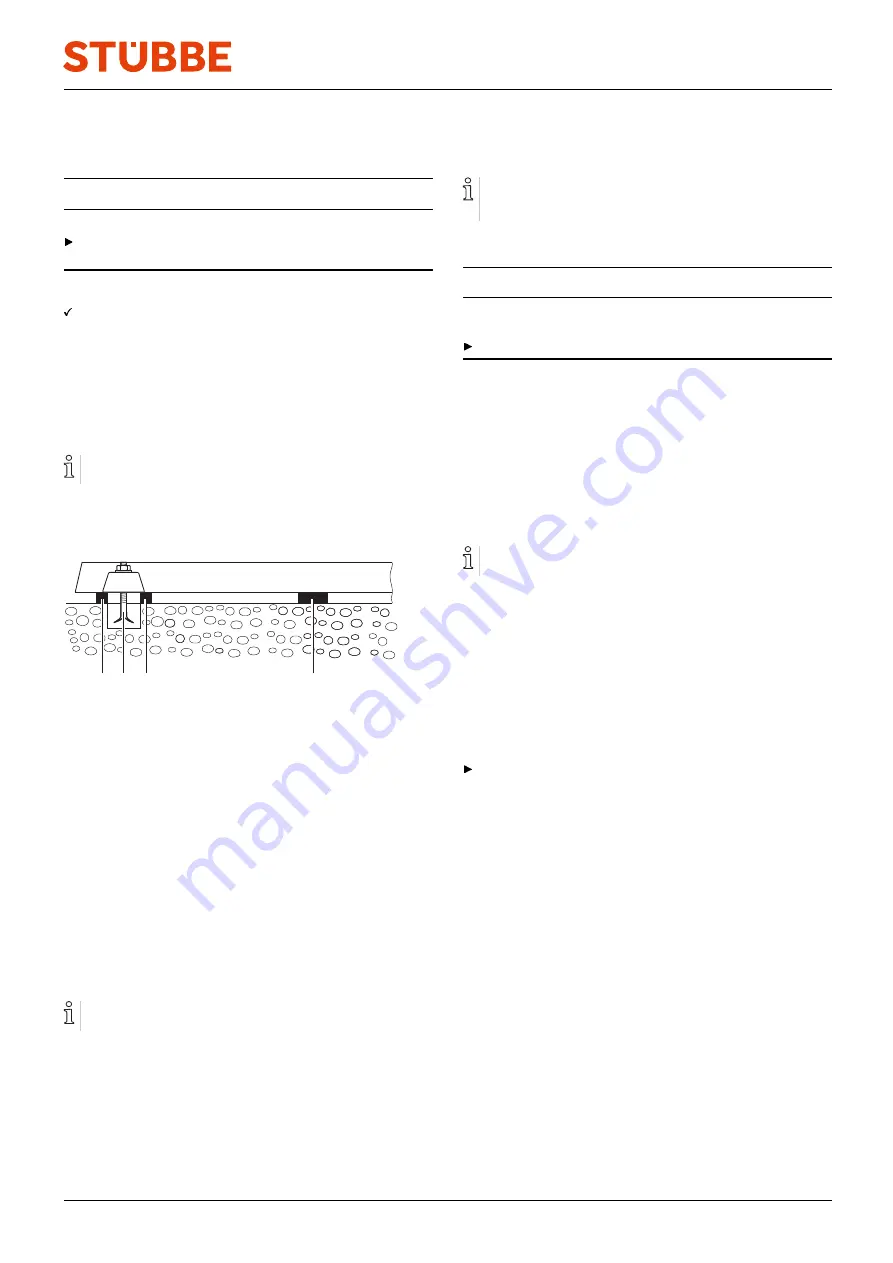
Fig. 5

Installation with foundation

4. Align the pump for height and system dimensions using

steel shims as follows:

Arrange steel shims (2) to the left and right of each
anchor bolt (1).

If the distance between the anchoring holes is
> 750 mm, then arrange additional steel shims (3) on
each side of the base plate in the center.

5. Ensure that the base plate lies flat against steel shims.
6. Check the permissible height deviation (1mm/m) using a

mechanical spirit level in a longitudinal and a transverse
direction

7. Repeat the procedure until the base plate is correctly

aligned.

5.2.2

Attaching pump unit

Filling the base plate with mortar casting compound
improves dampening properties.

1. Fill the anchoring holes with mortar casting compound.
2. When the mortar casting compound has set, bolt the base

plate at three points to the specified tightening torque.

3. Before tightening the remaining bolts, arrange shims next

to every bolt to even out any irregularities in the mounting
surface.

5.3

Planning pipelines

Water hammer may damage the pump or the system. Plan
the pipes and fittings as far as possible to prevent water
hammer occurring.

5.3.1

Specifying supports and flange connections

NOTE

Material damage due to excessive forces and torques on
the pump.

Ensure pipe connection without stress.

1. Plan pipes safely:

No pulling or thrusting forces

No bending moments

Adjust for changes in length due to temperature
changes (compensators, expansion shanks)

2. Support pipes in front of the pump.
3. Ensure the pipe supports have permanent low-friction

properties and do not seize up due to corrosion.

5.3.2

Specifying nominal widths

Keep the flow resistance in the pipes as low as possible.

1. Ensure nominal suction pipe width is not smaller than the

nominal suction flange width.

Recommended flow velocity < 1 m/s

Maximum flow velocity = 9 m/s

2. Ensure the nominal pressure line width is not smaller than

the nominal discharge flange width.

Recommended flow velocity < 3 m/s

Maximum flow velocity = 12 m/s

5.3.3

Designing pipelines

Plan pipes safely:

No pulling or thrusting forces

No bending moments

Adjust for changes in length due to temperature
changes (compensators, expansion shanks)

300 092

BA-2018.08.21 EN

SHM

15

Содержание SHM 20-15

Страница 1: ...ion BA 2018 08 21 EN Print No 300 092 TR MA DE Rev004 ST BBE GmbH Co KG Hollwieser Stra e 5 32602 Vlotho Germany Phone 49 0 5733 799 0 Fax 49 0 5733 799 5000 E mail contact stuebbe com Internet www st...

Страница 2: ...s 17 5 4 1 Keeping the piping clean 17 5 4 2 Installing suction pipe 17 5 4 3 Installing the pressure pipe 17 5 4 4 Inspection for stress free pipe connections 17 5 5 Electrical connection 17 5 5 1 Co...

Страница 3: ...3 Measures to be taken if the pump is shut down 19 Tab 4 Measures depending on the behavior of the pumped liquid 19 Tab 5 Fault number assignment 26 Tab 6 Troubleshooting list 28 Tab 7 Designation of...

Страница 4: ...ollow this manual and the other applicable documents especially all safety instructions and warnings 1 2 Other applicable documents Document purpose Where found ATEX additional manual 300 365 Addition...

Страница 5: ...azardous situation Minor injury Potentially hazardous situation Material damage Safety warning sign Take note of all information highlighted by the safety warning sign and follow the instructions to a...

Страница 6: ...flow and speed data sheet The power consumption of the pump increases as the spe cific gravity of the pumped fluid increases Adhere to the permissible specific gravity in order to eliminate the pos si...

Страница 7: ...cold and moving parts pump safety guarding provided by the customer For pumps without capability to run dry Dry run pro tection For potential electrostatic charging provide suitable grounding Warranty...

Страница 8: ...itional manual Additional instructions for use in explosive atmospheres www stuebbe com pdf_manuals 300365 pdf 2 3 3 Magnetic field The magnetic field of the magnetic coupling can destroy prod ucts th...

Страница 9: ...7 Fig 1 Name plate example 1 Pump type 2 Serial number 3 Ident number 4 Housing sealing material 5 Shaft seal information 6 Impeller diameter mm 7 Differential head 8 Flow 3 1 2 ATEX type plate Typ Se...

Страница 10: ...Layout and Function 3 2 Description Non self priming horizontal centrifugal pump Magnetically coupled and hermetically sealed 10 SHM BA 2018 08 21 EN 300 092...

Страница 11: ...n flange 2 Pressure flange 3 Magnetic coupling 4 Terminal box 5 Motor 6 Base frame 7 Volute casing 3 4 Shaft seals Only one of the following shaft seals is used 3 4 1 Magnetic coupling Magnetic coupli...

Страница 12: ...cking and inspection on delivery 1 Unpack the pump pump assembly upon delivery and inspect it for transport damage 2 Check completeness and accuracy of delivery 3 Ensure that the information on the na...

Страница 13: ...pump properly 1 Seal all openings with blind flanges blind plugs or plastic covers 2 Make sure the storage room meets the following condi tions Dry Frost free Vibration free UV protected 3 Rotate the...

Страница 14: ...ns 9 2 1 Ambient conditions Page 32 5 1 2 Preparing the installation site Ensure the installation site meets the following conditions Pump is freely accessible from all sides Sufficient space for the...

Страница 15: ...1 Fill the anchoring holes with mortar casting compound 2 When the mortar casting compound has set bolt the base plate at three points to the specified tightening torque 3 Before tightening the remai...

Страница 16: ...y and control devices recommended Avoid contamination 1 Install filters in the suction pipe 2 Install a differential pressure gauge with contact manome ter to monitor contamination Avoid reverse runni...

Страница 17: ...cooled down 1 Disconnect the pipe connecting flanges from the pump 2 Check whether the pipes can be moved freely in all direc tions within the expected range of expansion Nominal width 150 mm by hand...

Страница 18: ...on Page 17 6 2 Commissioning 6 2 1 Switching on Pump set up and connected properly Motor set up and connected properly Align motor precisely to the pump All connections stress free and sealed All safe...

Страница 19: ...back on again WARNING Risk of injury and poisoning due to hazardous pumped liquids Use protective equipment for any work on the pump Collect leaking liquid safely and damage fitting in accor dance wi...

Страница 20: ...stomer seals O rings shaft sealing rings 6 5 Operating the stand by pump Stand by pump filled and bled Operate the stand by pump at least once a week 1 Fully open the suction side fitting 2 Open press...

Страница 21: ...itions reduce the service life of antifriction bearings Plain bearings are subject to natural wear and tear which is heavily dependent on the respective operating condi tions It is therefore not possi...

Страница 22: ...keep a safe distance of 1 m Make sure that no magnetizable metal parts can be attracted by the pump s magnetic coupling Make sure that parts of the magnetic coupling cannot be attracted by the magneti...

Страница 23: ...ce Pressure gauge lines pressure gauge and fixtures dis mounted WARNING Risk of injury during disassembly work on the magnetic coupling Use jacking screws to disassemble the bearing bracket in order t...

Страница 24: ...e casing 102 1 11 Remove the impeller 230 1 from the shaft 210 1 12 Remove thrust bearing 314 3 from the volute casing 13 Remove thrust bearing 314 4 from the impeller 14 Remove thrust bearing 314 5 f...

Страница 25: ...motor coupling mechanical seal blocking pressure sys tem cardan shaft drives belt drive etc WARNING Risk of injury during assembly work on the magnetic cou pling Use jacking screws to assemble the be...

Страница 26: ...ossible faults are identified by a fault number in the table below This number identifies the respective cause and rem edy in the troubleshooting list Fault Number Pump not pumping 1 Pumping rate insu...

Страница 27: ...e pipe Install a larger impeller and consult the manufacturer X X X Pressure side fitting not opened wide enough Open the pressure side fitting X X X Magnetic coupling has parted Switch off pump and s...

Страница 28: ...impeller X X X Hydraulic parts of the pump dirty clotted or encrusted Dismount the pump Clean the parts X X Plain bearing faulty Replace plain bearing X Defective antifriction bearing in motor Replac...

Страница 29: ...ring 412 5 Sealing ring 505 1 Reinforcement ring 545 1 Bearing bush 554 1 Washer 554 2 Washer 554 3 Washer 580 1 Protection cap 580 2 Protection cap 580 3 Protection cap 801 1 Motor 817 1 Rear cover 8...

Страница 30: ...ix 9 1 2 Drawing SHM 20 15 855 1 904 1 314 5 545 1 412 5 210 1 545 1 230 1 314 3 102 1 817 1 554 2 901 2 934 1 554 1 901 1 580 1 801 1 341 1 Fig 7 Replacement parts SHM 20 15 30 SHM BA 2018 08 21 EN 3...

Страница 31: ...314 5 412 5 210 1 545 1 230 1 314 3 102 1 901 1 554 1 934 1 723 4 314 4 505 1 891 1 801 1 904 1 412 2 723 3 723 1 412 1 341 1 901 3 934 3 554 3 901 2 554 2 723 2 580 3 580 1 580 2 Fig 8 Replacement pa...

Страница 32: ...ling ring up to max 10 bar Profile sealing ring up to max 16 bar O ring max 16 bar 16 10 5 5 5 20 15 10 10 10 25 20 12 12 12 32 25 15 12 12 40 32 20 15 15 50 40 25 15 15 63 50 30 20 20 75 65 35 20 20...

Страница 33: ...70 73 70 73 Tab 14 Maximum sound pressure level sizes SHM50 40S SHM50 40L and SHM65 50 Measuring conditions Distance to the pump 1 m Operation free of cavitation Motor IEC standard motor Tolerance 3...

Страница 34: ...k discharge pressure Operating temperatures Weekly Check motor temperature Undoable screwed connections quarterly Check for correct and tight fitting Impeller Plain bearing Bearing bushes O rings As r...

Страница 35: ...s ET ETL ETLB ETLB S ETLB T ETLB ST to which this declaration relates are in conformity with the following standards Machinery Directive 2006 42 EC EMC Directive 2014 30 EU With regard to electrical h...

Отзывы: