background image

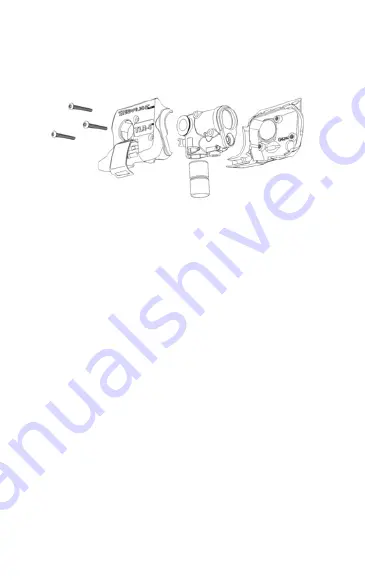
Mounting Screws

Battery Door

1/3N Batteries Only
(Non-Wrapped)

LED/Laser Module

TLR-6

®

 Mounting/Removal

MAKE SURE THAT THE FIREARM IS UNLOADED AND THE BREECH IS OPEN.  

IT IS IMPERATIVE THAT SAFETY MEASURES BE EMPLOYED AT ALL TIMES  

WHILE HANDLING THE FIREARM.

The TLR-6

®

 is designed to be attached to the trigger guard of the firearm.

1. Open battery door and remove any batteries (do not close door). 

2.  Use the hex wrench (included) to loosen and remove the 3 mounting/assembly screws. 

3. Separate the two halves of the housing and retain the laser/LED module. 

4.  Place the side of the housing (that has no battery door attached) on a flat work surface. 

5.  Place the laser/LED module into the molded surface and direct the LED  

and laser compartments to their respective openings. 

6.  Align the (unloaded firearm) trigger guard with the matching groove in the  

TLR-6

®

 housing and place both onto the flat work surface. 

7.  Place the mating side of the TLR-6

®

 over the trigger guard and onto the other  

half of the TLR-6

®

 (maintain alignment while joining the two halves together). 

8.  Securely fasten the two TLR-6

®

 halves together with the 3 mounting screws. 

Note: Do not over tighten screws. 

9.  Reinstall batteries (maintain proper polarity/orientation) and secure the battery door.

Battery Installation/Removal

MAKE SURE THAT THE FIREARM IS UNLOADED AND THE BREECH IS OPEN.  

IT IS IMPERATIVE THAT SAFETY MEASURES BE EMPLOYED AT ALL TIMES  

WHILE HANDLING THE FIREARM.

At the end of battery life, the switch may appear intermittent or non-functional.  

Replacing the batteries will restore normal operation. 

•  Unclip and swing battery door open.

• Remove both depleted batteries from the flashlight body. 

•  Insert fresh 1/3N batteries into the body of the TLR-6

®

Note: Batteries cannot have plastic wrapping. 

• Swing battery door shut and snap to lock.

Содержание TLR-6

Страница 1: ...Operating Instructions Instrucciones de funcionamiento Instructions d utilisation Bedienungsanleitung TLR 6 ...

Страница 2: ......

Страница 3: ...ng you are not willing to destroy Streamlight recommends that the TLR 6 should only be activated with the non trigger hand while employing a two hand grip on the firearm and with the trigger finger outside the trigger guard when possible Failure to do so could result in an accidental discharge and serious injury damage to property or death Thoroughly practice employing safe training conditions wit...

Страница 4: ...ger guard with the matching groove in the TLR 6 housing and place both onto the flat work surface 7 Place the mating side of the TLR 6 over the trigger guard and onto the other half of the TLR 6 maintain alignment while joining the two halves together 8 Securely fasten the two TLR 6 halves together with the 3 mounting screws Note Do not over tighten screws 9 Reinstall batteries maintain proper pol...

Страница 5: ...e user must decide how high above or below the sight line the bullet can be allowed to strike and adjust the sight accordingly At distances less than the zero range the bullet will be above the sight line Beyond the zero range the bullet will be below the sight line There are two adjustment screws mounted in brass bushings located on the laser cartridge housing The windage adjustment is located on...

Страница 6: ...it to be defective This limited lifetime warranty also excludes rechargeable batteries chargers switches and electronics which have a 2 year warranty with proof of purchase THIS IS THE ONLY WARRANTY EXPRESSED OR IMPLIED INCLUDING ANY WARRANTY OF MERCHANTABILITY OR FITNESS FOR A PARTICULAR PURPOSE INCIDENTAL CONSEQUENTIAL OR SPECIAL DAMAGES ARE EXPRESSLY DISCLAIMED EXCEPT WHERE SUCH LIMITATION IS P...

Страница 7: ...a No apunte nunca un arma de fuego a algo que no esté dispuesto a destruir Streamlight recomienda que la TLR 6 sólo se active con la mano que no se utiliza para disparar mientras utiliza un agarre de dos manos en el arma de fuego con el dedo índice fuera del protector del gatillo cuando sea posible De lo contrario podría producirse la descarga accidental y graves lesiones daño a la propiedad o la ...

Страница 8: ...abajo plana 7 Coloque el lado correspondiente de la TLR 6 sobre el protector de gatillo y sobre la otra mitad de la TLR 6 mantenga la alineación al unir las dos mitades 8 Una de forma segura las dos mitades de la TLR 6 junto con los 3 tornillos de montaje Nota No apriete excesivamente los tornillos 9 Vuelva a colocar las pilas mantenga la polaridad orientación correcta y asegure la puerta de las p...

Страница 9: ...a bala determinan dónde se produce este punto El usuario tiene que decidir a qué distancia por encima o por debajo de la línea de visión puede permitirse que la bala impacte y ajustar la visión en consecuencia A distancias inferiores al rango cero la bala estará por encima de la línea de visión Más allá del rango cero la bala estará por debajo de la línea de visión Hay dos tornillos de ajuste inst...

Страница 10: ...al Repararemos sustituiremos o reembolsaremos el precio de compra de este producto si determináramos que está defectuoso Esta garantía limitada de por vida también excluye las pilas recargables los cargadores botones y sistemas electrónicos que tengan una garantía de 2 años con prueba de compra ESTA ES LA ÚNICA GARANTÍA EXPRESA O IMPLÍCITA INCLUIDA CUALQUIER GARANTÍA DE COMERCIABILIDAD E IDONEIDAD...

Страница 11: ... vers quelque chose qu on ne souhaite pas détruire Streamlight conseille d activer la TLR 6 uniquement avec la main qui n actionne pas la détente tout en tenant l arme à deux mains et avec le doigt de détente hors du pontet autant que possible Toute autre pratique peut résulter en une décharge accidentelle et des blessures graves des dégâts matériels ou la mort S entraîner assidûment dans des cond...

Страница 12: ... de la TLR 6 et placer les deux sur la surface de travail plane 7 Placer le côté correspondant de la TLR 6 sur le pontet et sur l autre moitié de la TLR 6 maintenir l alignement lors de la jonction des deux moitiés 8 Fixer l une à l autre les deux moitiés de la TLR 6 avec les 3 vis de montage Remarque Ne pas trop serrer les vis 9 Réinstaller les piles maintenir la polarité l orientation correcte e...

Страница 13: ...a ligne de visée la balle peut frapper puis ajuster le viseur en conséquence En deçà de la distance de zérotage la balle est au dessus de la ligne de visée Au delà de la distance de zérotage la balle est en dessous de la ligne de visée Le logement de cartouche laser comprend deux vis de réglage montées dans des douilles en laiton Le réglage de la dérive se trouve sur le côté gauche de la cartouche...

Страница 14: ...ée à vie exclut également les batteries rechargeables les chargeurs les commutateurs et l électronique qui sont couverts par une garantie de 2 ans sur présentation d un justificatif d achat IL N EST OFFERT AUCUNE AUTRE GARANTIE NI EXPRESSE NI IMPLICITE NOTAMMENT DE QUALITÉ MARCHANDE OU D ADAPTATION À UN EMPLOI PARTICULIER NOUS DÉCLINONS EXPRESSÉMENT TOUS DOMMAGES INDIRECTS CONSÉCUTIFS OU SPÉCIAUX ...

Страница 15: ...e montierbares Lichtsystem montieren Zielen Sie mit einer Feuerwaffe niemals auf etwas das Sie nicht zerstören möchten Streamlight empfiehlt dass das TLR 6 mit der Hand eingeschaltet wird die sich nicht am Abzug befindet Dabei sollte ein Zweihandgriff an der Waffe verwendet werden und der Abzugsfinger sollte sich wenn möglich außerhalb der Abzugsabdeckung befinden Nichtbeachtung kann zur versehent...

Страница 16: ...iligen Öffnungen richten 6 Die Abzugabdeckung der nicht geladenen Waffe auf die entsprechende Nut am Gehäuse des TLR 6 ausrichten und beides auf die flache Arbeitsfläche legen 7 Die Kontaktseite des TLR 6 über die Abzugabdeckung und auf die andere Hälfte des TLR 6 platzieren die Ausrichtung beim Zusammenfügen der zwei Hälften aufrecht erhalten 8 Die zwei Hälften des TLR 6 mit den 3 Befestigungssch...

Страница 17: ...s um die Batterie zu schonen Nullstellung des Laservisier beim TLR 6 Bei einem Laser der unterhalb oder neben der Mündung montiert ist gibt es nur eine Entfernung bei der der Projektilpfad mit der Laservisierlinie zusammenfällt Dieser Punkt ist die Nullentfernung Die Einstellung des Lasers und die Mündungsgeschwindigkeit des Projektils bestimmen wo dieser Punkt liegt Der Benutzer muss entscheiden ...

Страница 18: ...die Befestigungsschrauben festgezogen sind Streamlight Dieser Lebenslangen Begrenzten Garantie Streamlight garantiert dass dieses Produkt während eines gesamten Verwendungslebens frei von Mängeln ist Ausgenommen sind Batterien und Glühbirnen Missbrauch und normaler Verschleiß Wir werden dieses Produkt reparieren ersetzen oder den Kaufpreis zurückerstatten wenn wir feststellen sollten dass es mange...

Страница 19: ......

Страница 20: ......

Страница 21: ......

Страница 22: ...www streamlight com 30 Eagleville Road Eagleville PA 19403 Phone 800 523 7488 997705 Rev D 1 16 ...

Отзывы: