background image

Installing the Motherboard

Carefully lower the motherboard into the case, with the I/O port   side 
leading so that the ports can fit into the I/O shield.

When  the  motherboard  is  correctly  in  position,  secure  it  to  the  case 
stand-offs using the screws provided. Ensure that all the holes correctly 
align with the stand-offs before fully tightening the screws. Also ensure that 
you have installed the correct stand-off locations.

The CPU and RAM can no w be installed on the motherboard.

6

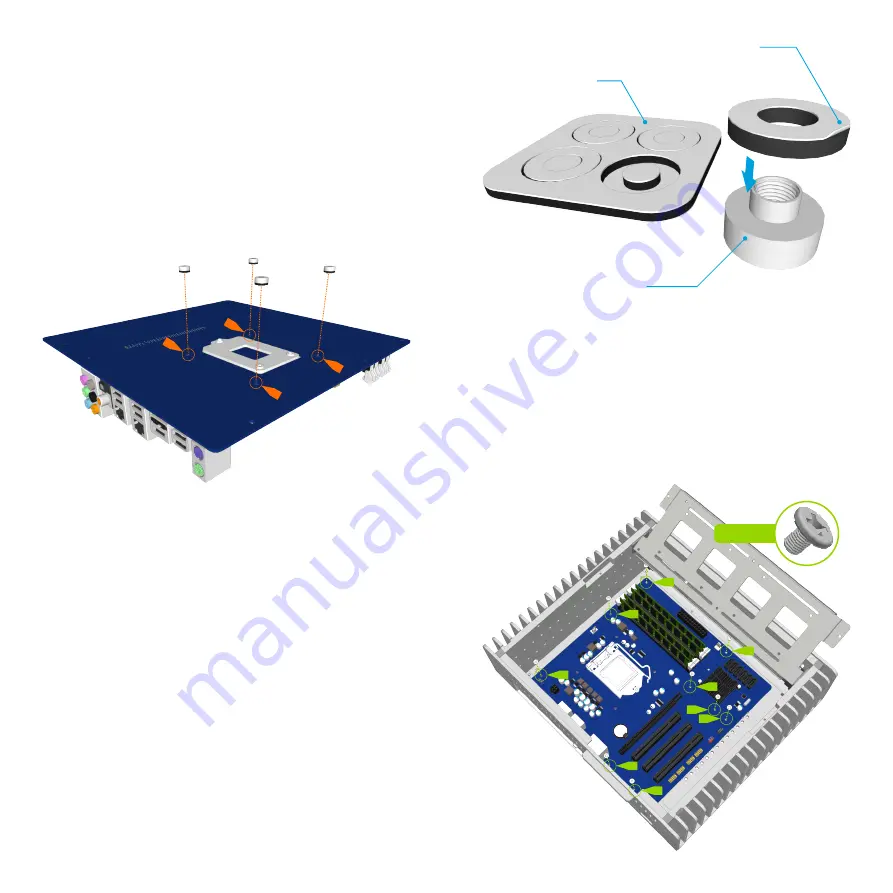
Fit the CPU Cooler Mounting Nuts

The 4 CPU cooler mounting nuts supplied with your case must be fitted 
to the motherboard prior to installing it inside the case as they will be 
required later on in the assembly to secure the CPU cooler assembly. The 
nuts are held in place by adhesive pads which are supplied in a pack of 4 
(there is a spare pack should you wish to change your motherboard in 
future). Affix the adhesive pads to the CPU nuts in preparation for fixing 
them to the motherboard.

With  the  motherboard  turned  upside  down,  located  the  CPU  cooler 
mounting holes. The hole position will vary depending on the brand and 
model of CPU. Peel the protective film from the adhesive pads and stick 
the nuts to the underside of the motherboard ensuring they correctly align 
with the holes. The slightly raised rim of the nut should fit through the 
motherboard CPU mounting holes.

CPU Cooler Mounting Nut

Adhesive Pads

Peel Protective Film

TC-M3x4

Содержание FC9A

Страница 1: ......

Страница 2: ...nd refinement From everyone at Streacom we hope that you enjoy using our product COPYRIGHT NOTICE Copyright 2014 Streacom All Rights Reserved No part of this publication may be reproduced stored in a retrieval system or transmitted in any form or in any means by electronic mechanical photocopying recording or otherwise without prior written permission All trademarks and registered trademarks in th...

Страница 3: ...65W Recommended 87 Max 2 x USB 3 0 Left Right Side Optional USB2 0 Conversion Cable 3 x Low Profile Expansion Cards Max Length 156mm 348 290 110mm W D H Including Feet NanoPSU External AC Adapter Internal DC to DC or ZeroFlex240 Fanless Internal PSU IRRC or FLIRC IR Solutions 4 4KG Excluding Heatpipe Assembly FC9 Optical Version Only Not Supplied With Case 3 Top Panel Heatsink Side Panel Optical D...

Страница 4: ...e drive tray has a swivel design that rotates upwards and towards the front of the case It is locked in place by 2 screws I either side of the tray Remove these 2 screws and rotate the tray until it makes contact with the front of the case This will allow you full clearance inside the case so that you can easily install the components If you have the Optical version of the FC9 you should also remo...

Страница 5: ... will also determine the choice of other internal components such as additional 3 5 hard drives and optional internal PSU Check your motherboard hole locations and fit the appropriate stand offs in the corresponding position on the bottom panel The stand offs can be hand tightened in place mITX mATX Installing the I O Shield Locate the I O shield supplied with your motherboard and firmly push it i...

Страница 6: ...to installing it inside the case as they will be required later on in the assembly to secure the CPU cooler assembly The nuts are held in place by adhesive pads which are supplied in a pack of 4 there is a spare pack should you wish to change your motherboard in future Affix the adhesive pads to the CPU nuts in preparation for fixing them to the motherboard With the motherboard turned upside down ...

Страница 7: ...L the surfaces indicated below We recommend first trying the assembly without applying thermal paste This will allow you to test and adjust the alignment without making a mess with thermal paste Once you have a good approximation of the alignment apply thermal paste initially between the lower CPU mount and heatpipes then lock the heatpipes between the upper and lower CPU mounts using the 4 HEX sc...

Страница 8: ...nector blocks which are screwed from the outside of the case between the fins If any fine adjustment is required you can loosen the 4 HEX screws on the CPU mount which will allow the heatpipes to slide Once you are satisfied with the alignment of the full assembly you can fully tighten all the screws The spring loaded screws should not be over tightened and only require 4 5 turns from the point th...

Страница 9: ...uides supplied with those accessories Connect the front USB ports and the power button light PCB to the motherboard see diagram on next page for wiring details The case is fitted with USB3 0 ports which require an internal USB3 0 connector on the motherboard If your motherboard does not have an internal USB3 0 header it is still possible to connect to the older USB2 0 header with a converter cable...

Страница 10: ...r LED ensure correct polarity otherwise the light will not function If your motherboard does not have an internal USB3 0 header it is still possible to connect to the USB2 0 header using a converter cable sold separately Using this converter will make the front USB ports 2 0 compatible USB 3 0 Connector HDD HDD RESET RESET NC LED LED PSW PSW NC 5V DA DA GND N C USB2 0 USB 3 0 USB 3 0 Optional Acce...

Страница 11: ...the screws provided Installing PCI Card Optional The FC9 supports 3 low profile expansion cards with a maximum length of 155mm without removing the drive tray To install a card first remove the pre installed PCI blanking plates by unscrewing it from the PCI mount then remove the PCI mount from the back of the case It is secured in place by 2 screws either side accessible from the inside of the cas...

Страница 12: ...es eject button or to the opposite side of the eject button or both sides whichever gives the best result Slimline Slot Loading Optical Drive Optical Drive Mounting Bracket Optional Rubber Pad Locations Bottom Panel Drive Options If you are using a Mini ITX motherboard there is also room to fit hard drives to the bottom panel of the case Drives are secured in place through the pre drilled holes in...

Страница 13: ...g the tray and with different orientations The drive is secured to the tray from the side using thumbscrews which fit through the slots and into the side mounting holes of the drives The 3 5 drive should only be fitted after all other drives are mounted to the tray If you prefer to use the lower side of the tray for 2 5 drives they are secured to the drive tray using 4 screws per drive as shown be...

Страница 14: ...he drive to be fitted anywhere along the tray The drives are secured to the tray from below using 4 screws per drive If you have the OPTICAL version of the FC9 secure the optical drive to the drive tray with the 4 screws as shown but DO NOT fully tighten the screws Only after you have closed the drive tray back into the case should these screws be tightened as you will need to adjust the position ...

Страница 15: ...sing the eject button Once the correct position has been found tighten the 4 screws to secure the optical drive in place CS M3 x 6 Replace the Top Panel With all the components installed the top panel can now be replaced Prior to doing this ensure that all cables are connected and all components are securely fitted Secure the top panel it in place using 4 screws 2 from either side of the case betw...

Страница 16: ...Designed in Europe Made in China Copyright 2014 Streacom All Rights Reserved ...

Отзывы: