


8
2.
MACHINE DAMAGE – Strong acids will attack
metal and rubber causing premature wear of
parts. The use of a delimer needs to be closely
monitored to avoid damage to machine surfaces
and parts.
With proper daily use of STERA-SHEEN or its equivalent,
there is no need for the use of a DELIMER.
DO NOT USE BLEACH
·
BLEACH HAS ABSOLUTELY NO CLEANING
PROPERTIES.
·
BLEACH IS CORROSIVE. It will damage
components of the machine causing premature
wear and metal corrosion.
GENERAL PURPOSE CLEANERS
General purpose cleaners do not have the ability to re-
move milkstone. Milkstone will become a problem if not
remedied with additional products and procedures.
THE USE OF CHLORINE TEST STRIPS
“Test strips” are used to determine concentrations of
active chlorine in sanitizing solutions. To use the strips,
tear off a small portion and submerge it into the sanitizing
solution. Then, compare the color change to the color key
on the side of the test strip dispenser to determine the
approximate chlorine concentration.
The ideal concentration of chlorine needs to be 100 ppm
(as stated by the FDA).
NOTE
Follow the directions on the container for proper con-
centration.
Two main factors contribute to falling chlorine concentra-
tions in a sanitizing solution.
1.
PRODUCT USE – As the chlorine in the solution
is being used, chlorine concentrations fall.
2.
TIME – As time passes, small amounts of chlorine
“evaporate” from the solution. (That is why you
can smell it.)
Sanitizing solutions should not be allowed to fall below 100
ppm chlorine. New solutions should be mixed once old
solutions become ineffective.
3.4 DISASSEMBLY OF MACHINE PARTS
Before using the machine for the first time, complete
machine disassembly, cleaning and sanitizing procedures
need to be followed. Routine cleaning intervals and proce-
dures must comply with the local and state health codes.
Inspection for worn or broken parts should be made at every
disassembly of the machine. All worn or broken parts
should be replaced to ensure safety to both the operator and
the customer and to maintain good machine performance
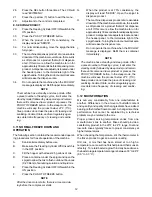
and a quality product. Check the wear line on the auger
flights on a regular basis (Fig. 3-3) and replace as needed.
Frequency of cleaning must comply with the local health
regulations.
To disassemble the machine, refer to the following steps:
A. DISASSEMBLY OF FRONT DOOR
1.
Turn the Main Freezer Power Off/On switch to the
OFF position.
2.
Remove the knobs on the front door.
3.
Remove the front door by pulling it off the studs.
4.
Remove the spigot through the bottom of the front
door.
5.
Remove all o-rings from parts by first wiping off
the lubrication using a clean towel. Then squeeze
the o-ring upward to form a loop (Fig. 3-4). Roll the
o-ring out of the groove.
Wear Line
Figure 3-3 Auger Flight Wear
Figure 3-4 Removing O-Ring
CAUTION
Do not use any type of sharp object to remove the
o-rings.
WARNING
High voltage will shock, burn or cause death. The
OFF-ON switch must be placed in the OFF position
prior to disassembling for cleaning or servicing. Do
not operate machine with panels removed.
Содержание E131-YG2
Страница 1: ...Model E131 YG2 F131 YG2 OPERATORS MANUAL Manual No 513649 Rev 1 ...
Страница 2: ......
Страница 10: ...4 ...
Страница 20: ...14 Figure 4 2 IntelliTec Control Menu Settings ...
Страница 28: ...22 ...
Страница 30: ...24 6 2 AUGER SHAFT AND FACEPLATE PARTS ...
Страница 32: ......


