background image

Build Instructions                                                                                                             

Fly Baby Bipe UM Build Instructions.  © 2012 Stevens AeroModel all rights reserved.

!

Page 13

Step 17

F16

F17

F18

F19

Step 18

Step 19

Step 20

Step 21

Step 22

Step 23

Step 23 Cont.

F20

F21

F22

Bottom View

F2

F2

F15

F14

F15

F14

F16

F15

F14

F18

F19

TEST YOUR MOTOR 

BEFORE INSTALLATION

Содержание Fly Baby Bipe

Страница 1: ...ess homebuilt Wing Span 14 5 inches Wing Area 62 inches2 Average Flying Weight 1 5 ounces Version 1 0 revised 03 14 2014 Build Instructions Fly Baby Bipe UM Build Instructions 2012 Stevens AeroModel all rights reserved Page 1 UM ...

Страница 2: ...kit immediately in new and unused condition to the place of purchase THIS PRODUCT IS NOT INTENDED FOR CHILDREN 12 YEARS OF AGE OR YOUNGER WARNING This product may contain chemicals known to the state of California to cause cancer and or birth defects or other reproductive harm PRODUCT SUPPORT This product has been engineered to function properly and perform as advertised with the suggested power s...

Страница 3: ... Acetate Windscreen Taped to back of wood brick 1 0 032 in x 12 in wire Landing Gear 2 0 015 in x 12 in wire Pushrods Hardware Bag 1 1 1 2 in length of Heat Shrink Tube 1 Nylon Receiver Clip 1 Pair Wheels SIGSH540 Build Instructions Fly Baby Bipe UM Build Instructions 2012 Stevens AeroModel all rights reserved Page 3 ...

Страница 4: ...dhesive trim Wood Sealant Suggestions While not required it is suggested that a high quality lacquer based clear sealant be applied SPARINGLY to seal and protect the wood grain in humid environments One single light misting of this sealant will be sufficient to repel water without adding significantly to the models final flying weight Likewise much of this model can be colored using a compatible l...

Страница 5: ...Sheet Wood Inventory 1 of 1 Build Instructions Fly Baby Bipe UM Build Instructions 2012 Stevens AeroModel all rights reserved Page 5 ...

Страница 6: ...Builders Notes Build Instructions Fly Baby Bipe UM Build Instructions 2012 Stevens AeroModel all rights reserved Page 6 ...

Страница 7: ...product tabs notches and otherwise interlocks like a 3D puzzle we suggest that when fitting parts you dry fit use no glue the parts together first It s advised to work 1 2 steps ahead in the instructions using this dry fit technique which allows ample opportunity to inspect the fit and location of assembled components and realizes a benefit as each successive part contributes to pulling the entire...

Страница 8: ...ur interlocking design to do it s job as each successive part installed within the fuselage will help pull the entire structure square and true Build the Central Crutch 1 Fit two 1 32 in ply parts F0 to the nylon Receiver Clip to form the Receiver Tray 2 Fit receiver tray assembly to the bottom of F1 orienting it so that the long arm of the nylon clip is toward the rear of F1 refer to plans for pr...

Страница 9: ...tevens AeroModel all rights reserved Page 9 Step 1 F0 F0 F2 F1 Step 2 Step 3 Step 4 Step 5 Step 6 Step 7 Step 8 F1 F1 F3 F4 F5 F5 F6 F7 Nylon Clip Front Bottom Bottom View Bottom B o t t o m Front Rear B o t t o m Bottom F1 F3 F2 F2 F1 F4 F5 F6 F2 F2 F1 F1 F4 F4 ...

Страница 10: ...ther at aft most end of fuselage Use a low tack painters masking tape to retain the fuselage sides at the tail of the aircraft then bond F9 to the fuselage sides 12 Fit the stabilizer mount F10 to the top rear of the fuselage sides as illustrated Ensure F10 is properly seated within the fuselage sides and bond to retain 13 Fit and bond former F11 to the notches in the fuselage sides immediately ah...

Страница 11: ...012 Stevens AeroModel all rights reserved Page 11 Step 9 F1 F8 F9 Step 10 Step 11 Step 12 Step 13 Step 14 Step 15 Step 16 F9 F10 F11 F12 F13 F14 F15 Bottom View Bottom View F2 F4 F3 F3 F1 F2 BOND HERE ONLY F3 F4 F10 F1 F3 F2 Top Bottom Bottom Align and Tape ...

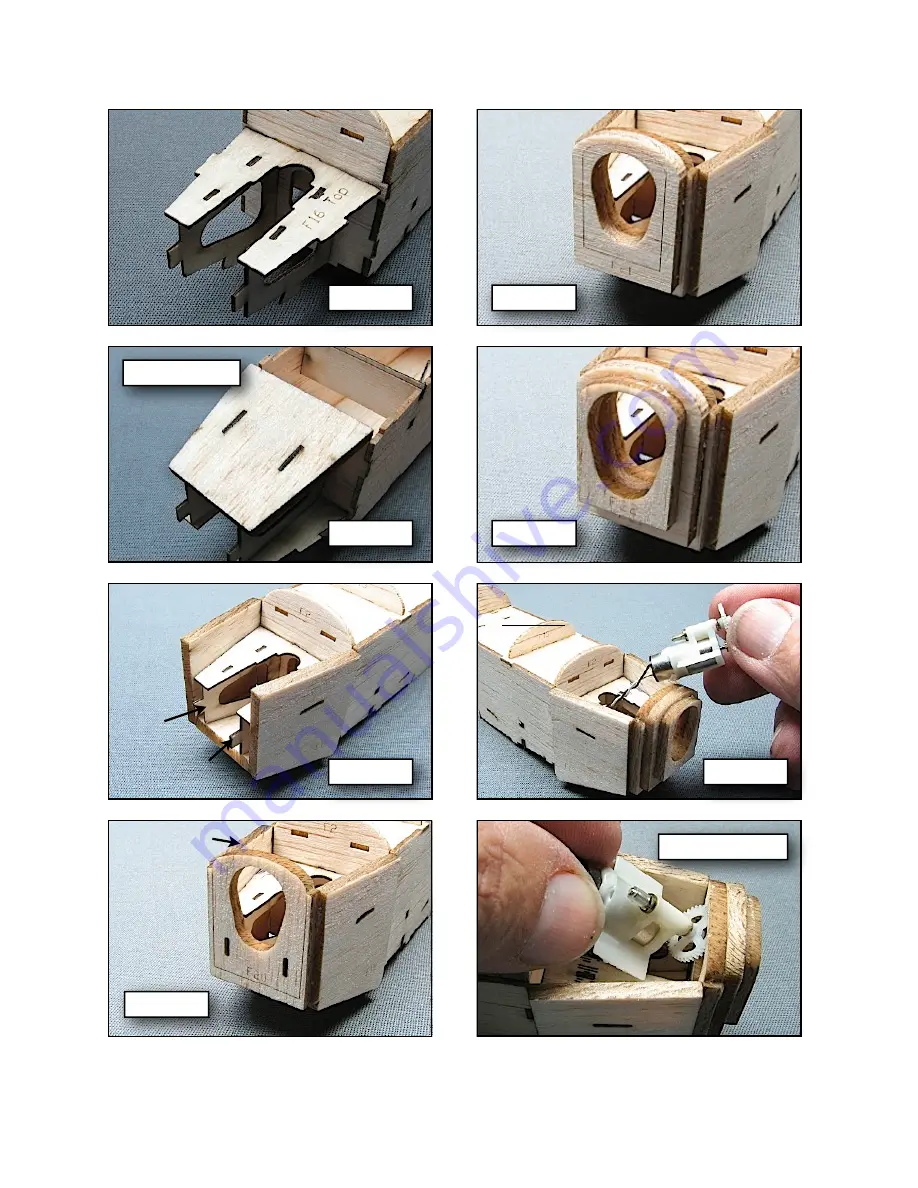
Страница 12: ...y recommended that you test your motor for function and proper fit PRIOR TO INSTALLING it within the fuselage While it is rare to come across a non functioning motor plan on it happening to you Yes Murphy is still out to get you Only proceed after verifying the proper function of your motor and gearbox assembly 23 Remove the plastic motor mounting posts from the mounting tabs of the motor gearbox ...

Страница 13: ...ructions 2012 Stevens AeroModel all rights reserved Page 13 Step 17 F 1 6 F17 F18 F19 Step 18 Step 19 Step 20 Step 21 Step 22 Step 23 Step 23 Cont F20 F21 F22 Bottom View F2 F2 F15 F14 F15 F14 F16 F15 F14 F18 F19 TEST YOUR MOTOR BEFORE INSTALLATION ...

Страница 14: ...F2 and overlapping former F13 with the edges mating flush with the fuselage sides Hold in place with masking tape until dry then bond with medium or thick CA 26 Turn the fuselage over and fit bottom sheeting F25 between former F2 and the landing gear pocket F25 should rest on the edge of the landing gear pocket F5 but don t allow the slot created by F6 at the center of the pocket to become blocked...

Страница 15: ...vens AeroModel all rights reserved Page 15 F23 Step 24 Step 25 Step 26 Step 27 Step 28 F24 F25 F26 A Bottom View Bottom View Step 23 Cont Step 24 Cont Step 25 Cont F2 F23 F24 F23 F2 F13 Moisten with Glass Cleaner Moisten with Glass Cleaner F13 F5 F6 F12 F10 F3 F11 ...

Страница 16: ...or and the rudder R Lightly block sand the elevator rudder vertical V and horizontal H stabilizers in preparation for finishing and final assembly Wings Wing parts are designated with a W followed by a numeric Parts have been numbered so that the wing assembly and required parts follows in numeric order from W1 to W13 Most of the assembly will be lightly tack glued together final bonding taking pl...

Страница 17: ... all rights reserved Page 17 Step 29 B E2 Step 30 Step 31 Step 32 Step 33 Step 34 Step 34 Cont Step 35 B C C E2 E1 W1 W2 W2 Wire Jig F12 F10 F3 F11 F12 F3 F11 F10 Sand Shape and Fill the Nose Bowl Cowl 45 deg Bevel the Leading Edge of Rudder and Elevator assembly as illustrated ...

Страница 18: ...o a common side Fit W8c to W8 and bond with thin CA Now lay W8 on the table with the etched surfaces facing up 42 Fit ribs W9 W10 W11 and W12 in their designated positions refer to plan for correct placement with the arrows on the ribs pointing toward the leading edge Tack glue the trailing edge of each rib to the wing sheeting W8 43 Turn the wing over on a flat surface and wrap the sheeting over ...

Страница 19: ... W4a W6 W9 W4b Step 37 Step 38 Step 39 Step 41 Step 42 Step 43 Step 44 W3 W7 W8a W8b W8c W10 W11 W12 Etch sides of parts W4a b faces up W5 W4 Etch sides of parts W4 faces up Top of W ing Panel Bottom View Bottom View Bottom View Bottom View Etch sides of parts W8a b faces up Bottom View W8b W8a W8 Top of W ing Panel ...

Страница 20: ...better fitting and stronger assembly 49 Temporarily fit the landing gear struts to the slots in F25 and F26 DO NOT BOND Fit the ply landing gear spreader LG3 to the notches in the bases of the struts Align struts so that they are symmetrical on either side of the fuselage and the spreader is parallel to the bottom of the fuselage as viewed from the front Bond the spreader to the struts with medium...

Страница 21: ...UM Build Instructions 2012 Stevens AeroModel all rights reserved Page 21 Step 46 IS1 LG1 Step 47 Step 48 Step 49 Step 50 Cont Step 50 Step 51 IS2 IS3 LG2 CS1 CS2 CS3 HR1 HR2 HR3 HR2 Glue Here X X X X X No Glue Bottom View Step 50 Cont ...

Страница 22: ...y the upper surfaces of the wings and open framework on top of the fuselage must be covered Do not cover the bottoms of the wings Receiver and Push Rods 57 Follow the Pushrod Detail on the plan to create two pushrods from the provided length of 0 015 in wire Each pushrod should terminate with a Snake bend in one end 58 There are three holes in former F3 for the pushrods to pass through you ll use ...

Страница 23: ...Build Instructions 2012 Stevens AeroModel all rights reserved Page 23 Step 52 Step 52 Cont Step 56 Step 57 Step 58 Step 59 Step 60 HR3 HR3 Snake Bend F3 Bottom View Rudder E l e v a t o r Right Side Exit To Rudder LEFT RIGHT Step 58 Cont ...

Страница 24: ...indscreen with canopy glue or very tiny drops of medium CA With the wind screen installed now s a good time to install the profile pilot figure within the cockpit 65 Fit and tack glue the ply lower wing spar in the slots in the bottom of the fuselage sides immediately behind the bottom sheeting F26 The bottom of the spar should parallel but not sit flush with the bottom decking of the fuselage whe...

Страница 25: ...uild Instructions 2012 Stevens AeroModel all rights reserved Page 25 Step 61 Step 62 Step 63 Step 64 Step 65 Step 66 Step 67 Step 67 Cont F27 HERE TS Fold and bond windscreen To fuselage Parallel W9 W10 W13 W 13 Bottom View Bottom View W3 ...

Страница 26: ... Lay one of the upper wing panels on the table with the bottom facing up Invert the model and lay it over the wing aligning the struts over ribs W6 Fit the dove tailed inter plane strut tops within the corresponding dove tailed slots in ribs W6 Now fit the root of the wing panel to ribs W3 Beginning at the trailing edge and working forward lightly tack glue the upper wing to the center section Fin...

Страница 27: ...uctions Fly Baby Bipe UM Build Instructions 2012 Stevens AeroModel all rights reserved Page 27 Step 68 Step 69 Step 70 Step 71 Step 72 Step 73 Step 74 Step 75 Bottom View Bottom View No Gap Here W6 Leading Edge W2 ...

Страница 28: ...d with your kit Shrink the tube with a heat gun When cool remove the wires and save them Now you have a length of pre shrunk tubing that will be a snug fit when assembling the pushrods to the control horns eliminating the need to get in close to your model with a soldering iron to shrink the tube after the fact 81 Trim the control surface pushrods just short of the control horns on the Rudder and ...

Страница 29: ... all rights reserved Page 29 Step 76 Step 77 Step 78 Step 79 Step 80 Step 81 Step 82 Bottom View Bottom View Pre Shrink the Heat Shrink Tube Scrap 015 in Wire Bottom Left Bottom Right Right Apply Clear Tape Apply Clear Tape Square Heat Shrink Heat Shrink Hook Loop Tape Complete ...

Страница 30: ...consider using when developing your own pre flight check list Get in the habit of always pre flighting your models before each and every flight Weight and Balance Check the Fly Baby Bipe UM balance The model should balance on the mark etched on the bottom of the upper wing at the wing tips Use your right and left hand index fingers and suspend the model from below between the marked CG measurement...

Страница 31: ...e Fly Baby Bipe UM should always return to wings level from any attitude We ve found the Fly Baby Bipe UM to capture the imagination of prospective pilots both young and old We never miss an opportunity to allow an on looker at the field to get some stick time in with the Fly Baby Bipe UM In fact we ve found the Fly Baby Bipe UM to be a very capable instructor assisted three channel trainer If you...

Отзывы: