background image

7

R A N G E  ADJUSTMENT

The sensor range is the range an object can be away from the sensor in order to 
activate the flush valve. The sensor is factory preset. If necessary, it can be adjusted 
as follows:

Adjusting the sensor range manually:

1. Disconnect the battery or switch off the electricity supply to the sensor.

2. For Jupiter 2030, make a short circuit between the (+) and the (-) connections 
of the sensor. A screw driver or any conductive material can be used to make this 
short circuit. Alternatively and for Jupiter 2030 E, activate the sensor three or four 
times after disconnecting the power supply.

Do not make a short circuit on the power supply or on the sensor when the power 
supply is connected to the sensor.

3. Reconnect the power supply to the sensor.

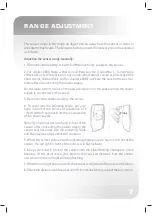
4.  To  enter  into  the  adjusting  mode,  put  your 
hand in front of the sensor at a distance of 2 
“(5cm) within 5 seconds from the reconnection 
of the power supply.

Note: If you will not put your hand in front of the 
sensor after connecting the power supply, the 
sensor  will  not  enter  into  the  adjusting  mode 
and the previous adjustment will continue.

5. When the sensor enters into the adjusting mode and your hand is in front of the 
sensor, the red light in front of the sensor will flash slowly.

6. Keep your hand in front of the sensor until the slow flashing changes to quick 
flashing, At this point move your hand to the required distance from the sensor 
and wait until the red light will stop flashing.

7. When the red light has turned off, the sensor is adjusted to the required distance.

8. Check the distance you have set and if it is not satisfactory, repeat the procedure. 

Содержание JUPITER 2030

Страница 1: ...1 INSTALLATION AND MAINTENANCE GUIDE ELECTRONIC FLUSH VALVE FOR URINAL...

Страница 2: ...ALLATION INFORMATION 4 INSTALLATION 5 8 SETTINGS ADJUSTMENT 9 BATTERY REPLACEMENT INSTRUCTIONS 10 MAINTENANCE Filter cleaning instructions Care and cleaning of chrome and special finishes 11 SPARE PAR...

Страница 3: ...ansformer Operating water pressure 0 5 8 0 bar 24 hours automatic flush when not used to improved hygiene Sensor range 600 mm Factory set Adjustable manually or with a remote control Flushing Time 6 s...

Страница 4: ...ize yourself with the part names and confirm that the parts are included 1 x Plastic box with concealed flush valve 1 x Temporary protective panel 1 x Plastic seat for the cover plate 1 x Wall cover p...

Страница 5: ...oughly before installing the flush valve Do not allow dirt Teflon tape or metal particles to enter the flush valve All plumbing is to be installed in accordance with applicable codes and regulations C...

Страница 6: ...sure there is no leakage 7 Assemble the temporary protective cover to protect the flush valve Step 2 Connecting the water supply and the power source 1 If your model is Jupiter 2030 E place the trans...

Страница 7: ...ange is unsatisfactory refer to the section entitled Settings Adjustment Battery replacement instructions Jupiter 2030 only When the battery weakens the red indicator light will blink at a constant ra...

Страница 8: ...ess to increase the detection range and to decrease the detection range of the sensor 1 FLOW TIME Changes the Flush valves flush time once the user leaves the urinal or the toilet Press to increase th...

Страница 9: ...3 Reconnect the power supply to the sensor 4 To enter into the adjusting mode put your hand in front of the sensor at a distance of 2 5cm within 5 seconds from the reconnection of the power supply No...

Страница 10: ...es dirt or scale introduced by the water supply MAINTENANCE Filter cleaning instructions This flush valve is provided with a stainless steel filter preventing foreign particles to enter the lines If t...

Страница 11: ...iaphragm Reduce the water supply pressure P R O B L E M I N D I C AT O R C A U S E S O L U T I O N Valve does not flush Sensor flashes continuously when user s steps within the sensor s range Red ligh...

Страница 12: ...10 015125100 05 12...

Отзывы: