background image

4

INSTALLATION

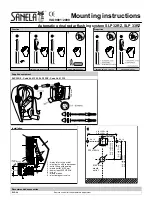
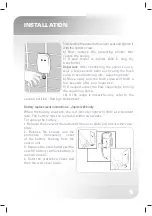
Step 1 – Installing the flush valve

1) Shut off the water supply.

2) Cut an adequate opening in the wall to accommodate 
the dimensions of the box and the sleeve (not supplied) 
where you will accommodate the transformer cable.  

3) Insert the electronic flush valve’s box through the wall. 

4) Connect the flush valve inlet to the water supply.

5)  Connect  the  flush  valve  outlet  nipple  to  the  pipe 
leading to the urinal’s inlet. 

6)  Turn  on  the  water  supply.  Make  sure  there  is  no 
leakage. 

7) Assemble the temporary protective cover to protect the flush valve. 

Step 2 – Connecting the water supply and the power 
source

1) If your model is Jupiter 2030 E, place  the transformer 
near the electricity plug, insert the transformer cable 
wire through the box. 

2)  Once  the  electricity,  plumbing  and  tiles  works  are 
finished, replace the temporary protective cover with 
the  plastic  seat.  Adjust 
it  using  the  four  screws 
provided. 

3) Connect the wire from 
the  electronic  unit  on 
to  the  cover  plate  to  the 
solenoid’s connector. 

4)  Connect  the  other 
wire  from  the  electronic 
unit to the power source 
connector. 

porar

y


p

rotective


cover


with 

Содержание JUPITER 2030

Страница 1: ...1 INSTALLATION AND MAINTENANCE GUIDE ELECTRONIC FLUSH VALVE FOR URINAL...

Страница 2: ...ALLATION INFORMATION 4 INSTALLATION 5 8 SETTINGS ADJUSTMENT 9 BATTERY REPLACEMENT INSTRUCTIONS 10 MAINTENANCE Filter cleaning instructions Care and cleaning of chrome and special finishes 11 SPARE PAR...

Страница 3: ...ansformer Operating water pressure 0 5 8 0 bar 24 hours automatic flush when not used to improved hygiene Sensor range 600 mm Factory set Adjustable manually or with a remote control Flushing Time 6 s...

Страница 4: ...ize yourself with the part names and confirm that the parts are included 1 x Plastic box with concealed flush valve 1 x Temporary protective panel 1 x Plastic seat for the cover plate 1 x Wall cover p...

Страница 5: ...oughly before installing the flush valve Do not allow dirt Teflon tape or metal particles to enter the flush valve All plumbing is to be installed in accordance with applicable codes and regulations C...

Страница 6: ...sure there is no leakage 7 Assemble the temporary protective cover to protect the flush valve Step 2 Connecting the water supply and the power source 1 If your model is Jupiter 2030 E place the trans...

Страница 7: ...ange is unsatisfactory refer to the section entitled Settings Adjustment Battery replacement instructions Jupiter 2030 only When the battery weakens the red indicator light will blink at a constant ra...

Страница 8: ...ess to increase the detection range and to decrease the detection range of the sensor 1 FLOW TIME Changes the Flush valves flush time once the user leaves the urinal or the toilet Press to increase th...

Страница 9: ...3 Reconnect the power supply to the sensor 4 To enter into the adjusting mode put your hand in front of the sensor at a distance of 2 5cm within 5 seconds from the reconnection of the power supply No...

Страница 10: ...es dirt or scale introduced by the water supply MAINTENANCE Filter cleaning instructions This flush valve is provided with a stainless steel filter preventing foreign particles to enter the lines If t...

Страница 11: ...iaphragm Reduce the water supply pressure P R O B L E M I N D I C AT O R C A U S E S O L U T I O N Valve does not flush Sensor flashes continuously when user s steps within the sensor s range Red ligh...

Страница 12: ...10 015125100 05 12...

Отзывы: