background image

AA 1.5V

AA 1.5V

CHARGING THE STARBLADE DRONE BATTERY & ATTACHING THE BATTERY TO THE DRONE 

SETUP OVERVIEW

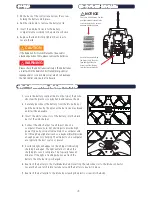
RADIO CONTOL TRANSMITTER • BATTERY INSTALLATION

If the Radio Control Transmitter will not be used for 
extended periods of time, please remove the batteries.

Please use 4 AA batteries. Use the 
polarity markings to install in the 
correct orientation. Do not mix 
batteries of different types.

Unscrew the screw holding 
the battery lid to the body. 
Then lightly pull the clip 
down to pull the lid away 
from the transmitter body.

NOTICE

Please check the AA batteries routinely. If the AA batteries 
are left within the Radio Control Transmitter, potential 
leakage and/or corrosion may occur, which can damage 
the transmitter and create a fire hazard.

On the back of the controller, unscrew the screw 
holding the battery lid in place. 

1.

Pull the clip down to remove the battery’s lid. 

2.

Insert the 4 AA batteries into the battery 
compartment according to the polarities shown. 

3.

Replace the lid and firmly tighten the screw to 
secure the lid.

4.

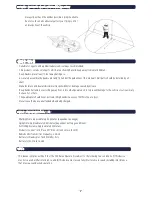
Locate the battery compartment on the top of the drone. 
Unscrew the plastic screw, by hand, and remove the lid.  

1.

Carefully disconnect the battery from the drone. Do not 
pull the batteries by the wires as the batteries may break 
and it will be unusable.

2.

Insert the white connector of the battery, into the black 
part of the USB charger.

3.

Connect the USB charger to a USB port, like on a 
computer. Please note: Not all USB ports provide high 
power. Typically, only ports mounted on a computer and 
not through a peripheral (such as a keyboard) will provide 
enough power for charging. The USB ports on a computer 
are typically the best source of power. 

4.

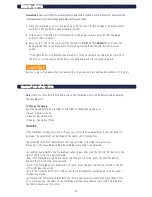
A solid red light will appear on the USB port indicating 
charging has begun. The light will turn off when the 
charging process is complete. This typically takes 60 
minutes. If the light is flashing when you attach the 
battery, then the battery is charged.

5.

Reattach the battery to the StarBlade drone by inserting the red connector to the drone connector. 
Secure the hook-latch fabric fastener around the battery to keep it in place.

6.

Reattach the battery lid to the drone by screwing the plastic screw into the body.

7.

CAUTION

WARNING

Содержание ODY-1720NX

Страница 1: ...njoy your purchase of the StarBlade and that this user manual helps you get your drone off the ground and light up the sky 5 INSTRUCTION REFERENCE MANUAL Model no ODY 1720NX WHAT S IN THE BOX 1 2 3 4 5 6 7 StarBlade Drone Unit Radio Control Transmitter USB Charging Cable 7 4VRechargeableLithiumBattery 4x Replacement Propellers Quick Start Guide Instruction Manual Not Shown ...

Страница 2: ...he screw to secure the lid 4 Locate the battery compartment on the top of the drone Unscrew the plastic screw by hand and remove the lid 1 Carefully disconnect the battery from the drone Do not pull the batteries by the wires as the batteries may break and it will be unusable 2 Insert the white connector of the battery into the black part of the USB charger 3 Connect the USB charger to a USB port ...

Страница 3: ... pushing the Speed Button To Change the Speed Push the Speed button before flight or mid flight to change the speed level 1 Beep Speed level one 2 Beeps Speed level two 3 Beeps Speed level three TRIMMING If the StarBlade is flying erratically without your control than an adjustment to the trim needs to be made The adjustment can be made on the radio control transmitter The following are the four a...

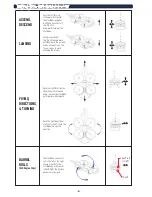
Страница 4: ...t throttle stick downward until landing on the ground You do not want to do this too quickly as to avoid breaking the drone Ease the right throttle stick Directional Stick up and down to make the StarBlade go forward and backward Push the right directional stick left or right to turn the StarBlade in a specific direction The StarBlade can barrel roll to the left or the right Please note that if th...

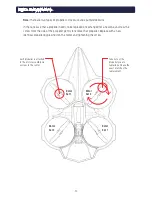
Страница 5: ...crew the screw from the side of the propeller gently to remove that propeller Replace with a new identical propeller by placing it on the motor and tightening the screw Each propeller is attached to the motor assembly via a screw in the center Take note of the propeller you are replacing and use the exact match as the replacement Rotor Set 2 Rotor Set 1 Rotor Set 2 Rotor Set 1 ...

Страница 6: ...power down the vehicle and the radio control and start over The rotor speed may be too slow to lift the quadcopter sufficiently Make sure the throttle is being raised sufficiently If the unit still does not go up or goes up too slowly the battery of the quadcopter might be too discharged for safe or satisfactory operation Charge the battery before continuing to fly the unit If the unit fails to go...

Страница 7: ...ely 50 meters Product size 24 41 l x 18 11 w x 5 51 h 62 cm l x 46 cm w x 14 cm h Radio Control Transmitter Frequency 2 4 GHz Battery for Quadcopter 7 4v 350mAh Li Poly Battery for Controller 4 x AA Suitable for ages 14 and up Adult supervision is always recommended This product contains small parts which are a choking hazard Keep away from small children Keep Quadcopter at least 10 feet away duri...

Страница 8: ... States For Customer Service please email Care OdysseyToys com Please note the units model number and name in your email Extra Parts Available Visit Odyssey online to order Extra Batteries New rotor blades Model no ODY 1720NX StarBlade Enterprise Class Quad Drone Follow us at ...

Отзывы: