8
STAR
TRAC
E-TBT
TOTAL
BODY
TRAINER
OWNER’S
MANUAL
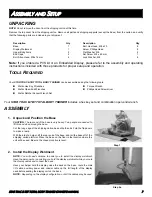
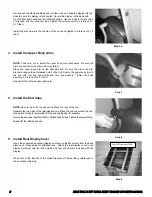
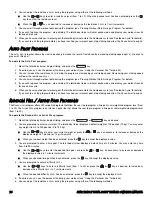
Gently push the display cables down into the neck, and slide the display into the
base. Be sure the display is fully seated. Secure the display to the base with
four M8 allen head bolts and four M8 flat washers. Use two bolts in the front side
of the neck, and two in the rear side. Tighten the screws securely to a torque of
8-10 lbs-ft.
Install the set screw into the left side of the neck and tighten to a torque of 8-10
lbs-ft.
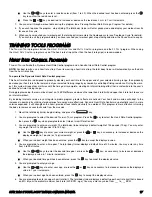
3. Install the Upper Body Arms
NOTE: Take care not to install the upper body arms backwards. Be sure the
arms are positioned as shown when installed.
Place one upper body arm on the right-side hub. Be sure the pin in the arm
bracket engages the unthreaded hole on the hub. Secure the upper body arm to
the hub with four hex head bolts and four lock washers. Tighten the bolts
securely to a torque of 19-21 lbs-ft.
Repeat for the left-side upper body arm.
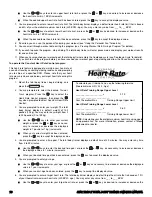
4. Install the End Caps
NOTE: Be sure the holes in each end cap face the rear of the unit.
Separate the two parts of the right-side end cap. Place the end cap around the hub.
Use a piece of tape to temporarily hold the end cap together if necessary.
Secure the end caps together with four Phillips head screws. Tighten the screws firmly.
Repeat for the left-side end cap.
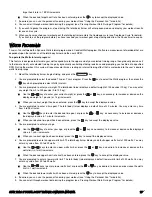
5. Install Rear Display Cover
Open the separately packaged display and remove the M4 screws from the back
plastics, set these aside for additional use. Attach the rear display cover to the
display weldment with four M4 screws and four M4 washers included with the
display.
Make note of the location of the Quick Disconnect Tab as this is referenced in
the next assembly step.
Step 3
Step 4
Step 2b
Step 5
Quick Disconnect Tab


