background image


Service Manual: E-TR and E-TRi 


39

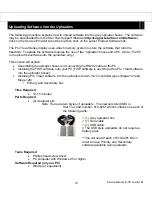
You will need Winzip (or equivalent) installed on your PC.  If you do not have a zip file extractor 
program, you can get a free version from 

www.winzip.com


Obtaining the FISP and Latest Software 

 
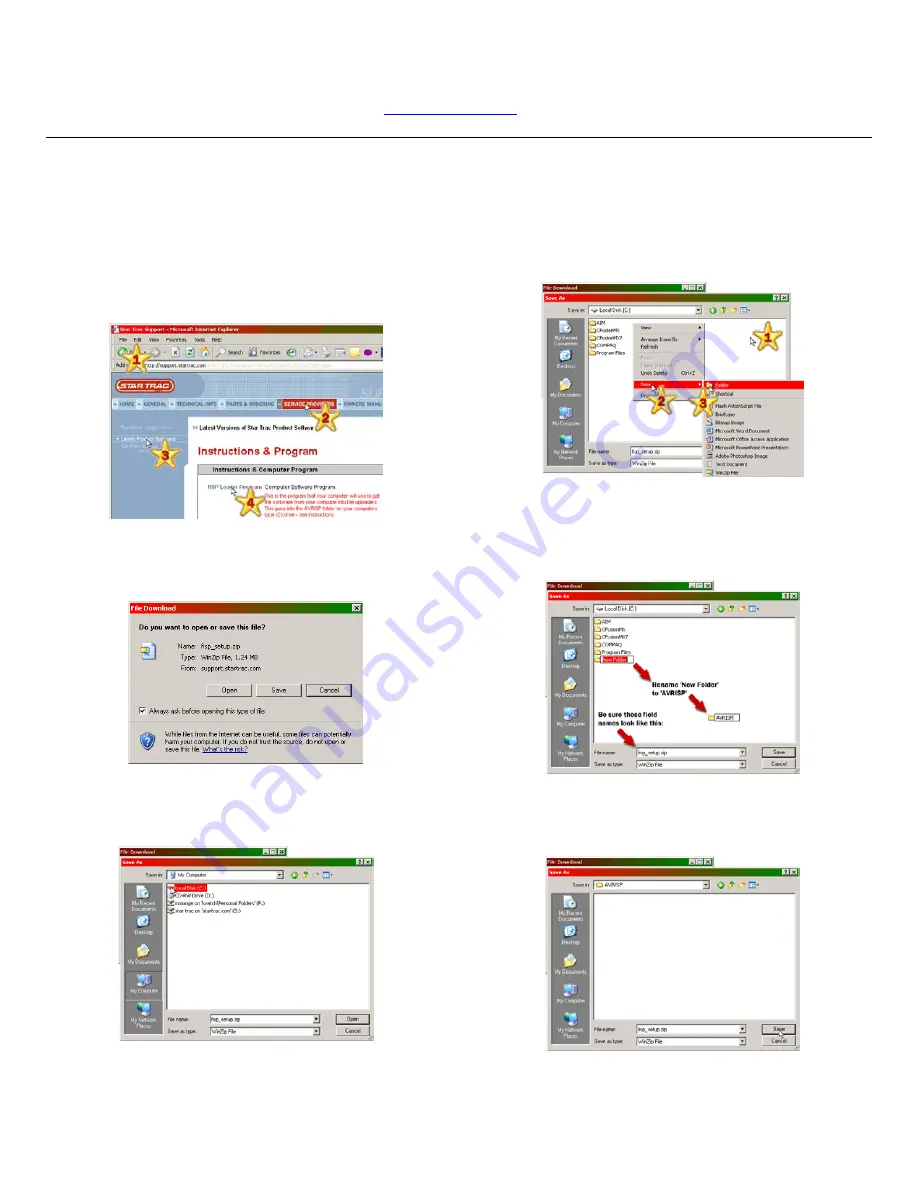
1.  Open your web browser and go to the 
Support Website (*1).  Click on the ‘Service 
Providers’ tab (*2).  Click on ‘Latest Product 
Software’ (*3).  Click on the ‘FISP Loader 
Program’ link (*4). 


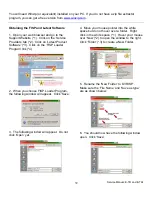
2.  When you choose FISP Loader Program, 
the following window will appear.  Click ‘Save’. 


3.  The following window will appear.  Do not 
click ‘Open’ yet. 


4.  Move your mouse pointer into the white 
space but do not hover over a folder.  Right 
click in the white space (*1).  Hover your mouse 
over ‘New’ (*2) to open the window to the right.  
Click ‘Folder’ (*3) to create a New Folder. 


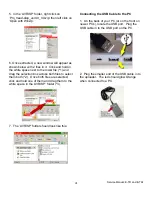
5.  Rename the ‘New Folder’ to ‘AVRISP’.  
Make sure the ‘File Name’ and ‘Save as type’ 
are as shown below: 


6.  You should now have the following window 
open.  Click ‘Save’. 


Содержание Pro Tread AC 7600

Страница 1: ...tar Trac Fitness 14410 Myford Road Irvine California 92606 800 503 1221 Tel 714 669 1660 Tel 714 669 0739 Fax X http support startrac com email support startrac com SERVICE MANUAL Pro Tread AC 7600 77...

Страница 2: ...act the Star Trac Customer Service department during regular hours of operation Star Trac Customer Support contact information USA Hours Monday thru Friday excluding U S holidays Check the support web...

Страница 3: ...ring 7 Power Cords 8 PREVENTIVE MAINTENANCE 9 Overview 9 Value of Preventive Maintenance 9 Determining When to Perform Maintenance 9 Preventive Maintenance Cautions 9 Preventive Maintenance Schedule 1...

Страница 4: ...ST 33 INFRARED TEST 33 LAST ERROR LIST 33 MAINTENANCE MODE AUTO CALIBRATION 34 LAST ERROR LIST DEFINITIONS 35 DEFINITIONS 35 LAST ERROR LIST BANKS 35 DFR INFORMATION 36 DFR s 36 Same Codes Different M...

Страница 5: ...Service Manual E TR and E TRi 3 DFR Code 1000 59 DFR Code 800 400 60 DFR Code 200 61 DFR Code 40 20 10 62 DFR Remaining Codes 63 Slipping Running Belt 64...

Страница 6: ...ake sure that the equipment you are working on is turned off and unplugged BEFORE performing any work unless otherwise noted or when necessary for voltage testing When replacing fuses be sure the fuse...

Страница 7: ...ly there must be at least 48 inches 1 25 m of free space behind the treadmill The Pro Series treadmill measures 85 5 l by 34 0 w 217 x 86 5cm See the following graph for proper equipment spacing requi...

Страница 8: ...VAC o 220V or 220VAC WATT The rate at which an electrical device consumes energy OHM A measurement of resistance o Ohm s Law Current I V R I current V voltage R resistance V I R Depending on what you...

Страница 9: ...lug NEMA Configurations U S A 110V Commercial 220V Commercial 110V Home NEMA 5 20 NEMA 6 15 NEMA 5 15 Plug Receptacle Plug Receptacle Plug Receptacle In this configuration the HOT line is in the norma...

Страница 10: ...Service Manual E TR and E TRi 8 Power Cords Below are the power cords you will find installed onto a Star Trac treadmill Note the configuration of the prongs for power and polarization...

Страница 11: ...ome types of PM need to be performed more often than others The frequency of PM depends a great deal on the use and environment of the unit Star Trac has a baseline of procedures that should be perfor...

Страница 12: ...and around treadmill 9 Inspect inside surface of running belt and top of deck 9 Correct any display or handrail squeaks and rattles 9 Visually inspect display panel keypad for wear 9 Vacuum inside shr...

Страница 13: ...ipe the following areas Do not spray directly onto surfaces o Display Keypad o Heart Rate Grips o Handrails o Shroud o Side Bed Covers o Under Belt Edge Inspect Inspect running belt for proper alignme...

Страница 14: ...EEKLY Clean Elevate the treadmill and vacuum the floor around and underneath Inspect Inspect display panel keypad for wear Inspect inside of running belt and top of deck Inspect all mounting hardware...

Страница 15: ...e power cord for pinches and or broken prongs Lubricate Wipe and debris from the elevation screws then lubricate Use a spray lithium grease or a thin coating of grease Avoid thin lubricants i e TriFlo...

Страница 16: ...from the factory with a Waxless running belt and deck system It is not necessary to regularly wax rewax or lubricate the running belt and deck on these models Wax may be applied to alleviate running...

Страница 17: ...ate the layers of the belt resulting in curled edges folded edges and ripples in the center of the walking area Checking for proper running belt tension can help ensure that the running belt is not to...

Страница 18: ...side of the frame to the other B Hold the edges of the towel and pull towards the tail roller then pull back towards the head roller C Rotate the running belt around and repeat to completely wipe the...

Страница 19: ...Y After 1 000 Miles 1 600 Km OR 1 Month Whichever comes first Clean deck with dry cloth and retighten belt using procedure below After 6 000 Miles 10 000 Km OR 6 Months 12 000 Miles 20 000 Km OR 12 Mo...

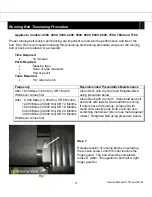
Страница 20: ...ouches the finger guard The belt should be completely relaxed Note This applies to both left right finger guards Fig 2 Step 2 Apply a piece of masking tape on the edge of the running belt on both side...

Страница 21: ...ece of tape closest to the tail roller is aligned with the edge of the deck on each side See Fig 5 Fig 6 Step 6 Using the 1 4 Allen wrench begin tightening the tensioning screws see Fig 1 You will tig...

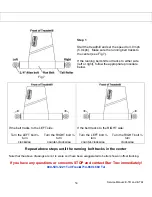
Страница 22: ...ither side left or right follow the appropriate procedure below To move belt back towards the center if it has tracked to the LEFT side To move belt back towards the center if it has tracked to the RI...

Страница 23: ...dirt and debris build up from the roller using a plastic scraper or an old credit card Do not use anything metal or sandpaper as you will damage the coating on the roller Vacuum up any debris from th...

Страница 24: ...ered Paraffin Wax Part No 140 3180 2 Phillips screwdriver Towel 36 x 12 90cm x 30cm is suggested Plastic drinking straw large diameter S SA AF FE ET TY Y F FI IR RS ST T Caution should be exercised at...

Страница 25: ...bottle of wax Fig 6 Start the treadmill at 3 0 mph 5 0 kmh While the treadmill is running squirt about 5 8 times on the left side onto the underside of the running belt Fig 7 and 5 8 times on the rig...

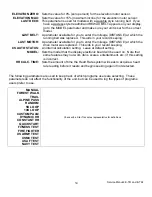
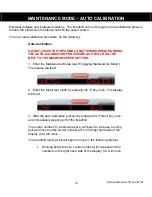
Страница 26: ...ad MAINTENANCE MODE momentarily in the information window Once in the Maintenance Mode release all of the keys The display will read UNITS ENGLISH or UNITS METRIC depending on your settings You will n...

Страница 27: ...SS Sets parameter back to its default factory setting Note For parameter LAST DECK this key will set the parameter to the current MILEAGE value to clear the REWAX BELT message OK key Updates saves the...

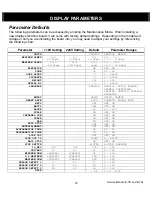
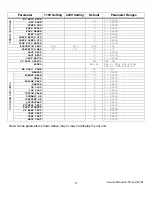
Страница 28: ...N TIME 99 20 99 OPER HOURS 0 0 65535 DISTANCE 0 0 65535 WEIGHT 155 0 350 SERIAL NO 0 0 65535 LANGUAGE ENGLISH ENGLISH DUTCH FRENCH GERMAN PORTUGUESE SPANISH SWEDISH ITALIAN KATAKANA ENTRY UNITS UNITS...

Страница 29: ...0 0 65535 LAST BELT 0 0 65535 LAST MOTOR 0 0 65535 CS AUTO STATUS ON OFF ON MODEL PRO AC PRO S PRO PRO ELITE PRO AC PRO ELITE AC HR CALC TIME 30 0 99 MANUAL 0 0 65535 FOREST WALK 0 0 65535 TRAIL 0 0...

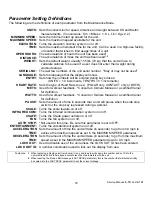
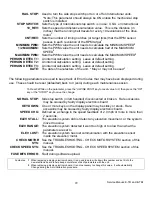
Страница 30: ...ult an Owners Manual or a certified trainer for definition WATTS Used for workout feedback Consult an Owners Manual or a certified trainer for definition PAUSE Sets the amount of time in seconds that...

Страница 31: ...defaulted back to 0 zero during each maintenance session To Reset While on the parameter press the ALPINE PASS key to reset value to 0 then press the OK key or the START key to save the change NO RAIL...

Страница 32: ...This aids in your record keeping CS AUTO STATUS An internal calculation setting Leave at default setting MODEL Sets the model that the display electronic board will be used on Note that some features...

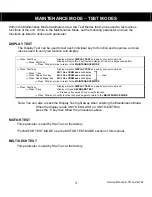
Страница 33: ...ill enter DISPLAY TEST and await your next command Press 1 key MC1 Vx x CKSM xxxx will display Press Speed Plus key MC2 Vx x CKSM xxxx will display Press Speed Minus key MC1 Vx x CKSM xxxx will displa...

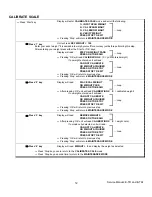
Страница 34: ...previous step Pressing Stop will return to MAINTENANCE MODE Press 2 key Display will read PLACE CAL WEIGHT ON WEIGHT PADS PRESS OK TO BEGIN Loop After pressing OK unit will read CALIBRATING X X calibr...

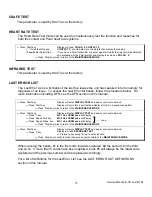
Страница 35: ...section in this manual Press Start key Display will enter DISPLAY TEST and await your next command Press Start key Display will cycle thru a self test and display all led s in a sequenced pattern Pres...

Страница 36: ...SETTING 1 Enter the Maintenance Mode see Engaging Maintenance Mode The display will read 2 Enter the Motor test mode by pressing the 8 key once The display will read 3 Start the auto calibration proce...

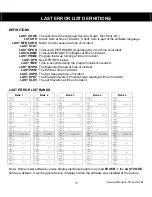
Страница 37: ...ST CODE 0 LAST CODE 0 LST CHK 0000000 LST CHK 0000000 LST CHK 0000000 LST CHK 0000000 LST CHK 0000000 LAST MTR CURR 0 LAST MTR CURR 0 LAST MTR CURR 0 LAST MTR CURR 0 LAST MTR CURR 0 LAST STAT 0000 LAS...

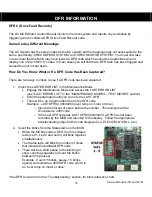
Страница 38: ...e LAST ERROR LIST in the MAINTENANCE MODES TEST MODES section Scroll the parameters until you come to the LAST DFR There will be an 8 digit number that is the DFR code Example LAST DFR X 00004000 over...

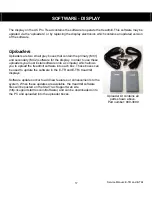
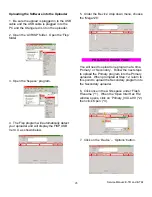
Страница 39: ...In order to use these uploaders you must install software onto a computer which allows you to upload the treadmill software into each box Those boxes can be used to update the software in the E TR an...

Страница 40: ...s and connecting the RS232 cable to the PC Installing the FISP software onto your PC FISP software is used to put the Pro Tread software into the uploader boxes Installing Pro Tread software into the...

Страница 41: ...re 3 Click on the FISP Loader Program link 4 2 When you choose FISP Loader Program the following window will appear Click Save 3 The following window will appear Do not click Open yet 4 Move your mous...

Страница 42: ...you are in the AVRISP folder Click Save End of procedure Extracting Unzipping the Zip Files 1 Open the AVRISP folder Right click on fisp_setup zip then left click on Open with Winzip 2 If using the f...

Страница 43: ...the selection box across both files to select them both 2 Once both files are selected click and hold one of them and drag them to the white space in the AVRISP folder 3 7 The AVRISP folder should loo...

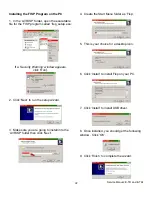
Страница 44: ...appears click Run 2 Click Next to run the setup wizard 3 Make sure you are going to install into the AVRISP folder then click Next 4 Create the Start Menu folder as Fisp 5 This is your choice for a de...

Страница 45: ...l display the FISP USB Ver X X as shown below 5 Under the Device drop down menu choose the Mega128 PROJECT CHANGE POINT You will need to upload one program at a time Primary or Secondary Follow the ne...

Страница 46: ...ck on Load Fisp to send software to the uploader 11 You will see a Transferring Date status window Click Close when prompted 12 This will complete the programming of the Primary uploader Return to the...

Страница 47: ...Service Manual E TR and E TRi 45 SOFTWARE MCB...

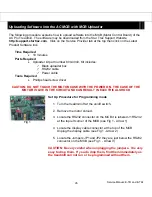
Страница 48: ...iver CAUTION DO NOT TOUCH THE MOTOR CASE WITH THE POWER ON THE CASE OF THE MOTOR IS LIVE IN THE CIRCUIT AND CAN RESULT IN ELECTRICAL SHOCK Fig 1 Set Up Procedure for Programming mode 1 Turn the treadm...

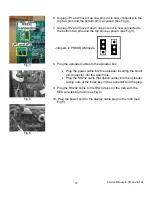
Страница 49: ...Fig 3 Jumpers in PROGRAM mode Fig 3 Fig 4 Fig 5 8 Plug the uploader cables to the uploader box Plug the power cable into the uploader inserting the small pin connector into the small hole Plug the RS...

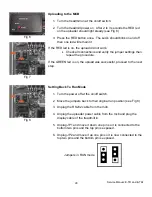
Страница 50: ...s then repeat the procedure If the GREEN led is on the upload was successful proceed to the next step Setting Back To Run Mode 1 Turn the power off at the on off switch 2 Move the jumpers back to thei...

Страница 51: ...jumpers J1 and J2 should be blinking If they are lit solid Turn the power off and verify that the jumpers in the RUN mode positions NOTE Do not move the jumpers with the power on If they are blinking...

Страница 52: ...Service Manual E TR and E TRi 50 PART REPLACEMENT PROCEDURES Table Of Part Replacement Procedures Running Belt Tensioning Procedure Display Panel Keypad Electronics Replacement...

Страница 53: ...h Whichever comes first Clean Deck with dry cloth and Retighten Belt using procedure below After 6 000 Miles 10 000 Km OR 6 Months 12 000 Miles 20 000 Km OR 12 Months 18 000 Miles 30 000 Km OR 18 Mont...

Страница 54: ...running belt on both sides Fig 3 Step 3 Draw a line on each piece of masking tape aligned with the edge of the deck Note Be careful not to move the belt or roller while drawing the lines Fig 4 Check...

Страница 55: ...e edge of the deck on each side See Fig 5 Fig 6 Step 6 Using the 1 4 Allen wrench begin tightening the tensioning screws see Fig 1 You will tighten or stretch the run belt until the forward lines on t...

Страница 56: ...he LEFT side If the belt tracks to the RIGHT side Turn the LEFT bolt turn clockwise Turn the RIGHT bolt turn counter clockwise Turn the LEFT bolt turn counter clockwise Turn the RIGHT bolt turn clockw...

Страница 57: ...ROUBLESHOOTING Table Of Troubleshooting Documents Check Speed System and Check Motor System Troubleshoot DFR Codes Code 1000000 100000 10000 Code 4000 Code 1000 Code 800 400 Code 200 Code 40 20 10 Rem...

Страница 58: ...FR 4 register all zero Press 3 key No Yes Does the Last Code 3 read Check MO or Check SP No Press Speed or key until display reads Last DFR 3 xxxxxxxx Yes Does DFR 3 register any greater that zero Yes...

Страница 59: ...Service Manual E TR and E TRi 57 DFR Code 1000000 100000 and 10000...

Страница 60: ...Service Manual Treadmills E Series P Series 58 DFR Code 4000...

Страница 61: ...Service Manual Treadmills E Series P Series 59 DFR Code 1000...

Страница 62: ...pinched or damagd F3 F4 No Yes End End DFR Code 800 Phase Over Current 12 Blinks Possible Causes 1 Worn running belt 2 Dirty running belt 3 Faulty MCB DFR Code 400 Illegal Speed Command 11 Blinks Pos...

Страница 63: ...ut AC voltage should be less than a 5 volt deferential from the original AC voltage that was taken with out a load G1 G3 No Yes End DFR Code 200 DC Link Bus Under Voltage 10 Blinks Possible Causes 1 L...

Страница 64: ...e motor harness connector or for a damaged wire Yes Was there a damaged wire or bad connection on the phase wires to harness connector H2 No H3 H1 Yes No End DFR Code 40 Phase A Circuit Open 7 Blinks...

Страница 65: ...Service Manual Treadmills E Series P Series 63 DFR Remaining Codes...

Страница 66: ...ses 1 The running belt is worn Check the condition of the running belt Feel the underside of the belt If the belt feels glazed glossy in the center it is worn and should be replaced The underside of t...

Страница 67: ...Service Manual AC Pro Tread 7600 7700 65 This page intentionally left blank...

Страница 68: ...Star Trac Fitness 14410 Myford Road Irvine California 92606 800 503 1221 Tel 714 669 1660 Tel 714 669 0739 Fax X http support startrac com email support startrac com Doc 620 7734 Rev B SERVICE MANUAL...

Отзывы: