COD
POSSIBLE CAUSE
POSSIBLE SOLUTION
1
2
3
4
5
6
7
8
9
10
Voltage drop or electrical
supply is out.
Damaged electric motor.
Tank is full of air.
Installation fuse has burned out.
Check valve does not seal
because of impurities.
The demand is above
the compressor’s capacity.
Thermal protector tripped.
Filter clogged.
Air leakage in the compressor.
High ambient temperature
(Max. 40
˚
C or 104
˚
F)
Check the installation and/or wait
for the electrical supply stabilization.
Send it to the nearest
StanleyBlack&Decker
Authorized Service Center.
Electric motor will start
as soon as the pressure
in the tank decreases.
Find out the burning cause
Page. 21
Send the compressor to the
nearest
StanleyBlack&Decker
Authorized Service Center
Check the compressor’s capacity.
Turn compressor off, wait for 5 (five)
min. and reset the protector. If tripping
is frequent, look for the nearest
Replace it.
Re-fasten bolts and/or fittings.
Improve local conditions.
COD
CAUSA POSSÍVEL
SOLUÇÃO POSSÍVEL
1
2
3
4
5
6
7
8
9
0
1
2
3
4
5
6
7
8
9
Queda ou falta de tensão na
rede elétrica.
Motor elétrico danificado.
Reservatório cheio de ar.
Fusível da instalação queimado.
Válvula de retenção não veda
devido a presença de impurezas.
Demanda do sistema acima da
capacidade do compressor.
Protetor térmico atuou.
Filtro obstruído.
Vazamento de ar no compressor.
Temperatura ambiente elevada
(Máx. 40
˚
C).
Junta da placa de válvulas rompida.
Óleo lubrificante incorreto
ou baixo nível de óleo.
Carbonização da placa de válvula.
Rede elétrica subdimensionada
ou deficiente.
Operando em ambiente agressivo.
Não foi efetuada a troca de óleo
no intervalo recomendado.
Elementos de fixação frouxos.
Vazamento contínuo de ar pela
válvula de alívio do pressostato
quando o compressor desliga.
Excesso de água no reservatório.
Verifique a instalação e/ou
aguarde a estabilização da rede.
Procure o Centro de Serviço
Autorizado
Black&Decker.
O motor elétrico partirá assim
que a pressão no reservatório
diminuir.
Localize a causa
(Veja Tabela 2 - Pág. 14)
Encaminhe o compressor ao
Centro de Servico Autorizado
Black&Decker.
Redimensione o compressor
se necessário.
Desligue o compressor, aguarde
5 (cinco). Se ocorrer reincidência
frequente procure o Centro de
Servico Autorizado
Black&Decker.
Substitua-o.
Reaperte os parafusos e/ou
as conexões.
Melhore as condições
de instalação.
Procure o Centro de Serviço
Autorizado
Black&Decker.
Utilize óleo lubrificante mineral
conforme recomenda este manual,
ou verifique o nível e reponha
se necessário.
Proceda a limpeza da mesma a
cada 1000 horas de serviço ou
12 meses através do Centro de
Serviço Autorizado
Black&Decker.
Consulte um técnico especializado.
Proceda a troca dos componentes
através do Centro de Serviço
Autorizado
Black&Decker.
Melhore as condições locais.
Proceda a troca dos componentes
através do Centro de Serviço
Autorizado
Black&Decker.
Localize e reaperte.
Encaminhe o compressor ao
Centro de Serviço Autorizado
Black&Decker.
Drene o reservatório através do
purgador, conforme indicado
COD
POSSIBLE CAUSE
POSSIBLE SOLUTION
1
2
3
4
5
6
7
8
9
10
11
12
13
14
15
16
17
18
19
20
21
Voltage drop or electrical
supply is out.
Damaged electric motor.
Tank is full of air.
Installation fuse has burned out.
Check valve does not seal
because of impurities.
The demand is above
the compressor’s capacity.
Thermal protector tripped.
Filter clogged.
Air leakage in the compressor.
High ambient temperature
(Max. 40
˚
C or 104
˚
F)
Valve plate joint is broken.
Wrong oil or low oil level.
Carbonized valve plate.
Deficient or inadequate
electrical supply.
Operating in a non-adequate
environment.
The oil change did not occur at
the recommended interval.
Loose fastening elements.
Continuous air leakage through
pressure switch’s relief valve when
compressor shuts off.
Excess water in the tank.
Too much dust and paint
on the compressor.
Water is mixed with the oil
(milky coloration).
Check the installation and/or wait
for the electrical supply stabilization.
Send it to the nearest
Black&Decker
Authorized Service Center.
Electric motor will start
as soon as the pressure
in the tank decreases.
Find out the burning cause
(See Table 2 - Pág. 21)
Send the compressor to the
nearest
Black&Decker
Authorized Service Center
Check the compressor’s capacity.
Turn compressor off, wait for 5 (five)
min. and reset the protector. If tripping
is frequent, look for the nearest
Black&Decker
Authorized Center.
Replace it.
Re-fasten bolts and/or fittings.
Improve local conditions.
Look for the nearest
StanleyBlack&Decker
Authorized Center
.
Change oil.
Clean it every 1000 working hours
or 12 months at your nearest
Have a specialized technician
check it.
Improve local conditions.
See “Care and Maintenance”
Page 21
Find and re-fasten them.
Send compressor to the nearest
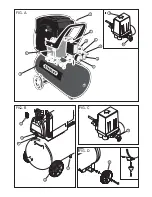
Drain the tank through the drain
as indicated in
Fig. B - Page 2
Clean the compressor externally.
Change the lubricant oil and run
your pressure compressor for
15 min, at a maximum pressure of
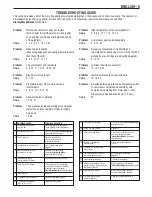
TROUBLESHOOTING GUIDE
This section provides a list of the more frequently encountered malfunctions, their causes and corrective actions. The operator or
maintenance personnel can perform some corrective actions, and others may require the assistance of a qualified
StanleyBlack&Decker
technician.
ENGLISH 9
Motor does not start or does not restart
(Do not insist to start the motor. Do it only after
you have discovered and eliminated the cause
of the problem)
1, 2, 3, 4, 5, 7, 14, 15, 22
Reduce air production
(Pressure gauge keeps showing a lower pressure
than that of the job)
6, 8, 9, 10, 11, 13, 16
The compressor unit overheats
5, 6, 10, 11, 12, 13, 16, 20, 25
Electric motor overheats
5, 7, 10
Premature wear of the compressor unit
internal parts
6, 9, 10, 12, 15, 16, 23
Abnormal noise or vibration
15, 16, 17
Tank pressure increases quickly or too frequent
starts (The normal number of starts is roughly
6 an hour)
19, 24
Problem
Code
Problem
Code
Problem
Code
Problem
Code
Problem
Code
Problem
Code
Problem
Code
Problem
Code
Problem
Code
Problem
Code
Problem
Code
Problem
Code
Problem
Code
High temperature of the compressed air
5, 6, 8, 9, 10, 11, 12, 13, 20
Compressor operate ininterruptedly
6, 8, 13, 25
Excessive consumption of lubricating oil
(Compressors usually use more oil in the first 200
working hours until rings are smoothly adjusted)
6, 10, 12
Lubricant oil with unusual color
10, 15, 16, 21
Insufficient pressure for required work
15, 18, 24
Air leakage through relief valve of pressure switch
or compressor unit (when assembled), with
compressor operating from more than 1 (one)
minute (valve closes above 20 psi (1.3 bar))
25
StanleyBlack&Decker
Authorized Center
StanleyBlack&Decker
Authorized Center
StanleyBlack&Decker
Authorized
Service Center.

