


17
ENGLISH (
Original Instructions)
♦ Be aware of the location of pipework and wiring.
♦ Apply only a gentle pressure to the tool (approx. 5kg).
Excessive force does not speed up chiselling but
decreases tool performance and may shorten tool life.
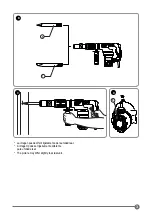
♦ Always hold the tool firmly with both hands and ensure a
secure stance (Fig. C). Always operate the tool with the
side handle properly mounted.
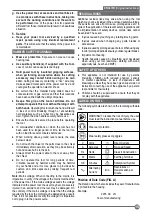
Proper Hand Position (Fig. C)
WARNING!
To reduce the risk of serious personal injury,
ALWAYS use proper hand position as shown.
WARNING!
To reduce the risk of serious personal injury,
ALWAYS hold securely in anticipation of a sudden reaction.
Proper hand position requires one hand on the side handle (1),
with the other hand on the main handle.
Switching On and Off (Fig. A)
♦ To run the tool, press the switch (2) and turn it in ‘ON’
position.
♦ To stop the tool, turn it in ‘OFF’ position and release
the switch (2).
Chipping and Chiselling (Fig. A)
♦ Insert the appropriate chisel in right position.
♦ Adjust the side handle (1) as required.
♦ Switch on the tool and start working.
♦ Always switch off the tool when work is finished and before
unplugging.
WARNING:
♦ Do not use this tool to mix or pump easily combustible
or explosive fluids (benzine, alcohol, etc.).
♦ Do not mix or stir inflammable liquids labelled accordingly.
MAINTENANCE
Your Stanley corded/cordless appliance/tool has been
designed to operate over a long period of time with a
minimum of maintenance. To ensure satisfactory operations,
the tool must be maintained and cleaned regularly
WARNING: To reduce the risk of injury, turn
unit off and disconnect machine from power
source before installing and removing accessories,
before adjusting or changing set-ups or when making
repairs.
Be sure the trigger switch is in the OFF position.
An accidental start-up can cause injury.
♦ This machine is not user-serviceable. If problems occur
contact an authorised repair agent.
♦ The tool will automatically switch off when the carbon
brushes are worn.
WARNING!
Before performing any maintenance on corded/
cordless power tools:
♦ Switch off and unplug the appliance/tool.
♦ Or switch off and remove the battery from the appliance/
tool if the appliance/tool has a separate battery pack.
♦ Or run the battery down completely if it is integral and
then switch off.
♦ Unplug the charger before cleaning it. Your charger does
not require any maintenance apart from regular cleaning.
♦ Regularly clean the ventilation slots in your appliance/
tool/ charger using a soft brush or dry cloth.
♦ Regularly clean the motor housing using a damp cloth.
Do not use any abrasive or solvent-based cleaner.
♦ Regularly open the chuck and tap it to remove any dust
from the interior (when fitted).
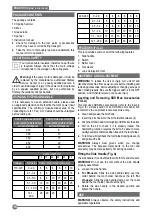
Replace the Carbon Brush (Fig. D)
Lubrication
♦ Regularly replace and check the carbon brushes.
Replace it in time when it is worn to the abrasive
boundary line. Keep the carbon brush clean and make
it freely slide in the brushing range. Two brushes shall
be eplaced at the same time.
♦ Use the cross screwdriver to counterclockwise unscrew
the screws, open the bottom cover (8) with a flat
screwdriver to counterclockwise open the brush cover,
you can remove the brush as shown in the Fig. D, and
put the new brush, and then clockwise fasten the brush
cover, finally put the bottom cover, and then use the
cross screwdriver to tighten it properly.
♦ Open the cap of the lube oil-injection inlet (5), check
the lube oil in the gearbox, if the lube oil is dirty or
insufficient, replace or add the adequate amount of lube
oil provided by the company.
Cleaning
WARNING!
Blow dirt and dust out of the
main housing with dry air as often as dirt is
seen collecting in and around the air vents.
Wear approved eye protection and approved dust
mask when performing this procedure.
WARNING!
Never use solvents or other
harsh chemicals for cleaning the non-
metallic parts of the tool. These chemicals may
weaken the material of the parts. Use only mild
soap and damp cloth to clean the tool. Never let any
liquid get inside the tool,cleaning of gasoline or
other chemicals, never immerse any part of the tool
into liquid.
¡IMPORTANT!
To ensure product SAFETY and
RELIABILITY, repairs, maintenance and adjustment
(other than those listed in this manual) should be
performed by authorized service centers or other
qualified organizations, always using identical
replacement parts. Unit contains no user service
able parts inside.
Optional Accessories
WARNING!
Since accessories, other than those
offered by Stanley, have not been tested with this
product, use of such accessories with this tool could be
hazardous. To reduce the risk of injury, only Stanley,
recommended accessories should be used with this
product.


