background image

5

ENGLISH

(Original instructions)

Vibration

The declared vibration emission values stated in the technical 

data and the declaration of conformity have been measured in 

accordance with a standard test method provided by EN60745 

and may be used for comparing one tool with another. The 

declared vibration emission value may also be used in a 

preliminary

assessment of exposure.

Warning!

 The vibration emission value during actual use of 

the power tool can differ from the declared value depending 

on the ways in which the tool is used. The vibration level may 

increase above the level stated.

When assessing vibration exposure to determine safety 

measures required by 2002/44/EC to protect persons regularly 

using power tools in employment, an estimation of vibration 

exposure should consider, the actual conditions of use and the 

way the tool is used, including taking account of all parts of the 

operating cycle such as the times when the tool is switched off 

and when it is running idle in addition to the trigger time.

Labels on tool

The following symbols along with the date code are shown on 

the tool:

:

Warning!

 To reduce the risk of injury, the user 

must read the instruction manual.

Additional safety instructions for batteries and 

chargers

Batteries

u

  Never attempt to open for any reason.

u

  Do not expose the battery to water.

u

  Do not store in locations where the temperature may 

exceed 40 °C.

u

  Charge only at ambient temperatures between 10 °C and 

40 °C.

u

  Charge only using the charger provided with the tool.

u

  When disposing of batteries, follow the instructions given 

in the section "Protecting the environment".

p

Do not attempt to charge damaged batteries.

Chargers

u

  Use your Stanley Fat Max charger only to charge the bat-

tery in the tool with which it was supplied. Other batteries 

could burst, causing personal injury and damage.

u

  Never attempt to charge non-rechargeable batteries.

u

  Have defective cords replaced immediately.

u

  Do not expose the charger to water.

u

  Do not open the charger.

u

  Do not probe the charger.

$

The charger is intended for indoor use only.

Read the instruction manual before use.

Electrical safety

#

Your charger is double insulated; therefore no 

earth wire is required. Always check that the 

mains voltage corresponds to the voltage on the 

rating plate. Never attempt to replace the charger 

unit with a regular mains plug.

u

  If the supply cord is damaged, it must be replaced by the 

manufacturer or an authorised Stanley Fat Max Service 

Centre in order to avoid a hazard.

Features

This tool includes some or all of the following features.

  1. Variable speed switch

  2. Forward/reverse slider

  3. Chuck

  4. Chuck collar

  5. Battery

  6. Belt clip

  7. LED work light

  8. Magnetic bit holder

  9. State of charge indicator

10.   Bit holder

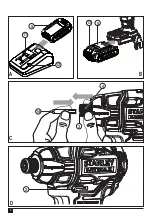
Fig. A

 11.  Charger

 12.  Charging indicator

Assembly

Warning!

 Before assembly, remove the battery from the tool.

Fitting and removing the battery (fig. B)

u

  To fit the battery (5), line it up with the receptacle on the 

tool. Slide the battery into the receptacle and push until 

the battery snaps into place.

u

  To remove the battery, push the release buttons (13) while 

at the same time pulling the battery out of the receptacle.

Fitting and removing a screwdriver bit or 

socket(fig. C)

This tool is fitted with a quick release chuck to allow for an 

easy exchange of bits.

Содержание KFMCF647

Страница 1: ...www stanley eu KFMCF647 8 4 9 3 1 2 7 10 5 6...

Страница 2: ...2 5 11 12 A 5 13 14 3 4 C B 2 D...

Страница 3: ...shock 3 Personal safety a Stay alert watch what you are doing and use common sense when operating a power tool Do not use a power tool while you are tired or under the influence of drugs alcohol or m...

Страница 4: ...ed metal parts of the power tool live and could give the operator an electric shock u Use clamps or another practical way to secure and support the workpiece to a stable platform Holding the work by h...

Страница 5: ...ow the instructions given in the section Protecting the environment p Do not attempt to charge damaged batteries Chargers u Use your Stanley Fat Max charger only to charge the bat tery in the tool wit...

Страница 6: ...ed batteries within 1 week Battery life will be greatly diminished if stored in a discharged state Leaving the battery in the charger The charger and battery pack can be left connected with the LED gl...

Страница 7: ...according to local provisions Further information is available at www 2helpU com Technical data KFMCF647 Voltage VDC 18 No load speed Min 1 0 2700 Beats BPM 0 3100 Max torque PTI Method Nm 180 Chuck...

Страница 8: ...rzeugen Funken die den Staub oder die D mpfe entz nden k nnen c Halten Sie Kinder und andere Personen w hrend der Benutzung eines Ger ts fern Bei Ablenkung k nnen Sie die Kontrolle verlieren 2 Elektri...

Страница 9: ...dfreien Zustand Kontrollieren Sie ob bewegliche Teile falsch ausgerichtet sind oder klemmen und ob Teile gebrochen oder so besch digt sind dass die Funktion des Ger ts beeintr chtigt ist Bei Besch dig...

Страница 10: ...h dieses Ger ts verbleiben zus tzliche Restri siken die m glicherweise nicht in den Sicherheitswarnungen genannt werden Diese Risiken bestehen beispielsweise bei Missbrauch oder l ngerem Gebrauch Auch...

Страница 11: ...ndanzeige 10 Bohrspitzenhalter Abb A 11 Ladeger t 12 Ladeanzeige Montage Warnung Entfernen Sie vor der Montage den Akku aus dem Ger t Einsetzen und Entnehmen des Akkus Abb B Um den Akku 5 einzusetzen...

Страница 12: ...f hrt wird Wenn der neu eingesetzte Akku ordnungsgem geladen wird ist der urspr ngliche Akku defekt Geben Sie diesen bei einem Service Center ab damit er recycelt werden kann Lassen Sie das Ladeger t...

Страница 13: ...itere Informationen finden Sie auf www 2helpU com Technische Daten KFMCF647 Spannung VDC 18 Leerlaufdrehzahl Min 1 0 2700 Schlagzahl Schl ge pro Minute 0 3100 Max Drehmoment PTI Methode Nm 180 Bohrfut...

Страница 14: ...lectrique augmente si de l eau p n tre dans un outil lectrique d Ne tirez pas sur le cordon d alimentation N utilisez jamais le cordon pour transporter tirer ou d brancher l outil lectrique Maintenez...

Страница 15: ...tructions ne doivent en aucun cas l utiliser Les outils lectriques peuvent tre dangereux entre des mains inexp riment es e Entretenez vos outils lectriques V rifiez que les pi ces mobiles sont align e...

Страница 16: ...er le nettoyage et l entretien sans surveillance Risques r siduels Certains risques r siduels autres que ceux mentionn s dans les avertissements sur la s curit peuvent survenir en utilisant l appareil...

Страница 17: ...vail LED 8 Porte embout magn tique 9 T moin du niveau de charge 10 Porte embout Fig A 11 Chargeur 12 T moin de charge Assemblage Avertissement Avant l assemblage retirez la batterie de l outil Install...

Страница 18: ...haude ou trop froide le t moin alterne un clignotement lent puis un clignotement rapide en rouge et ainsi de suite S lection du sens de rotation figure D Pour le serrage utilisez le sens de rotation a...

Страница 19: ...que les produits d crits dans les Donn es techniques sont conformes aux normes 2006 42 CE EN 60745 1 2009 A1 2010 EN60745 2 2 2010 Ces produits sont galement conformes la Directive 2004 108 CE jusqu a...

Страница 20: ...e para transportar tirar de la herramienta el ctrica o desenchufarla Mantenga el cable alejado del calor aceite bordes afilados y piezas en movimiento Los cables da ados o enredados aumentan el riesgo...

Страница 21: ...uela solo con el cargador especificado por el fabricante Un cargador adecuado para un tipo de paquete de bater as puede provocar riesgos de incendio al ser utilizado con otro paquete de bater as b Uti...

Страница 22: ...prolongados aseg rese de realizar pausas con frecuencia Deterioro auditivo Riesgos para la salud producidos al respirar el polvo que se genera cuando se utiliza la herramienta ejemplo en los trabajos...

Страница 23: ...tones de liberaci n 13 a la vez que tira de la bater a para extraerla del recept culo Colocaci n y extracci n de una punta o una broca del destornillador Fig C Esta herramienta est dotada de un mandri...

Страница 24: ...trario al de las agujas del reloj Para seleccionar la rotaci n hacia delante empuje el con trol deslizante de avance retroceso 2 hacia la izquierda Para seleccionar la rotaci n hacia atr s empuje el c...

Страница 25: ...cnicos cumplen con 2006 42 CE EN 60745 1 2009 A1 2010 EN60745 2 2 2010 Estos productos tambi n cumplen la directiva 2004 108 CE hasta el 19 04 2016 2014 30 UE desde 20 04 2016 y 2011 65 UE Para m s in...

Страница 26: ...tam o risco de choque el ctrico e Quando trabalhar com uma ferramenta el ctrica ao ar livre utilize uma extens o adequada para esse fim A utiliza o de um cabo adequado para uso ao ar livre reduz o ris...

Страница 27: ...outra bateria b Utilize ferramentas el ctricas apenas com baterias espec ficas A utiliza o de outras baterias pode dar origem a risco de danos e inc ndio c Quando n o utilizar a pilha mantenha a afas...

Страница 28: ...ara o de conformidade foram medidos de acordo com o m todo de teste padr o fornecido pela EN EN60745 e podem ser utilizados para comparar ferramentas O valor de emiss o de vibra o declarado pode ainda...

Страница 29: ...e o bot o de ajuste O acess rio fixo no local Nota Para retirar a ponta bocal repita os passos descritos acima Aten o Utilize apenas tomadas de impacto As tomadas que n o sejam de impacto podem partir...

Страница 30: ...n vel de aperto com uma chave de fenda de aperto Luz de trabalho LED A luz de trabalho LED 7 activada automaticamente quando o gatilho premido A luz de trabalho LED acende se quando o gatilho parcial...

Страница 31: ...UE Para obter mais informa es contacte a Stanley Europe atrav s do seguinte endere o ou consulte o verso do manual O signat rio respons vel pela compila o do ficheiro t cni co e efectua esta declara...

Страница 32: ...o pora enia pr dem elektrycznym d Nie wolno ci gn za przew d zasilaj cy Nie wolno ci gn podnosi ani wyci ga wtyczki z gniazda poprzez ci gni cie za kabel zasilaj cy narz dzia Chroni kabel zasilaj cy p...

Страница 33: ...e i konserwacja narz dzi zasilanych akumulatorowo a U ywa wy cznie adowarki zalecanej przez producenta U ycie adowarki przeznaczonej do adowania jednego typu akumulatora do adowania innego typu akumul...

Страница 34: ...e s uchu u Zagro enie dla zdrowia spowodowane wdychaniem py u wytwarzanego podczas u ytkowania urz dzenia np pod czas pracy w drewnie szczeg lnie d bowym bukowym oraz MDF Drgania Podawana w tabeli dan...

Страница 35: ...u obrot w 2 w po o eniu rodkowym u Poci gn i przytrzyma ko nierz uchwytu 4 w stron ty u narz dzia u Wsun trzpie ko c wki 14 w uchwyt 3 u Zwolni ko nierz Akcesorium jest unieruchomione i zablo kowane U...

Страница 36: ...e z opisem powy ej u Trzyma narz dzie w jednej linii z elementem z cznym u Po dokr ceniu sprawdzi moment obrotowy kluczem dynamometrycznym O wietlenie LED Diodowe wiat o robocze 7 uruchamia si automat...

Страница 37: ...UE od 20 04 2016 r oraz 2011 65 UE Aby otrzyma wi cej informacji nale y skontaktowa si z firm Stanley Europe pod adresem podanym poni ej lub na ko cu instrukcji Osoba ni ej podpisana odpowiedzialna je...

Страница 38: ...mi care Cablurile deteriorate sau ncurcate sporesc riscul electrocut rii e Atunci c nd opera i o unealt de lucru n aer liber utiliza i un prelungitor pentru exterior Utilizarea unui cablu adecvat pen...

Страница 39: ...endiu c Atunci c nd acumulatorul nu este utilizat p stra i l ferit de alte obiecte metalice precum agrafe de birou monede chei cuie uruburi sau alte obiecte metalice mici ce ar putea crea prin contact...

Страница 40: ...zut de norma EN60745 i pot fi utilizate pentru com pararea diverselor unelte Valoarea declarat a emisiilor de vibra ii poate fi utilizat de asemenea n cadrul unei evalu ri preliminare n privin a expun...

Страница 41: ...tija cap tului 14 n mandrin 3 u Elibera i man onul Accesoriul este fixat pe pozi ie Not Pentru a scoate cap tul racordul tubular repeta i pa ii de mai sus Avertisment Utiliza i exclusiv adaptoare cu i...

Страница 42: ...i cuplul cu o cheie de cuplu Lumin de lucru cu LED Indicatorul luminos de lucru cu LED 7 este activat automat la ap sarea declan atorului LED ul de lucru va lumina atunci c nd comutatorul este ap sat...

Страница 43: ...i suplimentare v rug m s contacta i Stanley Europe la urm toarea adres sau s consulta i coperta din spate a manualului Subsemnatul este responsabil pentru ntocmirea dosarului tehnic i face aceast decl...

Страница 44: ...44 Stanley Fat Max KFMCF647 1 a b c 2 a b c d e f 3 a b c...

Страница 45: ...45 d e f g 4 a b c d e f g 5 a b c d...

Страница 46: ...46 6 a u u u u u u u 8 u u u u u u EN60745...

Страница 47: ...47 2002 44 EC u u u 40 C u 10 40 C u u p u Stanley Fat Max u u u u u u Stanley Fat Max 1 2 3 4 5 6 7 8 9 10 11 12 B u 5...

Страница 48: ...48 u 13 C u 2 u 4 u 14 3 u A 10 C 40 C 24 C 10 C 40 C u 5 11 u 12 12 12 u 1 12 u 5 u u u 60 D u 2...

Страница 49: ...49 u u u u u u 7 u 9 u u u Stanley Fat Max u u u Z www 2helpU com KFMCF647 18 1 0 2 700 0 3 100 PTI 180 6 1 2 230 230 18 18 A 1 2 90 240 45 120 FMC689L FMC687L FMC688L 18 18 18 1 5 2 0 4 0...

Страница 50: ...ibi yan c ortamlarda al t rmay n Elektrikli aletler toz veya dumanlar ate leyebilecek k v lc mlar kart r c Bir elektrikli aleti al t r rken ocuklardan ve etraftaki ki ilerden uzak tutun Dikkatinizi da...

Страница 51: ...in ba lanmas i in cihazlar verilmesi halinde bunlar n uygun bi imde ba lanmas ve kullan lmas n sa lay n Bu cihazlar n kullan lmas tozla ilgili tehlikeleri azaltabilir 4 Elektrikli aletlerin kullan m v...

Страница 52: ...imi ve bilgisi olmayan ki ilerce yaln zca dikkatli g zetim alt nda ve cihaz n g venli ekilde kullan m ile cihazla ilgili riskler hakk nda bilgi verildikten sonra kullan labilir u ocuklar cihazla oynam...

Страница 53: ...ir k sm n veya t m n i ermektedir 1 De i ken h z anahtar 2 leri geri s rg s 3 Mandren 4 Kovan rakoru 5 Ak 6 Kemer klipsi 7 LED al ma lambas 8 Manyetik u tutucu 9 arj durumu g stergesi 10 U tutucu ekil...

Страница 54: ...er her h zda bir kez yan p s ner ve tekrarlan r D n y n n se me ekil D S kmak i in ileri saat y n nde d n kullan n Gev etmek i in geri saat y n n n tersine d n kullan n u leri d nmeyi se mek i in iler...

Страница 55: ...2010 Bu r n ayn zamanda 2004 108 EC 19 04 2016 ya kadar 2014 30 EU 20 04 2016 dan itibaren ve 2011 65 EU say l Y nerge ile uyumludur Daha fazla bilgi i in l tfen a a daki adresten Stanley Europe ile...

Страница 56: ...a Monza 7 A Fax 039 9590313 20871 Vimercate MB www stanley it Nederland Stanley Fat Max Tel 31 164 283 065 Joulehof 12 Fax 31 164 283 200 4600 RG Bergen op Zoom Enduser NL SBDinc com Norge Stanley Fat...

Отзывы: