background image

3 – 4

Remote Operation

3.2

Alphabetic list of commands

*CLS

3 – 16 Clear status

*ESE(?) [

i,

]

{

j

}

3 – 16 Standard event status enable

*ESR? [

i

]

3 – 16 Standard event status

*IDN?

3 – 14 Identify

*OPC(?)

3 – 14 Operation complete

*RST

3 – 14 Reset

*SRE(?) [

i,

]

{

j

}

3 – 15 Service request enable

*STB? [

i

]

3 – 15 Status byte

*TRG

3 – 13 Remote Trigger

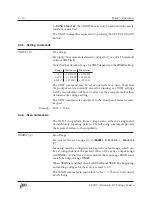
A

ALRM(?)

{

z

}

3 – 13 Audible alarms

I

ILOC?

3 – 15 Interlock

ISOL(?)

{

z

}

3 – 9 Output isolation

K

KCLK(?)

{

z

}

3 – 13 Key clicks

L

LCME?

3 – 17 Last command error

LEXE?

3 – 16 Last execution error

O

OVLD?

3 – 15 Overload

R

RNGE(?)

{

z

}

3 – 9 Range

S

SCAA(?)

{

z

}

3 – 13 Scan Arm

SCAB(?)

{

f

}

3 – 11 Scan Beginning Voltage

SCAC(?)

{

z

}

3 – 12 Scan Cycle

SCAD(?)

{

z

}

3 – 12 Scan Display

SCAE(?)

{

f

}

3 – 11 Scan Ending Voltage

SCAR(?)

{

z

}

3 – 10 Scan Range

SCAS(?)

{

z

}

3 – 12 Scan Shape

SCAT(?)

{

f

}

3 – 11 Scan Time

SENS(?)

{

z

}

3 – 9 Remote Sensing

DC205 Precision DC Voltage Source

Содержание DC205

Страница 1: ...Operation and Service Manual Precision DC Voltage Source DC205 Stanford Research Systems Revision 0 30 February 22 2019 ...

Страница 2: ...e returned to a Stanford Research Systems authorized service facility Contact Stanford Research Systems or an authorized representative before returning this product for repair Information in this document is subject to change without notice Copyright c Stanford Research Systems Inc 2019 All rights reserved Stanford Research Systems Inc 1290 D Reamwood Avenue Sunnyvale CA 94089 USA Phone 408 744 9...

Страница 3: ...strument settings 1 5 1 5 1 Sense 1 5 1 5 2 Isolation 1 6 1 5 3 Scanning 1 7 1 6 Interlock 1 10 2 Operation 2 1 2 1 Navigating the front panel 2 2 2 1 1 Power 2 2 2 1 2 Range 2 4 2 1 3 Select Adjust 2 4 2 1 4 Numeric Entry 2 5 2 1 5 Sense 2 6 2 1 6 Config 2 6 2 1 7 Scan 2 7 2 1 8 Output 2 7 2 1 9 Status 2 8 2 1 10 Source Out 2 8 2 2 Theory of operation 2 10 2 3 Scanning 2 10 2 4 Error messages 2 10...

Страница 4: ...Setup commands 3 13 3 4 8 Interface commands 3 13 3 4 9 Status commands 3 15 3 5 Status model 3 18 3 5 1 Status byte SB 3 18 3 5 2 Service request enable SRE 3 19 3 5 3 Standard event status ESR 3 19 4 Field Calibration 4 1 4 1 Introduction to Field Calibration 4 2 4 2 Equipment needed 4 2 4 3 Detailed procedure 4 2 A Fuse and ac Line A 1 A 1 Power Entry module A 1 A 2 ac voltage selector A 1 A 3 ...

Страница 5: ...ated with the LINE VOLTAGE SELECTOR set for the wrong ac line voltage or if the wrong fuses are installed Verify that the correct line fuses are installed before connecting the line cord Use two 2 metric size 5 20 mm fuses For 100 V 120 V use 1 A fuses for 220 V 230 V 240 V use 0 5 A fuses See appendix A for detailed instructions Line cord The DC205 Precision DC Voltage Source has a detachable thr...

Страница 6: ...d on SRS Products Symbol Description Alternating current Caution risk of electric shock Frame or chassis terminal Caution refer to accompanying documents Earth ground terminal Battery Fuse On supply Off supply DC205 Precision DC Voltage Source ...

Страница 7: ...this manual are Front panel buttons are set as Button Front panel knobs are set as Knob Front panel indicators are set as Overload Remote command names are set as IDN Literal text other than command names is set as OFF Remote command examples will all be set in monospaced font In these examples data sent by the host computer to the DC205 are set as straight teletype font while responses received b...

Страница 8: ...quired to settle to 63 of final value Time to settle to 99 999 of final value Settling times measured for full scale step into 10 MΩ load Accuracy and stability Range Accuracy Stability 23 C 5 C 1 C 24 h 90 day 1 year 24 h ppm setting μV 1 V 7 2 12 6 25 10 1 1 10 V 7 6 12 15 25 20 1 3 100 V 8 60 12 80 25 100 1 20 preliminary Noise and drift Range Temperature Noise coefficient typical 0 C 40 C 0 1 10 H...

Страница 9: ...Optical fiber Connection to SX199 Optical Interface Controller Provides isolated connectivity to GPIB RS 232 and Ethernet General Parameter Specification Temperature 0 C to 40 C non condensing Power 20 W 100 120 220 240 VAC 50 60 Hz Dimensions 8 3 W 3 5 H 13 D Weight 10 lbs Fuse two 2 metric size 5 20 mm DC205 Precision DC Voltage Source ...

Страница 10: ...viii General Information DC205 Precision DC Voltage Source ...

Страница 11: ...fer to chapter 2 for a more complete introduction to the DC205 In This Chapter 1 1 How to use this manual 1 2 1 2 Preliminaries 1 2 1 2 1 Equipment needed 1 2 1 3 First example turning on the instrument 1 2 1 4 User interface 1 4 1 5 Instrument settings 1 5 1 5 1 Sense 1 5 1 5 2 Isolation 1 6 1 5 3 Scanning 1 7 1 6 Interlock 1 10 1 1 ...

Страница 12: ...e current source 1 2 1 Equipment needed To perform all the steps described in this chapter you will need 1 a collection of stacking banana plug test leads 2 a precision voltmeter with at least 6 digits resolution 3 a BNC 50 Ω terminator 4 a dual banana to BNC banana male BNC female adapter 1 3 First example turning on the instrument This section describes the initial steps for first operating the D...

Страница 13: ...te the value is not added to the display as the implied value 13 is out of range for the current setting Then press the decimal point button and then press 0 three times The display should show and Pending should still be flashing 7 Now press the 7 digit The display will show We don t actually want that last digit so now press the button to erase the 8 Press the Enter Start The Pending indicator sh...

Страница 14: ...s one position to the left Now slowly turn the knob for 3 more clicks clockwise The display should now show and the multimeter should show the same voltage 5 Now clear the output setting by pressing 0 and Enter Start The display returns to but notice the mil livolts digit is still blinking Now press the button three times The display should now show Turn the knob counterclockwise for 5 clicks The ...

Страница 15: ...gn the Ground tab of the adapter with the LOW side banana leads 5 If not already so configured press the Range button repeat edly until the 1 V range is selected Press Float Ground to select Ground and press 2 or 4 Wire to select 2 wire 6 Press 1 and Enter Start to program the setting to 1 000 000 V Press On Off to enable the output Verify the multimeter displays a voltage very close to 1 000 000 V ...

Страница 16: ...rry any of the load current the desired output voltage is applied at the point of interest in this case at the multimeter input terminals 1 5 2 Isolation The CONFIG setting selects whether the output circuitry of the DC205 is referenced to chassis ground or floating 1 If the OUTPUT On indicator is lit disable it by pressing the On Off button 2 Connect a pair of banana test leads from the red and bla...

Страница 17: ... at the HI terminal The Overload indicator should turn off and the multimeter again should display very close to 1 0000 V 1 5 3 Scanning In addition to generating a stable DC voltage the DC205 is also able to create linear sweeps of the output voltage This example will demonstrate one such sweep 1 If the OUTPUT On indicator is lit disable it by pressing the On Off button 2 Connect a pair of banana t...

Страница 18: ...can and repeating until cancelled Press and to switch between these options Leave the setting at and then press again 10 The display now shows the scan display mode indicated by the at the left side of the display The two choices are display is updated in near realtime during the scan and display is left static during the scan Press and to switch between these options Leave the setting at and then...

Страница 19: ...hat the scan is armed and ready and the Pending indicator is steadily illuminated Press the Enter Start button to start the scan 13 While the scan is running notice that the multimeter and the DC205 display are both smoothly sweeping from 0 1 V to 0 8 V After 10 seconds the scan should end and the output voltage settles at 0 8 V DC205 Precision DC Voltage Source ...

Страница 20: ...r death Figure 1 1 The DC205 rear panel shown with an interlock defeat plug For safety the 100 V range can only be enabled when the interlock signal is asserted To assert the interlock a low impedance circuit must be closed between pins 1 and 2 of the rear panel INTERLOCK socket A mating plug is provided with the DC205 When the interlock is asserted the front panel Interlock indicator will be illu...

Страница 21: ... Chapter 2 1 Navigating the front panel 2 2 2 1 1 Power 2 2 2 1 2 Range 2 4 2 1 3 Select Adjust 2 4 2 1 4 Numeric Entry 2 5 2 1 5 Sense 2 6 2 1 6 Config 2 6 2 1 7 Scan 2 7 2 1 8 Output 2 7 2 1 9 Status 2 8 2 1 10 Source Out 2 8 2 2 Theory of operation 2 10 2 3 Scanning 2 10 2 4 Error messages 2 10 2 1 ...

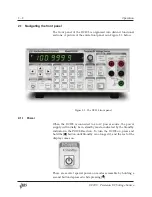
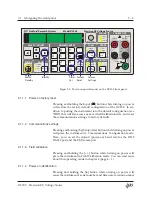
Страница 22: ... 1 Power When the DC205 is connected to an AC power source the power supply will initially be in standby mode indicated by the Standby indicator in the POWER section To turn the DC205 on press and hold the button until Standby is no longer lit and the rest of the display comes on There are several special power on modes accessable by holding a second button depressed while pressing DC205 Precision...

Страница 23: ...will restore the factory default configuration of the DC205 In ad dition to putting the instrument into the default configuration see RST this will also erase any saved field calibration data and reset the communications settings to factory defaults 2 1 1 2 Communcations settings Pressing and holding the Setup Arm button while turning on power will place the instrument in Communcations Configuration m...

Страница 24: ...g the range is only possible when the output is disabled Pressing Range while the output is On causes the Error indicator to briefly light and the DC205 will beep Note that while any range may be selected so long as the output is off it is not possible to enable the output onto the 100 V range unless the safety interlock is asserted 2 1 3 Select Adjust The cluster of four arrow buttons in the SELECT...

Страница 25: ...lay idle state by pressing Cancel or by briefly pressing the knob inwards When no digit is selected blinking turning the knob will have no effect The arrow buttons are also used when navigating secondary instru ment settings such as scan parameters 2 1 4 Numeric Entry The numeric entry keypad is used to directly enter voltage settings to the DC205 Values are implicitly positive unless the button is ...

Страница 26: ...n will accept the currently displayed value To leave a pending numeric entry without causing the value to be set press the Cancel button 2 1 5 Sense The 2 or 4 Wire button in the SENSE block controls whether the DC205 uses local or remote feedback for controlling the voltage at the load Pressing 2 or 4 Wire toggles between 2 wire and 4 wire This op eration can be performed at any time regardless o...

Страница 27: ...fully arm a scan the output must already be on and the instrument range must match the scan range previously selected Once armed the output voltage is changed to the beginning scan voltage and the Armed indicator is lit The Pending indicator is also lit steadily indicating the scan is ready and can be started by pressing the Enter Start button Pressing Cancel when a scan is armed will disarm the s...

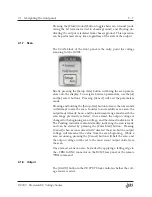
Страница 28: ...ommands are received by the DC205 from any of the three remote interfaces The indicator is not persistent it will light for approximately one second each time remote commands are received The Error indicator will illuminate red whenever a disallowed oper ation is attempted or when an illegal remote command is received This indicator is also not persistent and will illuminate for approxi mately 1 s...

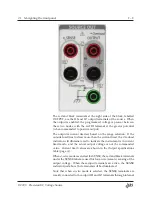
Страница 29: ...imit the Overload indicator will illuminate red to indicate the instrument is in current limit mode and the actual output voltage is not the commanded value Current limit values are shown in the Output specifications table page vi When 4 wire mode is selected for SENSE the red and black terminals under the SENSE label are used for four wire remote sensing of the output voltage When these input term...

Страница 30: ...emory becomes corrupted the DC205 may display the message Err FL indicating the flash memory is invalid This failure is unlikely but the instrument will not operate in this mode and must be returned to the factory for service 2 4 0 2 Configuration lost If the memory recording the last configuration of the DC205 is de termined to be corrupted upon power up the message Err CF is displayed This message ...

Страница 31: ...onfiguration 3 6 3 3 2 Buffers 3 6 3 4 Commands 3 7 3 4 1 Command syntax 3 7 3 4 2 Notation 3 8 3 4 3 Examples 3 8 3 4 4 Configuration commands 3 9 3 4 5 Setting commands 3 10 3 4 6 Scan commands 3 10 3 4 7 Setup commands 3 13 3 4 8 Interface commands 3 13 3 4 9 Status commands 3 15 3 5 Status model 3 18 3 5 1 Status byte SB 3 18 3 5 2 Service request enable SRE 3 19 3 5 3 Standard event status ESR 3...

Страница 32: ... 9 Range ISOL z 3 9 Output isolation SENS z 3 9 Remote Sensing SOUT z 3 9 Output Settings VOLT f 3 10 DC voltage Scanning SCAR z 3 10 Scan Range SCAB f 3 11 Scan Beginning Voltage SCAE f 3 11 Scan Ending Voltage SCAT f 3 11 Scan Time SCAS z 3 12 Scan Shape SCAC z 3 12 Scan Cycle SCAD z 3 12 Scan Display SCAA z 3 13 Scan Arm TRG 3 13 Remote Trigger Setup KCLK z 3 13 Key clicks ALRM z 3 13 Audible a...

Страница 33: ...15 Overload STB i 3 15 Status byte SRE i j 3 15 Service request enable ESR i 3 16 Standard event status ESE i j 3 16 Standard event status enable CLS 3 16 Clear status LEXE 3 16 Last execution error LCME 3 17 Last command error DC205 Precision DC Voltage Source ...

Страница 34: ...ote Trigger A ALRM z 3 13 Audible alarms I ILOC 3 15 Interlock ISOL z 3 9 Output isolation K KCLK z 3 13 Key clicks L LCME 3 17 Last command error LEXE 3 16 Last execution error O OVLD 3 15 Overload R RNGE z 3 9 Range S SCAA z 3 13 Scan Arm SCAB f 3 11 Scan Beginning Voltage SCAC z 3 12 Scan Cycle SCAD z 3 12 Scan Display SCAE f 3 11 Scan Ending Voltage SCAR z 3 10 Scan Range SCAS z 3 12 Scan Shap...

Страница 35: ...3 2 Alphabetic list of commands 3 5 SOUT z 3 9 Output T TOKN z 3 14 Token Mode V VOLT f 3 10 DC voltage DC205 Precision DC Voltage Source ...

Страница 36: ...rface is implemented as a serial port emulator with fixed baud rate of 115 200 The RS 232 DB 9 and optical fiber interfaces TBD are both configured at power on as 9600 baud 8 bit no parity or flow control The USB and RS 232 interfaces can be commanded to differ ent baud rates under program control with the BAUD command but the optical fiber interface is fixed at 9600 baud 3 3 2 Buffers The DC205 stores i...

Страница 37: ...aracters are always required Do not send or or as part of the command Multiple parameters are separated by commas Multiple commands may be sent on one command line by separating them with semi colons so long as the input buffer does not overflow Commands are terminated by either CR or LF characters Null commands and whitespaces are ignored Execution of the command does not begin until the command te...

Страница 38: ...eter for both set and query forms 3 4 3 Examples Each command is provided with a simple example illustrating its usage In these examples all data sent by the host computer to the DC205 are set as straight teletype font while responses received by the host computer from the DC205 are set as slanted teletype font The usage examples vary with respect to set query optional parame ters and token format...

Страница 39: ... may be sent at any time ISOL 1 Example Remote Sensing SENS z Set query the remote sensing mode to z TWOWIRE 0 FOURWIRE 1 The SENS command is equivalent to pressing the 2 or 4 Wire button This command may be sent at any time SENS FOURWIRE Example Output SOUT z Set query the voltage source output mode to z OFF 0 ON 1 The voltage source output is enabled or disabled using the SOUT command When set t...

Страница 40: ...can parameters then determine the voltage setting The VOLT command is equivalent to the front panel numeric entry keypad VOLT 1 25e 2 Example 3 4 6 Scan commands The DC205 can perform linear voltage scans either as a single shot or indefinitely repeating pattern The following commands provide the remote interface to this capability Scan Range SCAR z Set query the scan range to z RANGE1 0 RANGE10 1 ...

Страница 41: ... be within the valid range for the selected scan range SCAR Limits are the same as for the VOLT command The SCAE command is equivalent to the entry field under SCAN Setup SCAE 0 750 Example Scan Time SCAT f Set query the scan duration to f in seconds The default value is SCAT 1 0 The value for SCAT must be between 0 1 and 9999 9 Values are rounded to the nearest 0 1 s The duration time set by SCAT ...

Страница 42: ...CE 0 REPEAT 1 Scans can be configured to either execute a single time SCAC ONCE or to repeat indefinitely SCAC REPEAT When SCAC REPEAT is set and the scan shape SCAS ONEDIR is se lected then the output voltage will change abruptly from SCAE to SCAB at the conclusion of each cycle When SCAC ONCE is set the output voltage remains at SCAE at the conclusion of the scan The SCAC command is equivalent to ...

Страница 43: ...Remote Trigger TRG Remotely start a scan Note that the scan must already be armed for TRG to start a scan The TRG command is equivalent to the Enter Start button when the scan system is Armed 3 4 7 Setup commands Key clicks KCLK z Set query audible key clicks to z OFF 0 ON 1 Note there is no corresponding front panel method to access this command it is exclusive to the remote interface Audible ala...

Страница 44: ...05 responds with the numeric version of the token quantity When TOKN ON the text version is returned TOKN Example ON Operation complete OPC The set form OPC will set the OPC bit in the Standard Event Status register the query form OPC will return the value 1 OPC is useful for pacing streams of remote commands the OPC command will not be processed by the command execution of the DC205 until all pre...

Страница 45: ...nt value of the interlock If the safety interlock is asserted ILOC returns 1 otherwise it returns 0 ILOC Example 1 Overload OVLD Reads the current value of the signal overload status Returns 1 if the output is overloaded current limit mode or 0 otherwise OVLD Example 0 Status byte STB i Reads the Status Byte register bit i STB Example 0 Service request enable SRE i j Set query the Service Request ...

Страница 46: ...S CLS immediately clears the ESR register CLS Example Last execution error LEXE Query the last execution error code A query of LEXE always clears the error code so a subsequent LEXE will return 0 Valid codes are Value Definition 0 No execution error since last LEXE 1 Illegal value 2 Wrong token 3 Invalid bit 4 Queue full 5 Not compatible CURR 12 0 LEXE LEXE Example 1 0 The error 1 Illegal value is ...

Страница 47: ... execution error since last LCME 1 Illegal command 2 Undefined command 3 Illegal query 4 Illegal set 5 Missing parameter s 6 Extra parameter s 7 Null parameter s 8 Parameter buffer overflow 9 Bad floating point 10 Bad integer 11 Bad integer token 12 Bad token value 13 Bad hex block 14 Unknown token IDN Example LCME 4 The error 4 Illegal set is due to the missing DC205 Precision DC Voltage Source ...

Страница 48: ...Enable Registers These read write registers define a bitwise mask for their cor responding event register If any bit position is set in an event register while the same bit position is also set in the enable register then the corresponding summary bit message is set in the Status Byte Enable register names end with SE or EN Status Byte This read only register represents the top of the status model ...

Страница 49: ...s of 8 event flags These event flags are all sticky bits that are set by the corresponding events and cleared only by reading or with the CLS command Reading a single bit with the ESR i query clears only Bit i Weight Bit Flag 1 0 OPC 2 1 undef 0 4 2 QYE 8 3 DDE 16 4 EXE 32 5 CME 64 6 undef 0 128 7 undef 0 OPC Operation Complete Set by the OPC command QYE Query Error Indicates data in the output queu...

Страница 50: ...3 20 Remote Operation At power on this register is cleared DC205 Precision DC Voltage Source ...

Страница 51: ...ion This chapter provides instructios for calibrating the DC205 Precision DC Voltage Source in the field In This Chapter 4 1 Introduction to Field Calibration 4 2 4 2 Equipment needed 4 2 4 3 Detailed procedure 4 2 4 1 ...
Страница 52: ...4 2 Field Calibration 4 1 Introduction to Field Calibration 4 2 Equipment needed 4 3 Detailed procedure DC205 Precision DC Voltage Source ...

Страница 53: ...ntry module The line cord receptacle fuse holder and line voltage selector are all part of the power entry module located on the rear panel of the DC205 Detailed instructions for changing the line voltage selection and fuse replacement follow Figure A 1 The DC205 Power Entry module A 2 ac voltage selector The DC205 line voltage selection is indicated by the white number visible near the top of the...

Страница 54: ... 3 Insert the tool into the voltage selection slot and remove the selector wheel from the housing 4 Orient the selector wheel so that the desired line voltage will show through the window 5 Replace the wheel into the power entry module and close the covor door ensuring the selected voltage appears in the win dow 6 If necessary replace the fuse for the appropriate rating based on line voltage DC205...

Страница 55: ...o the right hand side of each of the fuse hold ers at the locations shown circled below Gently extract the two fuse holders 4 Gently pry the old fuses out of the holders and insert the new fuses in their place Be sure to use two 2 metric size 5 20 mm fuses The fuse should sit in the holder as shown 5 Re insert the fuse holders into the power entry module being sure to orient the white arrows as sh...

Отзывы: