14
15
08.07.2020
08.07.2020
EN
EN
d)
The standby mode
• The device goes to automatic standby mode
which will turn on when it is not used for 30
minutes. The temperature of the soldering iron
automatically drops to 200° C, and when the
device is not used for approx. 2 hours, it will
automatically turn off. To turn the device back
on, lift the soldering iron or press the "#" button
or switch the device on again. It is not possible
to change the sleep time.
e) Beeps
• A single beep means that the device has reached
the set temperature.
• A continuous beep may mean the following:
a decrease in temperature of approx. 10%
from the set value (the beep will stop when
the temperature reaches the appropriate
temperature), exceeding the maximum
temperature of the soldering iron /the soldering
iron is not connected (the display will show the
message "LE") or damage to the heater or the
heater temperature sensor (the display will show
"SE").
Model S-LS-72
a)
The display will turn on automatically and the last
temperature setting will be displayed for 3 seconds,
then the display will show the current temperature.
b) Temperature
• Pressing the "▲" or "▼" buttons switches into
the temperature control status; the temperature
value may be change using these buttons.
• Pressing "1" or "2" or "3" (the memory buttons)
you can quickly set the temperature stored in
the device.
c)
Memory buttons
• To change the value of the previously set
temperature, set the desired temperature using
the "▲" or "▼" buttons, then press and hold
button "1" or "2" or "3". The temperature will be
saved.
d)
Temperature calibration
• Calibration should be performed when changing
the Soldering iron or the heater.
• An external temperature sensor must be
connected to complete the calibration (not
included).
• To enter the programming mode, press and
hold the "▲" and "▼" buttons simultaneously.
Then select button "1", the display will show
"CAL" on the left hand side, and the last
correction value will be displayed. To change
the calibration value, use the "▲" or "▼" buttons
(calibration range between -50°C and +50°C).
Select the desired value and confirm by pressing
"1" again. Compare the temperature with the
sensor reading. Set the appropriate temperature
difference, if necessary repeating the steps.
e)
Changing the operating mode
• Pressing the "▲" and "▼" buttons
simultaneously, enter the programming mode
and then select the "2" button. Use the "▲" or
"▼" button to select the mode. When you have
set the mode, pressing the "2" button will save
your settings.
• Mode 0: continuous operation in high
temperature; in this mode, high temperature
stability is enhanced.
• Mode 1: suitable for operating at different
temperatures over the same time.
• Mode 2: operating within a wide temperature
range.
f)
Sleep function
• Pressing the "▲" and "▼" buttons
simultaneously, enter the programming mode
and then select the "2" button. Then, set the
operating mode (see subsection above) or
press the "2" button three times to proceed
to the sleep function settings. The last saved
sleep time will appear on the display. You can
change the sleep time value using the "▲" or
"▼" buttons. Confirm pressing "2".
• In the sleep mode, the temperature goes down
to 200°C, if the set working temperature is lower
than 200°C then the device will not enter the
sleep mode.
• After the device has entered the sleep mode,
press any button if you want to turn the device
on.
g)
Device lock setting
• Pressing the "▲" and "▼" buttons
simultaneously, enter the programming mode
and then select the "3" button.
• Use the "▲" or "▼" button to set the selected
password, confirm with the "3" button. Then
enter the same password again and confirm
with "3".
• The device will be locked after restarting.
• "LOC" will appear on the display. To unlock,
press the "▲" and "▼" buttons simultaneously
to enter the programming mode, and then
select the "3" button. Use the "▲" or "▼" button
to enter the password.
• To deactivate the device lock, enter the
programming mode and set the password to
"0".
i)
Changing the temperature units
• The device must be turned off before changing
the units.
• Press and hold the "2" button and turn on the
device. The units will be changed
h)
Sound setting
• The device must be turned off.
• To turn on the sound, press and hold the "▲"
and "▼" buttons and simultaneously turn on the
device.
i)
Error message
• If the "S - E" message appears on the display
with a five-second long alarm beep, there is
a problem with the sensor in the soldering iron
or the soldering iron is disconnected.
• If the "H - E" message appears on the display
with a five-second long alarm beep, the heating
element cable or part of the circuit is damaged.
3.4. LOCKING FUNCTION
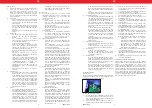
Model S-LS-72
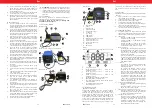
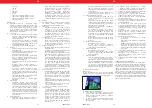
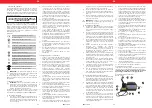
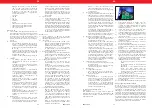
To reset the password, open the device housing, press the
PCBA reset button (shown in the figure below) and turn on
the device at the same time.
h)
Error message
• “S-E” message on the display means that there
is a problem with the sensor in the soldering
iron or that the soldering iron is disconnected.
• "H – E” message on the display means that the
heating element cable or a part of the circuit is
damaged.
Model: S-LS-63, S-LS-64, S-LS-65
a) After turning on the device, depending on the
model, the display will show the power value for
3 seconds. Then the last temperature setting will
appear followed by the current temperature.
b) Temperature
• Pressing the "▲" or "▼" buttons switches into
the temperature control status; the temperature
value may be change using these buttons.
• Pressing "1" or "2" or "3" (the memory buttons)
you can quickly set the temperature stored in
the device.
c)
Memory buttons
• To change the value of the previously set
temperature, set the desired temperature using
the "▲" or "▼" buttons, then press and hold
button "1" or "2" or "3". The temperature will be
saved.
d)
Temperature lock function
• Set the temperature and press "1" and "2" and
"3" simultaneously for more than 3 seconds. The
set value will be locked.
• To remove the lock, press and hold button "1"
and "2" and "3" again for more than 3 seconds.
The temperature lock will be unlocked.
e) Menu
• To enter the settings, press the "▲" and "▼"
buttons simultaneously for more than 3
seconds. Moving to the next menu window is
possible by pressing the "▲" or "▼" buttons. In
order to select a parameter, use buttons "1" or
"2" or "3"; you can change the parameter value
using buttons "▲" or "▼".
• Temperature calibration (CAL): An external
temperature sensor (not included in the set)
should be connected to calibrate the device.
When you enter the parameter using "1"
button, the display will show the value of the last
correction (the correction range is - 50°C~50°C).
Then, select a desired value. Confirm the set
value correction by pressing "1" again. Compare
temperature values with the sensor readings.
Set the appropriate temperature difference, if
necessary repeating the steps.
• Resolution of the set temperature (FIN) - Using
the FIN mode you can change the resolution
of the set temperature in 1 ° C or 5 ° C
increments. Press "2" button and then use the
"▲" or "▼" buttons to select the ON value if the
temperature is to be changed by 1 ° C or the
OFF value if it is to be changed by 5 ° C.
• Temperature unit selection (C-F) - enter the
parameter using "3" button, select the desired
unit using the "▲" or "▼" button. Confirm by
pressing "3".
• Standby mode (Stb) - use the "▲" or "▼"
buttons to move to the next menu window.
Select the parameter with "1" button and set the
appropriate time. The time setting range is from
1 to 120 minutes. Confirm with "1". The device
will go into standby and, after the selected time
has elapsed, the temperature will gradually
decrease to approx. 150° C. The device will turn
on if you press any button.
• Automatic switch off time (Sdn) - select the
parameter using "2" button, and set the
appropriate time after which the device will be
turned off. The time setting range is from 1 to
120 minutes. Confirm with "2".
• Sound (bL) - select the parameter with the "3"
button and set the sound to "OFF" or "ON"
using the "▲" or "▼" buttons. Confirm with "3".
• Factory settings (FAC) - use the "▲" or "▼"
buttons to move to the next menu window.
Select the parameter using "1" button and
select "ON" on the display). Confirm with "1",
the device will return to factory settings:
» CAL: reset
» FIN: ON
» C-F: C
» STB: OFF
» SDN: OFF
» BL: ON
» Quick access temperature 1: 200° C
» Quick access temperature 2: 300° C
» Quick access temperature 3: 400° C
» ESC: exit the menu.
Model S-LS-68
a)
The display will turn on and the temperature will
rise to the factory settings. When the temperature
reaches a stable value, a red dot will flash on the
right hand side, which means that the device is
maintaining the temperature. After the temperature
has been reached, the display will show its current
value.
b) Temperature
• To change the temperature, press the "*" button.
Then, the hundreds digit will "flash"; use the "▲"
or "▼" button to set the desired temperature.
• Pressing the "*" button again initiates setting
the tens and single digits of the temperature
value. The value is changed using the "▲" or "▼"
buttons
• Confirm the selected value with the "#" button.
c) Calibration
• Calibration should be performed when changing
the Soldering iron or the heater.
• An external temperature sensor must be
connected to complete the calibration (not
included).
• The device must be turned off.
• Press and hold the "*" button and simultaneously
turn on the device. The symbol "-P-" will show
for 2 seconds on the display, confirming the
calibration mode.
• The device will automatically set the temperature
to 400° C
• Press the "*" button, the display will show "0",
you can now set the temperature difference.
• Using a temperature meter, read the soldering
iron tip temperature. The temperature shown
on the device should be about 400° C (the
temperature fluctuations may be +/- 5 ° C).
• Use the "▲" or "▼" button to set the temperature
difference, if necessary.
• Confirm with the "#" button. A beep will sound.


