background image

14

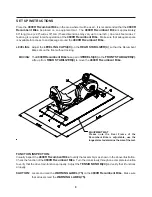
HOW TO INSTALL AND REPLACE BATTERY:

AA Batteries

COMPUTER INSTRUCTIONS

1.
2.

Do not mix a new battery with an old battery.
Use the same type of battery.  Do not mix an alkaline battery with
another type of battery.
Rechargeable batteries are not recommended.

1.
2.

3.

NOTE:

Open the Battery Door on the back of the meter.
The meter operates with two AA batteries, two batteries included.
Refer to the illustration to install or replace the batteries.

OPERATION DESCRIPTIONS

To stop a running program, stop pedaling for 4 seconds to switch into 

"STOP"

 mode.  In this mode, you

can move the pedals again to continue to run the current program or, you can press the 

SET

 button to

select a new program.  The functional values of 

DISTANCE

 and 

CALORIES

 will continue to accumulate.

When you complete a program, you can stop pedaling and press 

SET

 button to select a new program.

The functional values of 

DISTANCE

 and 

CALORIES

 will continue to accumulate.  This will allow you to

run several programs and still know the total 

DISTANCE

 and 

CALORIES

 during the workout.

If you want to restart with a new program,  press and hold the 

MODE

 button down for two seconds to

reset all of the function values to zero.  Press 

SET

 button to select a new program.

The computer will shut off automatically after 3 minutes of inactivity and all function values will be reset
to zero.

1.

2.

3.

4.

STORAGE

1.
2.

3.

4.

To store the 

4800R Recumbent Bike

 simply keep it in a clean dry place.

Adjust the 

REAR FRAME(3)

 into the 

FRONT FRAME(1)

 to the shortest position.  The 

4800R Recumbent

Bike

 is approximately 45 5/8" long x 28" wide x 33" tall.  These dimensions will vary.  Please measure

your 

4800R Recumbent Bike

 if exact dimensions are needed.

To move the 

4800 Recumbent Bike,

 lift the 

REAR STABILIZER(4)

 and use the 

WHEELS(48)

 on the

FRONT STABILIZER(2).

To avoid damage to the electronics, remove the batteries before storing the 

4800R Recumbent Bike

 for

one year or more.

MAINTENANCE

The safety and integrity designed into the 

4800R Recumbent Bike

 can only be maintained when the

4800R Recumbent Bike

 is regularly examined for damage and wear.  Special attention should be given to

the following:

Adjust the 

TENSION KNOB(24)

 and verify that the Magnetic System provides tension.  The Magnetic

System should provide many years of use.
Use a wrench to verify that the pedals are tightened securely.  If tightening is required, remember that the
left pedal has left hand threads and is tightened by turning counterclockwise.
Verify that the Warning Label is in place and easy to read.  Call Stamina Products immediately
(1-800-375-7520) for a replacement Warning Label if the Warning Label is missing or damaged.
It is the sole responsibility of the user/owner to ensure that regular maintenance is performed.
Worn or damaged components shall be replaced immediately or the 

4800R Recumbent Bike

 removed

from service until repair is made.
Only Stamina Products supplied components shall be used to maintain/repair the 

4800R Recumbent

Bike.

Keep your 

4800R Recumbent Bike

 clean by wiping with an absorbent cloth after use.

1.

2.

3.

4.
5.

6.

7.

Содержание 15-4800R

Страница 1: ...Serious bodily injury can also occur if all instructions are not followed Keep others and pets away from equipment when in use Always make sure all bolts and nuts are tightened prior to each use Foll...

Страница 2: ...dations in developing your own personal fitness program Always choose the workout which best fits your physical strength and flexibility level Know your limits and train within them Always use common...

Страница 3: ...ssembled for shipping purposes Simply follow the few assembly instructions set forth in this manual Within a few minutes you will be getting your body into shape and on your way to achieving a happier...

Страница 4: ...oducts with the finest materials and uses the highest standards of manufacturing occasionally a part that does not fit is the incorrect size or is otherwise inappropriate is found Even with the highes...

Страница 5: ...izes of bolts and screws This chart is provided to help identify the hardware used in the assembly process After unpacking the unit open the hardware bag and make sure that you have the following item...

Страница 6: ...with CARRIAGE BOLTS M8 x 75mm 55 ARC WASHERS M8 71 LOCK WASHERS M8 74 and ACORN NUTS M8 68 STEP 2 Rotate the ADJUSTMENT KNOB 44 counter clockwise until the knob portion can be pulled Pull the ADJUSTM...

Страница 7: ...RE 39 into the Socket of PULSE EXTENSION WIRE 37 located on the REAR FRAME 3 STEP 4 Attach the SEAT 42 onto the REAR FRAME 3 with ROUND HEAD BOLTS M6 x 20mm 56 STEP 5 Attach the BACK SUPPORT 5 onto th...

Страница 8: ...NOTE Thread the RIGHT PEDAL 34 onto the right side of the CRANK 7 as shown Tighten the pedal securely Select the RIGHT PEDAL STRAP 80 which has R marked on the bottom side of the strap Snap the two h...

Страница 9: ...or without rocking The 4800R Recumbent Bike has a pair of WHEELS 48 on the FRONT STABILIZER 2 Lifte up from REAR STABILIZER 4 to move the 4800R Recumbent Bike LEVELING MOVING FUNCTION INSPECTION Visua...

Страница 10: ...r shifting your hips on the seat The seat is too close to the pedals if you have more than a slight bend in your knees at the bottom of the pedal stroke The seat is too far from the pedals if you have...

Страница 11: ...every 5 seconds NOTE If you do not want to use the SCAN function press the MODE button to select one of the other functions Displays the time from 1 sec up to 99 59 minutes Displays the current speed...

Страница 12: ...is too fast or too slow NOTE PROGRAM 0 P0 This is a manual program There are no speed targets PROGRAMS P1 to P6 P2 MAX FAT BURN P3 AEROBIC P1 FAT BURN P4 HILL P5 INTERVAL P6 MOUNTAIN You may set the T...

Страница 13: ...ON Pedaling or press the MODE button STEP 2 SET THE PROGRAM Stop pedaling for four seconds Press the SET button and the display will flash one of the following seven programs P0 P1 P2 P3 P4 P5 or P6...

Страница 14: ...place Adjust the REAR FRAME 3 into the FRONT FRAME 1 to the shortest position The 4800R Recumbent Bike is approximately 45 5 8 long x 28 wide x 33 tall These dimensions will vary Please measure your...

Страница 15: ...CONDITIONING GUIDELINES 15 To maximize the benefits of exercising it is important to exercise with the proper intensity The proper intensity level can be found by using your heart rate as a guide For...

Страница 16: ...our cool down should include the stretches listed above and should be completed after each strength training session Lower Body Stretch Place feet shoulder width apart and lean forward Keep this posit...

Страница 17: ...transferable IF ANY PART OF THE PRODUCT IS NOT IN COMPLIANCE WITH THIS LIMITED WARRANTY OR ANY IMPLIED WARRANTY THE REMEDY OF REPAIR OR REPLACEMENT IS THE EXCLUSIVE REMEDY AVAILABLE TO YOU In the even...

Страница 18: ...PRODUCT PARTS DRAWING 18 FRONT BACK...

Страница 19: ...l 1 19 Idler Wheel Bushing 1 20 Tension Spring 1 21 Magnetic Unit 1 22 Eyebolt 2 23 Tension Bracket 2 24 Tension Knob 1 26 Computer 1 27 Sensor Wire 1 28 Magnet 1 29 Left Cover 1 30 Right Cover 1 31 C...

Страница 20: ...Screw Round Head M5 x 15mm 1 62 Screw Small Round Head M5 x 25mm 6 63 Screw Round Head M4 x 8mm 2 64 Screw Round Head M4 x 12mm 6 65 Screw Round Head M4 x 15mm 2 66 Nylock Nut M6 x 1 2 67 Thin Nylock...

Страница 21: ...21 NOTES...

Страница 22: ...art found please call 1 800 375 7520 in the U S between 8 00 A M and 5 00 P M Central Time Monday through Friday or fill out the fax sheet ordering form below and fax it to 417 889 8064 Our Customer S...

Отзывы: