


24
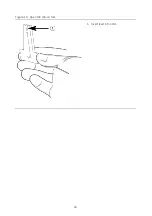
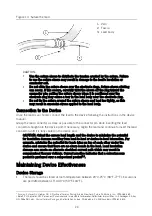
Figure 9. Vein lifter
Using the Lead Introducer
If a lead introducer is used, follow the instructions provided with the introducer.
CAUTION:
If using a percutaneous lead introducer with a hemostasis valve, make sure
the valve allows for appropriate passage of the lead without damaging the
lead body.
Be certain the vein lifter does not puncture the silicone rubber insulation of
the lead. This could prevent proper lead function.
Do not use excessive force while inserting the stylet.
When subclavian venipuncture is used for lead introduction, it is important to
insert the lead as lateral as possible during entry of the lead into the vein.
Avoid positioning the lead so that it becomes sharply bent or subjected to
tension.
Do not grip the lead with surgical instruments.
Do not leave a lead unconnected in a patient unless the lead is capped.
Position the Lead
Confirm that the helix is completely retracted before implantation.
NOTE: If blood clogs the helix, repositioning may require a greater number of pin
rotations to extend the helix. Repeated repositioning attempts may impair the helix
extension mechanism.
Atrial Lead Placement
1.
Using a straight stylet, introduce the lead into the atrium so that it rests on the floor of the
atrial chamber.
2.
Replace the straight stylet with a J-shaped stylet, or withdraw the existing stylet, bend it into
a soft J-shape, and reinsert the curved stylet into the lead.
3.
As the stylet approaches the electrode tip, introduce more lead to ensure that the tip
remains in the atrium as the lead takes its "J" shape.
4.
Retract the lead as necessary to ensure that the electrode tip slides into the atrial
appendage. Observe the fluoroscopy monitor to verify that the "J" is straightening.
Содержание Tendril MRI LPA1200M
Страница 1: ...Tendril MRI Pacing leads Model LPA1200M User s Manual ...
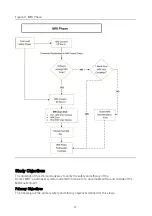
Страница 13: ...11 Figure 1 Lead Safety Phase The figure below depicts the MRI Phase ...
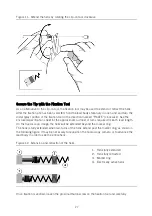
Страница 28: ...26 Figure 10 Open the clip on tool 1 Insert lead into notch ...
Страница 35: ......
Страница 36: ......
Страница 37: ......


