background image

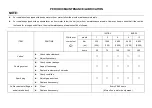
PERIODIC MAINTENANCE/LUBRICATION 

NOTE: 

z


For vehicles not equipped with an odometer or hour meter, follow the month maintenance intervals. 

z


For vehicles equipped with an odometer or an hour meter, follow the km (mi) or hour’s maintenance intervals. However, keep in mind that if the vehicle 

isn't used for a long period of time, the month maintenance intervals should be followed. 


 INITIAL  EVERY 

month 1 3  6 6 12 

Km 

(mi) 

320 

(200) 

1,200 

(750) 

2,400 

(1,500) 

2,400 

(1,500)

4,800 

(3,000) 

ITEM ROUTINE 

Whichever 

comes first 


hours  20  75  150 150 300 

Valves* 

z


Check valve clearance. 

z


Adjust if necessary. 


Cooling system 

z


Check coolant leakage. 

z


Repair if necessary. 

z


Replace coolant every 24 months. 


Spark plug 

z

 Check 

condition. 

z


Adjust gap and clean.   

z

 Replace 

if 

necessary. 


Air filter elements (Engine 

and air intake duct) 

z

 Clean. 

z

 Replace 

if 

necessary. 

Every 20-40 hours 

(More often in wet or dusty areas.) 

Содержание SRU600

Страница 1: ...OWNER S MANUAL SRU600 DQG SRU600LT 665 02725632576 1 21 5 9 125 READ THIS MANUAL CAREFULLY It contains important safety information ...

Страница 2: ......

Страница 3: ...ou with the extensive resources available to him IMPORTANT MANUAL INFORMATION The following signal words and symbols appear throughout this manual and on your RANGER Your safety is involved when these words and symbols are used Become familiar with their meanings before reading the manual The safety alert symbol on your vehicle or in this manual alerts you to the potential for personal injury WARN...

Страница 4: ...operation of this vehicle in your area Check the laws and regulations in force before choosing where to operate this vehicle It is illegal to operate this vehicle on public lands where vehicles its size are prohibited This vehicle complies with almost all state off highway noise level and spark arrester laws and regulations AFFIX DEALER LABEL HERE ...

Страница 5: ...G AND SPECIFICATION LABELS 10 DESCRIPTION AND VEHICLE IDENTIFICATION 15 CONTROL FUNCTIONS 19 PRE OPERATION CHECKS 39 OPERATION 47 DRIVING YOUR VEHICLE 56 PERIODIC MAINTENANCE AND ADJUSTMENT 67 CLEANING AND STORAGE 113 SPECIFICATIONS 116 Service guide 122 ...

Страница 6: ... even a dirt or gravel one z Never operate this vehicle without wearing an approved motorcycle helmet that fits properly You should also wear eye protection goggles or a face shield gloves over the ankle boots long sleeved shirt or jacket and long pants z Never consume alcohol or drugs before or while operating this vehicle z Never operate at speeds too fast for your skills or the conditions Alway...

Страница 7: ...earned and practiced the skills necessary to control the vehicle on such terrain Always be especially cautious on these kinds of terrain z Never turn at excessive speed Practice turning at slow speeds before attempting to turn at faster speeds Do not attempt turns on steep inclines z Never operate the vehicle on hills that are too steep for it or for your abilities Go straight up and down hills wh...

Страница 8: ...n you operate in reverse When it is safe to proceed in reverse go slowly Do not brake abruptly when carrying loads in the cargo bed z Always use the size and type of tires specified in this manual z Always maintain proper tire pressure as described in this manual z Never exceed the stated load capacity Cargo should be as far forward in the bed as possible and distributed evenly from side to side B...

Страница 9: ...icle in another vehicle be sure it is kept in an upright position Otherwise fuel may leak out of the carburetor or fuel tank WHAT CAN HAPPEN Gasoline is poisonous and can cause injuries HOW TO AVOID THE HAZARD If you should swallow some gasoline or inhale a lot of gasoline vapor or get some gasoline in your eyes see your doctor immediately If gasoline spills on your skin wash with soap and water I...

Страница 10: ...LOCATION OF THE WARNING AND SPECIFICATION LABELS ...

Страница 11: ...our vehicle They contain important information for safe and proper operation of your vehicle Never remove any labels from your vehicle If a label becomes difficult to read or comes off a replacement label is available from our company or dealer ...

Страница 12: ... ...

Страница 13: ... ...

Страница 14: ...Unless you are 16 years old or more please do not operate this vehicle ...

Страница 15: ...DESCRIPTION AND VEHICLE IDENTIFICATION ...

Страница 16: ...ark arrester 14 Passenger seat belt 15 Passenger seat 16 Oil filter cartridge 17 Engine oil dipstick 18 Battery 19 Fuses 20 Coolant reservoir 21 Radiator cap 22 Fuel level check window 23 Fuel tank cap 24 Light switch 25 Steering wheel 26 27 Main switch 28 On Command four wheel drive and differential gear lock switches 29 Indicator and warning lights 30 Multi function meter unit special edition mo...

Страница 17: ... and model label information in the spaces provided Remove the spare key and store it in a safe place Provided for assistance when ordering spare parts from our company or dealer or for reference in case the vehicle is stolen Vehicle Model Number Frame VIN Engine Serial Number ...

Страница 18: ... The electric starter is engaged by turning and holding the key in this position Release the key when the engine starts CAUTION z Do not operate the electric starter continuously for more than 5 seconds or starter damage could occur Wait at least 5 seconds between each operation of the electric starter to let it cool z Do not turn the key to the START position with the engine running or damage to ...

Страница 19: ... drive Differential gear lock indicator light 10 fuel gauge 11 coolant temperature gauge Coolant temperature gauge Function meter Coolant temperature Gauge The gauge indicates the coolant temperature The coolant temperature will vary with the outside air temperature and driving conditions CAUTION If the gauge indicates over the normal range stop the vehicle as soon as safely possible If the engine...

Страница 20: ...s the APPROXIMATE fuel level in the tank The gauge may move slightly during braking turning acceleration or going up or down hill The gauge needle is designed to remain in approximately the same position even when the ignition key is turned OFF CAUTION When gauge needle approaches the red zone when the fuel tank is almost empty Refuel at thenearest gas station Fuel gauge ...

Страница 21: ...it Parking brake indicator light P This indicator light comes on when the parking brake is applied Headlight indicator light This indicator light comes on when the light switch turn on Parking indicator light This indicator light comes on when the parking brake is applied Two wheel drive Four wheel drive Differential gear lock indicator light This indicator light comes on when the 2WD 4WD switch i...

Страница 22: ...appen remove the battery and recharge it On Command four wheel drive and differential gear lock switches 1 On Command four wheel drive switch 2WD 4WD 2 Differential gear lock switch LOCK 4WD This vehicle is equipped with an On Command four wheel drive switch 2WD 4WD and a differential gear lock switch LOCK 4WD Select the appropriate drive according to terrain and the conditions z Two wheel drive 2...

Страница 23: ...a while moving may cause the vehicle to unexpectedly handle differently This could distract the operator and increase the risk of losing control and an accident HOW TO AVOID THE HAZARD Always stop the vehicle before changing from 2WD to 4WD or from 4WD to 4WD LOCK or vice versa On Command four wheel drive switch 2WD 4WD 1 Lever 2 On Command four wheel drive switch 2WD 4WD To change from 2WD to 4WD...

Страница 24: ...urn at the same speed when the differential is locked so it takes more effort to turn the vehicle The amount of effort required is greater the faster you go You may lose control and have an accident if you cannot make a sharp enough turn for the speed you are traveling HOW TO AVOID THE HAZARD Always ride at a slow speed when the vehicle is in 4WD LOCK and allow extra time and distance for maneuver...

Страница 25: ...rator pedal fully returns to the idle position as soon as it is released WARNING POTENTIAL HAZARD Malfunction of the accelerator pedal WHAT CAN HAPPEN The accelerator pedal could be hard to operate making it difficult to speed up or slow down when you need to This could cause an accident HOW TO AVOID THE HAZARD Check the operation of the accelerator pedal before you start the engine If it does not...

Страница 26: ...et the parking brake pull the lever up completely To release the parking brake pull up on the lever press the release button and then push the lever all the way down Spring pressure helps return the lever to the released position Be sure to fully release the parking brake before starting out Failure to do so may result in poor performance and premature wearing of the rear brake and V belt 1 Parkin...

Страница 27: ...r the drive select lever operation 1 Drive select lever Fuel tank cap Remove the fuel tank cap by turning it counterclockwise 1 Fuel tank cap Fuel level check window Plastics tank The amount of fuel in the fuel tank can be checked through the fuel level check window If the fuel level is low refuel as soon as possible 1 Fuel level check window ...

Страница 28: ...h plate 2 3 Buckle 2 To wear the seat belt properly do the following 1 Hold the latch plate as you pull the belt across your lap and chest Make sure the belt is not twisted and is not caught on any portion of the vehicle your clothing or any equipment you are carrying 2 Push the latch plate into the buckle until it clicks Pull up on the latch plate to make sure it is secure ...

Страница 29: ...chest If it is loose pull the belt out all the way and then let it retract 5 To release the buckle firmly press the release button 1 Buckle 2 Release button WARNING POTENTIAL HAZARD Not wearing the seat belt Wearing the seat belt improperly WHAT CAN HAPPEN There is increased risk of being killed or seriously injured in an accident HOW TO AVOID THE HAZARD Always wear your seat belt when riding in t...

Страница 30: ...al products like tools or sharply edged products directly in the glove compartment If they must be stored wrap them in appropriate cushion material a Unlock b Open Cargo bed 1 Cargo bed 2 Tailgate 3 Cargo hook 4 Opening and closing the tailgate 1 Tailgate 2 Latch 2 ...

Страница 31: ...d until it stops To lower Lower the cargo bed slowly to its original position and be sure it is locked into place Maximum load limit 140kg 308lb WARNING POTENTIAL HAZARD Pinch points WHAT CAN HAPPEN You or someone else could be pinched between the cargo bed and the frame when the bed is being lowered HOW TO AVOID THE HAZARD Before closing the bed be sure others are standing away from the vehicle K...

Страница 32: ...this cargo bed Cargo should be properly distributed and securely attached Reduce speed when carrying cargo Allow greater distance for braking WARNING POTENTIAL HAZARD Carrying a passenger in the cargo bed WHAT CAN HAPPEN The passenger could fall be thrown out or be struck by objects in the cargo bed HOW TO AVOID THE HAZARD Never carry a passenger in the cargo bed This cargo bed is designed to carr...

Страница 33: ... bottoming can cause increased wear or damage to the vehicle Adjust the spring preload as follows To increase the spring preload turn the adjusting ring in direction a To decrease the spring preload turn the adjusting ring in direction b 1 Spring preload adjusting ring 2 Position indicator NOTE A special wrench can be obtained at our company or dealer to make this adjustment Standard position B A ...

Страница 34: ...d lead to an accident HOW TO AVOID THE HAZARD Always adjust the shock absorbers on the left and right side to the same setting Trailer hitch bracket This vehicle is equipped with a 5 cm 2 in receiver bracket for a standard trailer hitch Trailer towing equipment can be obtained at our company or dealer See pages 59 60 for precaution information 1 Trailer hitch bracket ...

Страница 35: ...radios etc The auxiliary DC jack should only be used when the engine is running 1 Auxiliary DC jack cap 1 Set the light switch to OFF 2 Start the engine 3 Open the auxiliary DC jack cap and then insert the accessory power plug into the jack 1 Auxiliary DC jack DC 12 V 120 W 10 A 4 When the auxiliary DC jack is not being used cover it with the cap ...

Страница 36: ... and cause the fuse to blow z If accessories are used without the engine running or with the headlights turned on the battery will lose its charge and engine starting may become difficult z Do not use an automotive cigarette lighter or other accessories with a plug that gets hot because the jack can be damaged ...

Страница 37: ...oil z Check oil level z Fill with oil if necessary Coolant reservoir z Check coolant level z Fill with coolant if necessary Final gear oil Differential gear oil z Check for leakage Accelerator pedal z Check for proper accelerator pedal operation Seat belts z Check for proper operation and belt wear Steering z Check for proper operation Fittings and fasteners z Check all fittings and fasteners Ligh...

Страница 38: ... pedal Check for correct brake pedal free play If the brake pedal free play is incorrect have Regard dealer adjust it See page 8 35 Check the operation of the brake pedal It should move smoothly and there should be a firm feeling when the brakes are applied If not have the vehicle inspected by Regard dealer Brake fluid level Check the brake fluid level Add fluid if necessary See pages 8 33 8 34 Re...

Страница 39: ...nt procedures provided in this manual have the vehicle inspected by our company or dealer Fuel Make sure there is sufficient gasoline in the tank Recommended fuel UNLEADED GASOLINE ONLY Fuel tank capacity 30 0 L 6 60 Imp gal 7 93 US gal CAUTION Use only unleaded gasoline The use of leaded gasoline will cause severe damage to internal engine parts such as the valves and piston rings as well as to t...

Страница 40: ...gine or the sun HOW TO AVOID THE HAZARD Do not overfill the fuel tank Be careful not to spill fuel especially on the engine or exhaust pipe Wipe up any spilled fuel immediately Be sure the fuel tank cap is closed securely Engine oil Make sure the engine oil is at the specified level Add oil as necessary See pages 8 9 8 12 CAUTION z In order to prevent clutch slippage since the engine oil also lubr...

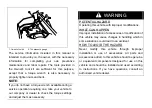
Страница 41: ...armful to the engine You may use soft water if you cannot get distilled water Coolant reservoir capacity up to the maximum level mark 0 35 L 0 31 Imp qt 0 37 US qt WARNING POTENTIAL HAZARD Removing the radiator cap when the engine and radiator are still hot WHAT CAN HAPPEN You could be burned by hot fluid and steam blown out under pressure HOW TO AVOID THE HAZARD Wait for the engine to cool before...

Страница 42: ...ully spring back to the idle position when released Have a Regard dealer repair as necessary for proper operation Seat belts Make sure that both seat belts are not frayed or damaged The seat belt must move smoothly when pulled out and retract on its own when re leased The latch plate should click securely into the buckle and release when the release button is pushed firmly Wash off any dirt or mud...

Страница 43: ...WHIDE RS 2 The tires should be set to the recommended pressure z Recommended tire pressure Front 70kPa 0 70 kgf cm2 10psi Rear 98kPa 0 98 kgf cm2 14psi Check and adjust tire pressures when the tires are cold Tire pressures must be equal on both sides 3 Tire pressure below the minimum specified could cause the tire to dislodge from the rim under severe riding conditions The following are minimums F...

Страница 44: ...et pressure with tires cold Set tire pressures to the following specifications Recommended pressure Minimum Maximum Front 70kPa 0 70 kgf cm2 10psi 63kPa 0 63 kgf cm2 9psi 77kPa 0 77 kgf cm2 11psi Rear 98kPa 0 98 kgf cm2 14psi 91kPa 0 91 kgf cm2 13psi 105kPa 1 05 kgf cm2 15psi 1 Tire pressure gauge Tire wear limit When the tire groove decreases to 3 mm 0 12 in due to wear replace the tire a Tire we...

Страница 45: ...ontrol cables work smoothly before you begin riding 1 Apply the brake 2 Shift the drive select lever into the neutral position NOTE z When the drive select lever is in the neutral position the neutral indicator light should come on If the neutral indicator light does not come on ask our company or dealer to inspect the electric circuit z The engine can be started in any gear if the brake is applie...

Страница 46: ...p the starter choke in this position to warm up the engine 6 Continue warming up the engine until it idles smoothly and return the starter choke to position 3 before riding CAUTION See the Engine break in section prior to operating the engine for the first time Starting a warm engine To start a warm engine refer to the Starting a cold engine section The starter choke should not be used Press the a...

Страница 47: ...tive lead of the jumper cable to the negative terminal of the battery in the vehicle Be especially careful not to z Touch the positive lead of the jumper cable to the negative lead z Reverse the polarity of the jumper cables when connecting to the batteries battery explosion and or serious damage to the electrical system may occur 6 Start the engine Refer to Starting a cold engine on pages 6 1 3 7...

Страница 48: ...e the transmission may be damaged Shifting Neutral to High and High to Low 1 Stop the vehicle Keep your foot off the accelerator pedal 2 Apply the brakes and then shift by moving the drive select lever along the shift guide NOTE Make sure that the drive select lever is completely shifted into position 1 Drive select lever 3 Release the brakes and press the accelerator pedal gradually Shifting Neut...

Страница 49: ...AZARD Improperly operating in reverse WHAT CAN HAPPEN You could hit an obstacle or person behind you resulting in serious injury HOW TO AVOID THE HAZARD When you shift into reverse make sure there are no obstacles or people behind you When it is safe to proceed go slowly Engine break in There is never a more important period in the life of your vehicle than the period between zero and 20 hours For...

Страница 50: ...eed of the vehicle from time to time Do not operate it at one set throttle position 10 20 hours Avoid prolonged operation above 3 4 throttle Rev the vehicle freely but do not use full throttle at any time After break in The vehicle can now be operated normally Parking When parking stop the engine and shift the drive select lever into the neutral position Apply the parking brake to help prevent the...

Страница 51: ...signed for your vehicle Our company or dealer has a variety of genuine accessories Other accessories may also be available on the market However it is not possible for us to test all accessories nor have any control over the quality or suitability of them Choose a genuine accessory or one that is equivalent in design and quality z Accessories should be rigidly and securely mounted An accessory whi...

Страница 52: ...tion z Do not exceed the maximum tongue weight You can measure tongue weight with a bathroom scale Put the tongue of the loaded trailer on the scale with the tongue at hitch height Adjust the load in the trailer if necessary to reduce the weight on hitch If you are carrying cargo and towing a trailer include the tongue weight in the maximum vehicle load limit z Load cargo in the cargo bed as close...

Страница 53: ...NING POTENTIAL HAZARD Overloading this vehicle or carrying or towing cargo improperly WHAT CAN HAPPEN Could cause changes in vehicle handling which could lead to an accident HOW TO AVOID THE HAZARD Never exceed the stated load capacity for this vehicle Cargo should be properly distributed and securely attached Reduce speed when carrying cargo or pulling a trailer Allow greater distance for braking...

Страница 54: ... 1 5 Please also read all caution and warning labels on your vehicle This vehicle is designed for the operator and one passenger The driver and passenger must always wear a seat belt Never carry passengers in the cargo bed WARNING POTENTIAL HAZARD Not wearing the seat belt Wearing the seat belt improperly WHAT CAN HAPPEN There is increased risk of being killed or seriously injured in an accident H...

Страница 55: ...1lb See Loading on page 6 12 Carrying a passenger and cargo can affect vehicle handling WARNING POTENTIAL HAZARD Overloading this vehicle or carrying or towing cargo improperly WHAT CAN HAPPEN Could cause changes in vehicle handling which could lead to an accident HOW TO AVOID THE HAZARD Never exceed the stated load capacity for this vehicle Cargo should be properly distributed and securely attach...

Страница 56: ...pproved motorcycle helmet eye protection and protective clothing WHAT CAN HAPPEN Operating without an approved motorcycle helmet increases your chances of a severe head injury or death in the event of an accident Operating without eye protection can result in an accident and increases your chances of a severe injury in the event of an accident HOW TO AVOID THE HAZARD Always wear an approved motorc...

Страница 57: ...the parking brake shift to neutral and follow the instructions on page 6 1 to start the engine Once it has warmed up and you have turned the choke off you are ready to begin driving your vehicle With the engine idling shift the drive select lever into low or high Then release the parking brake Press the accelerator pedal slowly and smoothly The centrifugal clutch will engage and you will start to ...

Страница 58: ...t your thumbs and fingers do not wrap around the wheel This is particularly important when driving in rough terrain The front wheels will move right and left as they respond to the terrain and this movement will be felt in the steering wheel A sudden jolt could wrench the steering wheel around and your thumbs or fingers could be injured if they are in the way of the steering wheel spokes BRAKING B...

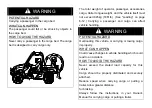
Страница 59: ...re too steep for you to climb Maximum slope angle 15 Choose carefully which hills you attempt to climb Avoid hills with slippery surfaces or ones where you will not be able to see far enough ahead of you WARNING POTENTIAL HAZARD Operating on excessively steep hills WHAT CAN HAPPEN The vehicle can overturn more easily on extremely steep hills than on level surfaces or small hills HOW TO AVOID THE H...

Страница 60: ...ver in reverse so you can use the engine brake if necessary to slow your descent Release the brake and begin to coast down the hill Use engine braking as much as possible gently applying the brakes when necessary GOING DOWNHILL Check the terrain carefully before going down a hill When possible choose a path that lets you drive your vehicle straight downhill Avoid sharp angles that could allow the ...

Страница 61: ...you must cross shallow slow moving water up to the depth of the vehicle s floorboards choose your path carefully to avoid sharp drop offs large rocks or slippery surfaces that could cause the vehicle to overturn Never operate through water deeper than 33 cm 13 in or fast flowing water Wet brakes may have reduced effectiveness After leaving the water test your brakes If necessary apply the brakes s...

Страница 62: ...se at the bottom of the air filter case the V belt cooling duct check hose the drive select lever box check hose Wash the vehicle in fresh water if it has been operated in salt water or muddy conditions 1 Air intake TEMP sensor connector 2 Crankcase gas recyling connector 3 Idle control valve connector ...

Страница 63: ...ime to react Could result in the vehicle overturning or going out of control HOW TO AVOID THE HAZARD Go slowly and be extra careful when operating on unfamiliar terrain Always be alert to changing terrain conditions when operating the vehicle RIDING IN BRUSH OR WOODED AREAS When operating in areas with brush or trees watch carefully on both sides and above the vehicle for obstacles such as branche...

Страница 64: ...ng Go only fast enough to maintain your momentum but still give yourself plenty of time to react to changes in conditions If there is any question about your ability to maneuver safely over the obstacle you should turn around if the ground is flat and you have the room or back up until you find a less difficult path WARNING POTENTIAL HAZARD Improperly operating over obstacles WHAT CAN HAPPEN Could...

Страница 65: ... WHAT CAN HAPPEN Moving parts can catch clothing or parts of the body causing injury Electrical components can cause shocks or can start fires HOW TO AVOID THE HAZARD Turn off the engine when performing maintenance unless otherwise specified Have our company or dealer perform service if you are not familiar with vehicle service Owner s manual and tool kit You are recommended to put this owner s ma...

Страница 66: ...r vehicle to our company or dealer to check the torque settings and adjust them as necessary WARNING POTENTIAL HAZARD Operating this vehicle with improper modifications WHAT CAN HAPPEN Improper installation of accessories or modification of this vehicle may cause changes in handling which in some situations could lead to an accident HOW TO AVOID THE HAZARD Never modify this vehicle through imprope...

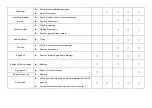
Страница 67: ...enance intervals should be followed INITIAL EVERY month 1 3 6 6 12 Km mi 320 200 1 200 750 2 400 1 500 2 400 1 500 4 800 3 000 ITEM ROUTINE Whichever comes first hours 20 75 150 150 300 Valves z Check valve clearance z Adjust if necessary Cooling system z Check coolant leakage z Repair if necessary z Replace coolant every 24 months Spark plug z Check condition z Adjust gap and clean z Replace if n...

Страница 68: ...Replace gasket s if necessary Sparks arrester z Clean Fuel line z Check fuel hose for cracks or damage z Replace if necessary Engine oil z Replace warm engine before draining Engine oil filter cartridge z Replace Final gear oil Differential gear oil z Check oil level oil leakage z Replace Front brake z Check operation brake pad wear fluid leakage see NOTE page 8 5 z Correct if necessary Replace pa...

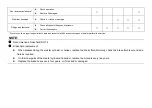
Страница 69: ...cessary Wheel bearings z Check bearing assemblies for looseness damage z Replace if damaged Front and rear suspension z Check operation and for leakage z Correct if necessary Steering system z Check operation and for looseness Replace if damaged z Check toe in Adjust if necessary Rear upper and lower knuckle pivots z Lubricate with lithium soap based grease Drive shaft universal joint z Lubricate ...

Страница 70: ...tools data and technical skills have our company or dealer perform the service NOTE Recommended brake fluid DOT 4 Brake fluid replacement z When disassembling the master cylinder or caliper replace the brake fluid Normally check the brake fluid level and add fluid as required z On the inner parts of the master cylinder and caliper replace the oil seals every two years z Replace the brake hoses eve...

Страница 71: ...stops 1 Latch 2 1 Hood To close Lower the hood slowly to its original position and then hook the hood latches Secure projections 1 on the underside of the hood into slots 2 on the back of the instrument panel Secure slots 3 on the side of the hood around projections 4 on the frame ...

Страница 72: ...s and wires are in place when closing the hood z Do not drive the vehicle with the hood open unlatched or removed Console To remove 1 Remove the seats See page 4 15 for seat removal and installation procedures 2 Remove the parking brake lever boot 3 Pull the console upward 1 Console ...

Страница 73: ...cartridge replaced at the intervals specified in the periodic maintenance and lubrication chart To check the engine oil level 1 Place the vehicle on a level surface 2 Remove the console See page 8 8 for console removal and installation procedures 3 Start the engine warm it up for several minutes and then turn it off 4 Wait a few minutes until the oil settles 5 Remove the engine oil filler cap and ...

Страница 74: ... the console See page 8 8 for console removal and installation procedures 2 Start the engine warm it up for several minutes and then turn it off 3 Place an oil pan under the engine to collect the used oil and then remove the engine oil filler cap 4 Remove the engine oil drain bolt to drain the oil from the crankcase 1 Engine oil drain bolt NOTE Skip steps 5 if the oil filter cartridge is not being...

Страница 75: ... light coat of engine oil to the O ring of the new oil filter cartridge NOTE Make sure the O ring is seated properly 1 O ring 7 Install the new oil filter cartridge with an oil filter wrench and then tighten it to the specified torque with a torque wrench Tightening torque Oil filter cartridge 17 Nm 1 7m kgf 12ft lbf ...

Страница 76: ... 2 00 L 1 76 Imp qt 2 11 US qt CAUTION z In order to prevent clutch slippage since the engine oil also lubricates the clutch do not mix any chemical additives Do not use oils with a diesel specification of CD or oils of a higher quality than specified In addition do not use oils labeled ENERGY CONSERVING II or higher z Make sure that no foreign material enters the crankcase 10 Start the engine and...

Страница 77: ...ow the brim of the filler hole add sufficient oil of the recommended type to raise it to the correct level CAUTION Be sure no foreign material enters the final gear case 4 Install the oil filler bolt and then tighten it to the specified torque Tightening torque Final gear oil filler bolt 23 Nm 2 3m kgf 17ft lbf Changing the final gear oil 1 Place the vehicle on a level surface 2 Place a container ...

Страница 78: ...il up to the brim of the filler hole Recommended oil SAE 80 API GL 4 Hypoid gear oil Oil quantity 0 25 L 0 22 Imp qt 0 26 US qt CAUTION Be sure no foreign material enters the final gear case 6 Install the oil filler bolt and then tighten it to the specified torque Tightening torque Final gear oil filler bolt 23 Nm 2 3m kgf 17ft lbf 7 Check for oil leakage If oil leakage is found check for the caus...

Страница 79: ...ler bolt 2 Proper oil level 3 Differential gear oil CAUTION Be sure no foreign material enters the differential gear case 3 Install the differential gear oil filler bolt and then tighten it to the specified torque Tightening torque Differential gear oil filler bolt 23 Nm 2 3m kgf 17ft lbf Changing the differential gear oil 1 Place the vehicle on a level surface 2 Place a container under the differ...

Страница 80: ...all the differential gear oil filler bolt and then tighten it to the specified torque Tightening torque Differential gear oil filler bolt 23 Nm 2 3m kgf 17ft lbf 7 Check for oil leakage If oil leakage is found check for the cause Coolant The coolant level should be checked before each ride Checking the coolant level 1 Place the vehicle on a level surface 2 Open the hood See pages 8 6 7 for hood op...

Страница 81: ...is not available soft water may be used for refilling Changing the coolant The coolant must be changed by our company or dealer at the intervals specified in the periodic maintenance and lubrication chart NOTE z Adding water instead of coolant lowers the antifreeze content of the coolant If water is used instead of coolant have our company or dealer check the antifreeze content of the coolant as s...

Страница 82: ...d dealer 1 Front axle boot 2 each side 1 Rear axle boot 2 each side Spark plug inspection Removal 1 Lift the cargo bed up See pages 4 18 4 21 for cargo bed lifting and lowering procedures 2 Remove the spark plug cap 1 Spark plug cap 3 Use the spark plug wrench in the tool kit to remove the spark plug as shown ...

Страница 83: ...h problems yourself Instead take the vehicle to our company or dealer You should periodically remove and inspect the spark plug because heat and deposits will cause the spark plug to slowly break down and erode If electrode erosion becomes excessive or if carbon and other deposits are excessive you should replace the spark plug with the specified plug Specified spark plug DPR8EA 9 NGK Installation...

Страница 84: ...tighten it to the specified torque Tightening torque Spark plug 17 5 Nm 1 75m kgf 12 7ft lbf NOTE If a torque wrench is not available when you are installing the spark plug a good estimate of the correct torque is 1 4 to 1 2 turn past finger tight Have the spark plug tightened to the specified torque as soon as possible 4 Install the spark plug cap 5 Lower the cargo bed ...

Страница 85: ...ck fastener screw 4 2 Air intake duct grill 2 Remove the air filter element from the air intake duct grill by pulling it out 1 Air filter element 2 Air intake duct grill 3 Remove any large particles from the air filter element by hand 4 Tap the air filter element to remove most of the dust and dirt and then blow the remaining dirt out with compressed air ...

Страница 86: ...r element and air filter case 1 Remove the seats See page 4 15 for seat removal and installation procedures 2 Remove the console See page 8 8 for console removal and installation procedures 3 Remove the air filter case cover by unhooking the 5 Install the air filter element into the air intake duct grill 6 Install the air intake duct grill by installing the quick fastener screws ...

Страница 87: ...r filter element 3 Element retaining plate 6 Wash the air filter element gently but thoroughly in solvent WARNING POTENTIAL HAZARD Using low flash point solvents or gasoline to clean the air filter element WHAT CAN HAPPEN Low flash point solvents or gasoline can catch fire or explode HOW TO AVOID THE HAZARD Use parts cleaning solvent to clean the air filter element ...

Страница 88: ...s It should be cleaned and lubricated more often if the vehicle is operated in extremely dusty areas Each time air filter element maintenance is performed check the air inlet to the air filter case for obstructions Check the air filter element rubber joint to the carburetor and manifold fittings for an airtight seal Tighten all fittings securely to avoid the possibility of unfiltered air entering ...

Страница 89: ...le as the water may affect other engine parts 1 V belt case drain plug Cleaning the spark arrester Be sure the exhaust pipe and muffler are cool before cleaning the spark arrester 1 Remove the bolts 1 Bolt 3 2 Remove the tailpipe by pulling it out of the muffler 3 Tap the tailpipe lightly and then use a wire brush to remove any carbon deposits from the spark arrester portion of the tailpipe and in...

Страница 90: ...ster Hot exhaust system WHAT CAN HAPPEN Could injure the eyes Could cause burns Could cause carbon monoxide poisoning possibly leading to death Could start a fire HOW TO AVOID THE HAZARD When cleaning the spark arrester Always let the exhaust system cool prior to touching exhaust components Do not start the engine when cleaning the exhaust system ...

Страница 91: ......

Страница 92: ...Ratio 10 1 Peak Power 28kw 6500r min Peak Torque 46N m 5500r min Min steady rotate speed at kerb 1300r min 100r min Min fuel consumption ratio 340g kw h Start Type Electric start Ignition Type MPFI ECU Fuel system MPFI CVT Gear box Gear selection with cam 0 703 2 88 H 3 514 2 47 10 12 L 5 857 4 12 16 87 Gear ratio R 3 828 2 69 11 02 Dimension 610 568 519 Weight 70kg ...

Страница 93: ...ake pad check Each brake pad is provided with wear indicator grooves which allow you to check the brake pad wear without having to disassemble the brake To check the brake pad wear check the wear indicator grooves If a brake pad has worn to the point that the wear indicator grooves have almost disappeared have a Regard dealer replace the brake pads as a set 1 Brake pad wear indicator groove NOTE T...

Страница 94: ...ke pad wear indicator groove Checking the brake fluid level 1 Minimum level mark Insufficient brake fluid may let air enter the brake system possibly causing the brakes to become ineffective Before riding check that the brake fluid is above the minimum level mark and replenish if necessary A low brake fluid level may indicate worn brake pads and or brake system leakage If the brake fluid level is ...

Страница 95: ...that water does not enter the brake fluid reservoir when refilling Water will significantly lower the boiling point of the fluid and may result in vapor lock z Brake fluid may deteriorate painted surfaces or plastic parts Always clean up spilled fluid immediately z Have a Regard dealer inspect the brake system if the brake fluid level goes down Brake fluid replacement Complete fluid replacement sh...

Страница 96: ...rd dealer check the brake system if necessary 1 Brake pedal WARNING POTENTIAL HAZARD Operating with improperly serviced or adjusted brakes WHAT CAN HAPPEN You could lose braking ability which could lead to an accident HOW TO AVOID THE HAZARD After servicing z Make sure the brakes operate smoothly and that the brake pedal position is correct z Make sure the brakes do not drag z All air must be bled...

Страница 97: ...dures 4 Check the parking brake lever free play The maximum free play is equal to one click of the parking brake lever If necessary adjust the free play as follows a Parking brake lever free play NOTE The parking brake lever must be released when checking and adjusting the parking brake lever free play 5 Loosen the locknut 1 Locknut 2 Adjusting nut 6 Turn the adjusting nut in direction a to increa...

Страница 98: ...the brake light come on later turn the adjusting nut in direction b 1 Brake light switch 2 Adjusting nut 3 Close the hood Cable inspection and lubrication WARNING POTENTIAL HAZARD Damaged control cables WHAT CAN HAPPEN Corrosion can result when the outer covering of control cables becomes damaged Cables can also become frayed or kinked Operation of controls could be restricted which could cause an...

Страница 99: ...e Lubricate the pivoting parts Recommended lubricant Lithium soap based grease all purpose grease Rear knuckle upper and lower pivot lubrication Lubricate the knuckle upper and lower pivots with a grease gun Recommended lubricant Lithium soap based grease ...

Страница 100: ...pivot points Recommended lubricant Lithium soap based grease all purpose grease Wheel removal 1 Loosen the wheel nuts 2 Elevate the vehicle and place a suitable stand under the frame 3 Remove the nuts from the wheel 4 Remove the wheel 1 Nut 4 ...

Страница 101: ...the wheel z Tapered nuts are used for both the front and rear wheels Install the nut with its tapered side towards the wheel 1 Arrow mark 1 Tapered nut 2 Lower the vehicle so that the wheel is on the ground 3 Tighten the wheel nuts to the specified torque Wheel nut torque Front 55 Nm 5 5m kgf 40ft lbf Rear 55 Nm 5 5m kgf 40ft lbf ...

Страница 102: ...poisoned You could be severely burned by the sulfuric acid in battery electrolyte Batteries produce explosive gases HOW TO AVOID THE HAZARD Avoid contact with skin eyes or clothing Always shield eyes when working near batteries Keep out of reach of children Antidote EXTERNAL Flush with water INTERNAL Drink large quantities of water or milk Follow with milk of magnesia beaten egg or vegetable oil G...

Страница 103: ...n the battery life 2 Always make sure the connections are correct when putting the battery back in the vehicle 1 Negative battery lead 2 Positive battery lead Fuse replacement The main fuse and the fuse box are located under the hood See page 83 for hood opening and closing procedures If a fuse is blown turn off the main switch and install a new fuse of the specified amperage If a fuse is blown re...

Страница 104: ...r hood opening and closing procedures 2 Remove the bulb holder cover at the rear of the headlight by pulling it off 1 Headlight bulb holder cover 3 Disconnect the headlight couple by lifting the tab as shown and pulling out the couple 4 Remove the defective bulb by turning it counterclockwise 1 Headlight bulb holder ...

Страница 105: ...dlight bulb into the bulb 1 Headlight bulb holder tab 2 CAUTION Do not touch the glass part of the headlight bulb to keep it free from oil otherwise the transparency of the glass the luminosity of the bulb and the bulb life will be adversely affected Thoroughly clean off any dirt and fingerprints on the headlight bulb using a cloth moistened with alcohol or thinner 6 Install the headlight bulb hol...

Страница 106: ...rection a To lower the beam turn the adjusting screw in direction b 1 Headlight beam adjusting screw Tail brake light bulb replacement If a tail brake light bulb burns out replace it as follows 1 Remove panel A if replacing the left tail brake bulb or panel B if replacing the right tail brake bulb by removing the quick fasteners and bolts 1 Panel A ...

Страница 107: ...der 3 Push the defective bulb in and turn it counterclockwise to remove it from the bulb holder 4 Push a new bulb in and turn it clockwise to install in the bulb holder 5 Install the bulb holder together with the bulb by turning it clockwise 6 Install the panel by installing the quick fasteners and bolts and then tighten the bolts to the specified torque ...

Страница 108: ...ians at a Regard dealer ship have the tools experience and know how to properly service your vehicle Use only genuine parts on your vehicle Imitation parts may look like genuine parts but they are often inferior Consequently they have a shorter service life and can lead to expensive repair bills WARNING POTENTIAL HAZARD Checking the fuel system while smoking or near an open flame WHAT CAN HAPPEN F...

Страница 109: ...ed Ask a Regard dealer to inspect 2 Compression There is compression No compression Use the electric starter to see if there is compression Compression normal Ask a Regard dealer to inspect 3 Ignition Remove the spark plug and check the electrodes Wet Dry Wipe clean with dry cloth Attach spark plug cap and ground to chassis Use the electric starter Spark is good Spark is weak No spark Adjust the s...

Страница 110: ... completely removing the cap Wait until the engine has cooled Level is low check the cooling system for leakage Level is OK Restart the engine If the engine overheats again ask a Regard dealer to inspect and or repair the cooling system No leakage Leakage Ask a Regard dealer to inspect and repair the cooling system Add coolant See NOTE Check the coolant level in the coolant reserver and or radiato...

Страница 111: ...page and deterioration of wheel bearings brakes transmission seals and electrical devices Many expensive repair bills have resulted from improper high pressure detergent applications such as those available in coin operated car washers 4 Once the majority of the dirt has been hosed off wash all surfaces with warm water and mild detergent type soap An old toothbrush or bottle brush is handy for har...

Страница 112: ...1 Fill the fuel tank with fresh fuel and add the specified amount of Fuel Stabilizer and Conditioner Operate the vehicle for at least 5 minutes to distribute treated fuel through the fuel system 2 Drain the fuel from the carburetor float chamber into a clean container by loosening the drain bolt this will help prevent fuel deposits from building up Pour the drained fuel into the fuel tank Specifie...

Страница 113: ...Tie a plastic bag over the exhaust pipe outlet to prevent moisture from entering 7 If storing in a humid or salt air atmosphere coat all exposed metal surfaces with a light film of oil Do not apply oil to any rubber parts or the seat covers 8 Remove the battery and charge it Store it in a dry place and recharge it once a month Do not store the battery in an excessively warm or cold place less than...

Страница 114: ...in 1 854 mm 73 0 in 818 mm 32 2 in 1 910 mm 75 2 in 275 mm 10 75 in 3 900 mm 153 5 in Basic weight With oil and full fuel tank 525 0 kg 1 156 lb Engine Engine type Cylinder arrangement Displacement Borehstroke Compression ratio Starting system Lubrication system Liquid cooled 4 stroke SOHC Forward inclined single cylinder 596cm 3 96 0h82 0 mm 10 0 1 Electric starter Wet sump ...

Страница 115: ...SAE 20W40 LUBE 4 10W30 or SAE 10W30 SAE 5W30 API Service SE SF SG type or higher CAUTION In order to prevent clutch slippage since the engine oil also lubricates the clutch do not mix any chemical additives Do not use oils with a diesel specification of CD or oils of a higher quality than specified In addition do not use oils labeled ENERGY CONSERVING II or higher 1 80 L 1 58 Imp qt 1 90 US qt 2 0...

Страница 116: ...Imp qt 0 34 US qt Radiator capacity including all routes 2 50 L 2 20 Imp qt 2 64 US qt Air filter Engine Intake Wet element Dry element Fuel Type Fuel tank capacity UNLEADED GASOLINE ONLY 30 0 L 6 60 lmp gal 7 93 US gal Carburetor Type quantity Manufacturer BSR36 39 MIKUNI Spark plug Type manufacturer Spark plug gap DPR7EA 9 NGK 0 8 0 9 mm 0 031 0 035 in Clutch type Wet centrifugal automatic ...

Страница 117: ...low high V belt V belt automatic Right hand operation 3 828 5 857 3 514 Chassis Frame type Caster angle Trail Steel tube frame 5 0e 26 0 mm 1 02 in Tire Type Size front rear Tubeless 25h8 12NHS 25h10 12NHS Brakes System Type front rear Operation Front and rear unified Dual disc brake Single disc brake Foot operation ...

Страница 118: ...orber Coil spring oil damper Coil spring oil damper Wheel travel Front wheel travel Rear wheel travel 185 0 mm 7 28 in 185 0 mm 7 28 in Electrical Ignition system Generator system Battery capacity DC CDI A C magneto 12V 28 0 Ah Headlight type Bulb Bulb voltage wattagehquantity Headlight Tail brake light 12 V 30 W 30 0 Wh2 12 V 5 W 21 0 Wh2 ...

Страница 119: ... Model RUF625 Specified fuses Main fuse 䫕 fuse Auxiliary DC jack fuse 亢 fuse 20 0 A 10 0A 10 0 A 5 A ...

Страница 120: ...eriod Since the date customer buy our product 1 If there is any problem with the main spare parts engine the front and rear differential gear half axle we will responsible to repair it freely in one year 2 Articles that easy to get to broken shall not be subjected to the range of free repair 3 If there have any problems for the large quantity we will send our engineer to repair it or call back our...

Страница 121: ...mer follows the following steps The customer must fill in the warranty card when he she purchase our product Domestic customers send it back to our company Foreign customers send it back to our dealer Dealer put the information into computer and email to our company It will be valid when our company confirm that we have receive the information Č The method of validity If domestic customers find an...

Страница 122: ... SSR MOTORSPORTS INC ...

Страница 123: ... ...

Отзывы: