background image

8

9

English

English

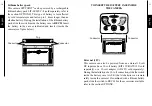
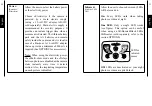
BOTTOM VIEW

1. Power button
2.  LED recording indicator 
3. UP button 
4. BACK button
5. OK button
6. DOWN button 


7.  ALK / RECH (switch for battery)

8.  SD card slot
9. USB port
10. 12-volt jack
11. External trigger jack
12. TV OUT
13. Removable battery case

7.

10.

9.

11.

13.

8.

12.

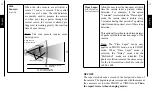
Connector

Connector

Top

POWER

The battery level is shown in the REPORT mode. 
(4/4 = full, 1/4= low) When the battery level shows 2/4, 
the camera will continue to take pictures but we strongly 
recommend changing the batteries before they are empty. 

AA batteries

This camera requires the use of 6 AA batteries (1.5V). The 
use of alkaline or lithium batteries is strongly recommended. 
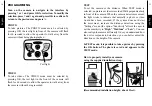
During the installation of the AA batteries, slide the switch 
inside the battery case to 

ALK

. Insert the batteries in the 

battery case as indicated and insert it inside the camera (see 
figure below). Exact polarity must be followed. We also 
recommend the use of new batteries to ensure maximum 
performance of your camera.

Содержание TINY-7

Страница 1: ... de surveillance photographique Fotografisches Überwachungs system TINY HD TINY 7 model Modèle TINY HD TINY 7 Modell TINY HD TINY 7 User manual Manuel d utilisation Bedienungsanleitung www spypoint com P INT SPY INT P SPY TINY HD TINY 7 ...

Страница 2: ...u for choosing the SPYPOINT TINY HD TINY 7 monitoring system This manual will help you get the most out of your new device For the latest version of this user manual or for additional information visit our website at www spypoint com ...

Страница 3: ...AVI Sequence length Adjustable from 10 to 90sec Capture mode Color by day black and white by night Sound recording Automatically recorded in video mode Memory storage SD SDHC card up to 32 GB No internal memory Configuration Viewing Built in LCD screen 2 4 configuration screen TINY 7 2 4 viewing screen TINY HD TV output Composite video PAL NTSC Computer output USB 2 0 Power supply accessories sold...

Страница 4: ...ing see DELAY Electricity mode Connected to a 12V DC Main source only Instant trigger time External trigger 1 8 jack for normally open contact Night time illumination system LEDs 38 LEDs Type Invisible Black LEDs TINY 7 Infrared LEDs TINY HD Exposure Automatic infrared level adjustment OK BUSY 1 2 3 4 5 6 Optical field of view 40 Recommendations Operating temperature 20 C to 50 C 4 F to 122 F Stor...

Страница 5: ...attery level shows 2 4 the camera will continue to take pictures but we strongly recommend changing the batteries before they are empty AA batteries This camera requires the use of 6 AA batteries 1 5V The use of alkaline or lithium batteries is strongly recommended During the installation of the AA batteries slide the switch inside the battery case to ALK Insert the batteries in the battery case a...

Страница 6: ...d and insert it inside the camera see figure below P INT SPY TM INT P SPY Connector Connector Top P INT SPY TM INT P SPY Connector Connector TO INSERTTHE BATTERYCASE INSIDE THE CAMERA External 12V This camera can also be powered from an external 12 volt DC input such as a 12 volt battery KIT 12V BATT 12V sold separately or a 12 volt adapter AD 12V sold separately During the installation of a 12 vo...

Страница 7: ... TEST mode if no memory card is used the camera also beeps The camera is compatible with SD SDHC memory card up to 32 GB capacity Before inserting or removing the memory card the camera must be turned off Failing to do so may cause loss of or damage the pictures already recorded from the memory card When the SD card is full the viewing screen indicates Disk full when PHOTO VIDEO or TEST mode are s...

Страница 8: ...o take a picture by pressing the OK button The photo is saved and appears in the VIEW mode How to properly install your camera using the supplied installation strap Recommended installation height about 3 feet PROGRAMMING Turn on the camera to navigate in the interface by pressing or and press OK for selection To modify the selection press and again and press OK to confirm To return to the previou...

Страница 9: ...d 00 00 as stop time These hours are the basic settings of your camera Note The hours can be recorded over a 12 or 24 hours period Refer to Setting Time format 00 00 means midnight Delay 10s 1m 3m 5m 10m 15m 30m Select the time interval between photos or videos Additional setting It is possible to decrease the delay between detections to 10 seconds instead of 1 minute by using the following proced...

Страница 10: ...es in front of the camera e g a branch Date Set the date as Month Day Year Time format 12h 24h Allow the user to choose between a 12 or 24 hours period time displays on the photos eg 6 00 pm or 18 00 Time Set the time as Hour Minute Stamp Yes No Select or cancel printing the date time temperature and moon phases on photos New moon Waxing Crescent First Quarter Waxing Gibbous Full moon Waning Gibbo...

Страница 11: ... Electricity if the camera is powered by a main electric supply using a 12 volt DC adapter AD 12V sold separately Main electric supply is recommended for security purposes It provides an instant trigger time when a movement is detected The lithium battery pack and the AA batteries can remain safely inside the camera and it is ideal in case of a blackout A 12 volt DC adapter that can provide a mini...

Страница 12: ...minutes during that period of operation start time and stop time even if there is no detection This option allows the user to obtain pictures of game outside the detection range of the camera Note The Time Lapse mode only applies in PHOTO mode not in VIDEO mode When Time Lapse mode is selected the Delay mode and the Multi shot mode are disabled The photo resolution remains the same except for the ...

Страница 13: ...AD TO A COMPUTER To transfer or view photos and videos on a PC you must first turn off the camera and connect the USB cable supplied from the camera to your computer The computer will recognize the camera and will install the software itself Click on My Computer and select Removable Disk Then click DCIM and 100DSCIM to find all your photos and videos Taking the SD card out of the camera and insert...

Страница 14: ...TV You can view the photos or videos directly from a TV Connect the yellow end of the cable supplied into the VIDEO IN of the TV and the other end into the TV OUT of the camera The last photo or video recorded appears on the screen automatically Press or to view next or previous images The options are the same as when viewing on the 2 4 screen see above SOUND RECORDING This SPYPOINT camera offers ...

Страница 15: ...blinks Camera is set in TEST mode Camera is set in PHOTO or VIDEO mode The red light in front of the camera flashes for 60 seconds to allow the user to leave without being photographed or recorded The camera screen turns off The camera may be set to PHOTO or VIDEO mode and the screen turns off in order to preserve battery life The camera is left inactive for more than 2 minutes on the main menu it...

Страница 16: ...hargeable battery and charger BATT 12V 12 volt 7 0Ah rechargeable battery and AC charger 12 volt power cable CB 12FT Power cable with alligator clips at one end to connect a 12 volt battery to a camera 12ft Water resistant battery box KIT6V 12V Universal kit with two 6V rechargeable batteries 2 8Ah with 6V 5 6Ah and 12V 2 8Ah output configuration AC charger with water resistant ABS plastic case 12...

Страница 17: ...uct LIMITED WARRANTY SPYPOINT TINY HD TINY 7 designed by GG Telecom is covered by a one 1 year warranty on material and workmanship starting from its original date of purchase The sales receipt is your proof of purchase and must be presented if warranty service is needed This warranty does not cover any GG Telecom product whichhas been subjected to misuse neglect and accidents or has been improper...

Страница 18: ...illance SPYPOINTMD TINY HD TINY 7 Ce manuel d utilisation vous permettra d utiliser votre nouvel appareil de façon optimal Pour la plus récente version du manuel d utilisateur ou pour toutes informations additionnelles consultez notre site web au www spypoint com ...

Страница 19: ... de capture Couleur de jour noir et blanc de nuit Enregistrement du son Automatiquement enregistré en mode vidéo Mémoire de stockage Carte SD SDHC jusqu à 32Go Pas de mémoire interne Configuration visionnement Écran LCD intégré Écran de configuration de 2 4 6 1 cm TINY 7 Écran de visionnement de 2 4 6 1 cm TINY HD Sortie TV Vidéo Composite PAL NTSC Sortie Ordinateur USB 2 0 Alimentation accessoire...

Страница 20: ...nchement à une prise électrique seulement Déclenchement externe Prise 1 8 pour contact sec Système d éclairage de nuit DEL 38 DEL Type DEL noires invisibles TINY 7 DEL infrarouges TINY HD Exposition Ajustement automatique de la puissance de l éclairage infrarouge OK BUSY 1 2 3 4 5 6 Angle de champ de vision optique 40 Recommandations Température de fonctionnement 20 C à 50 C 4 F à 122 F Températur...

Страница 21: ...ue le niveau affiche 2 4 la caméra continue de prendre des photos mais nous suggérons fortement de changer les piles avant qu elles ne soient vides Piles AA Le système requiert l utilisation de 6 piles AA 1 5V L emploi de piles alcalines ou au lithium est fortement recommandé Lors de l installation de piles AA glisser le commutateur du compartiment des piles à ALK Insérer les piles dans le support...

Страница 22: ...el qu indiqué voir figure plus bas P INT SPY TM INT P SPY Dessus Connecteur Connecteur P INT SPY TM INT P SPY Connecteur Connecteur INSÉRER LE SUPPORT AMOVIBLE POUR PILES AA ET BLOC PILE LITHIUM DANS LA CAMÉRA Externe 12V La caméra peut aussi être alimenté au moyen d une source externe de 12 volts telle qu une batterie 12 volts KIT 12V BATT 12V vendu séparément ou un adaptateur 12 volts AD 12V ven...

Страница 23: ...que l appareil est allumé et que le mode PHOTO VIDÉO ou TEST est choisi l écran affiche Insérer carte mémoire et émet un signal sonore si la carte mémoire est absente La caméra accepte les cartes mémoire jusqu à une capacité de 32Go Avant d insérer ou de retirer une carte mémoire éteindre la caméra pour éviter tout dommage aux fichiers Lorsque la carte mémoire est pleine l écran affiche Mémoire pl...

Страница 24: ...siré Lorsque le mode TEST est choisi aucune photo ou vidéo n est enregistrée Passer devant l appareil de façon perpendiculaire Lorsque l appareil détecte le mouvement la lumière de test allume pour indiquer que l appareil aurait normalement enregistré une photo ou une vidéo Si le système ne détecte pas la présence augmenter la distance de détection à l aide du menu de configuration l option Sensib...

Страница 25: ...irées Pour configurer le système en français appuyer sur le bouton jusqu à ce que Language soit surligné Appuyer sur OK choisir Français avec le bouton ou et confirmer le choix en appuyant sur OK Le système modifiera de lui même tous les menus en français Heure début Heure arrêt Permet de configurer la période de fonctionnement de la caméra L heure de début et d arrêt programmées sont les heures d...

Страница 26: ... à chaque détection avec un délai de 10 secondes entre chaque photo Cette option permet d obtenir jusqu à 6 photos sous différents angles lorsque la caméra est programmée en mode PHOTO Durée vidéo 10s 30s 60s 90s Permet de configurer la durée d enregistrement des séquences vidéo lorsque la caméra est programmée en mode VIDÉO Langue English Français Deutsch Italiano Permet de choisir la langue des ...

Страница 27: ...tion OPTIONS DISPONIBLES Note Lorsque le branchement électrique est utilisé le mode Multi Photos et le délai de détection entre les photos sont désactivés puisque la caméra déclenche instantanément lorsqu il y a mouvement La température imprimée sur les photos est aussi désactivée lors du branchement électrique DEL pour le capteur infrarouge IR Infrarouge Marche Une seule DEL Arrêt Permet de chois...

Страница 28: ...u il y ait pour autant une détection de mouvement Par exemple si l option 5 minutes est sélectionnée dans le mode Time Lapse la caméra prend une photo toutes les 5 minutes durant la période de fonctionnement réglée heure de début et heure d arrêt Cette option permet entre autres l obtention de photos de gibiers en dehors du champ de détection de la caméra Note L option Time Lapse s applique seulem...

Страница 29: ...HEMENT EXTERNE Entrée 1 8 qui permet de déclencher la prise de photos ou de vidéos à l aide d un contact normalement ouvert Exemple l utilisation d un contact de porte magnétique relié à un système d alarme TRANSFERT VERS L ORDINATEUR Pour transférer ou visionner les photos ou vidéos à un ordinateur s assurer que la caméra est éteinte et connecter le câble USB fourni de la caméra à l ordinateur L ...

Страница 30: ...bre d étoiles jaunes affichées à droite de l écran correspond à la résolution des photos Basse 3 MP Normale 5 MP Haute 7 ou 8 MP Visionner sur une télévision Permet de visionner les photos et les vidéos directement sur un téléviseur Allumer la caméra et brancher l extrémité jaune du câble à la prise VIDEO IN du téléviseur et l autre extrémité à la prise TV OUT de la caméra La dernière photo ou vid...

Страница 31: ... et la lumière de test clignote durant 60 secondes pour permettre à l utilisateur de quitter les lieux sans être photographié ou filmé L écran de l appareil s éteint L appareil est en mode PHOTO ou VIDEO et l écran s éteint dans le but de préserver les piles La caméra est laissée inactive plus de 2 minutes sur le menu principal celle ci s initialise automatiquement en mode PHOTO et l écran s étein...

Страница 32: ...AC câble d alimentation de 3 6m PW 12FT et courroie incluse Câble d alimentation PW 12FT Câble d alimentation de rechange de 3 6m pour branchement de la caméra au KIT 12V Pile 12 volts rechargeable et chargeur BATT 12V Pile rechargeable de 12 volts 7 0Ah et chargeur AC Câble 12 volts CB 12FT Câble d alimentation de 3 6m avec pinces crocodiles pour connecter une pile 12 volts à une caméra Boîtier d...

Страница 33: ...protège des bris pouvant être engendrés par les ours ou autres animaux Aussi disponible en noir Support pour caméras MA 360 Support ajustable pour caméras compatible avec toutes caméras possédant une fixation pour trépied standard de 20 Pivote sur 360 S incline de 90 Aussi disponible en noir Cadenas CL 6FT Câble cadenas de 2m compatible avec toutes les caméras SPYPOINTMD Trépied en aluminium TP CA...

Страница 34: ...lisations non conformes du produit affecteront son fonctionnement ses performances sa durabilité et annuleront la garantie SERVICE DE RÉPARATION Les réparations pour bris ou défectuosités non couverts par la garantie seront facturées à prix raisonnables Pour le soutien technique s v p écrire un courriel à tech spypoint com Décrire le problème rencontré et indiquer un numéro de téléphone pour vous ...

Страница 35: ...aben ZudenvielenVorzügendieserdigitalenÜberwachungskamera gehören die vielfältigen Einsatzmöglichkeiten und die benutzerfreundliche Bedienung Diese Kamera wurde von Spitzeningenieuren entworfen und entwickelt Sie kann bei Tag und Nacht ohne Blitzlicht scharfe und qualitativ herausragende Bild und Videoaufnahmen machen ...

Страница 36: ...ei Nacht Ton Aufnahme Automatisch eingeschaltet im Video Modus Speicherplatz SD SDHC Karten bis zu 32 GB kein interner Speicher Konfiguration Anzeige Eingebauter LCD Bildschirm 2 4 Konfiguration Bildschirm TINY 7 2 4 Bildschirm TINY HD TV Ausgang PAL NTSC Computer Ausgang USB 2 0 Stromversorgung Zubehör separat erhältlich siehe Zubehörteile Alkaline oder Lithium Batterien 6x AA Lithium Akku Wieder...

Страница 37: ...uslösung Externer Auslöser 1 8 Buchse für einen Arbeitskontakt Nächtliches Beleuchtungssystem LEDs 38 LEDs Typ Unsichtbare Black LEDs TINY 7 Infrarot LEDs TINY HD Abdeckung Automatische Infrarotlevel Anpassung Optisches Sichtfeld 40 Temperaaturbereich Betriebstemperatur 20 C bis 50 C 4 F bis 122 F Lagertemperatur 30 C bis 75 C 22 F bis 167 F LIEFERUMFANG SPYPOINT TINY HD TINY 7 Befestigungsgurt US...

Страница 38: ...s angezeigt 4 4 voll 1 4 niedrig Wenn der Batterie Status 2 4 anzeigt wird die Kamera weiterhin Bilder erzeugen aber wir empfehlen die Batterien aus zu tauschen bevor diese leer sind Alkali Batterien Für diese Kamera werden 6 AA Batterien benötigt 1 5V Wir empfehlen den Einsatz von Alkali Batterien Beim Gebrauch von Alkali Batterien den Schalter im Batteriefach auf ALK d h Alkaline stellen Legen S...

Страница 39: ...tteriefach auf RECH stellen P INT SPY TM INT P SPY Connector Connector Das Batteriefach im Inneren der Kamera einsetzen Extern 12V Anschluss Optional kann diese SPYPOINT Kamera auch über die externe 12V DC Buchse betrieben werden Bitte nehmen Sie in diesem Fall zur Vermeidung von Überspannung die Alkali Batterien aus dem Gerät Während der Verwendung einer 12V Batterie den Schalter im Batteriefach ...

Страница 40: ... zu Datenverlust oder Zerstörung der bereits auf der Karte gespeicherten Bilder kommen Sobald die Speicherkarte voll ist erscheint auf dem Display die Anzeige SPEICHER VOLL wenn Foto Video oder Test Modus ausgewählt sind Der folgenden Tabelle können Sie die ungefähre Anzahl an Bildern entnehmen die je nach Leistung der Speicherkarte von der Kamera gespeichert werden kann BILD AUFLÖSUNG 2 0 GB 4 0 ...

Страница 41: ... Einsatz an dieser Stelle eine Aufnahme erfolgt wäre Erkennt das Gerät keine Bewegung müssen Sie die Entfernungserkennung am Rädchen DISTANCE neu einstellen oder das Gerät neu ausrichten Sie können Ausrichtung bzw Montagehöhe der Kamera besser einschätzen wenn Sie sich mit der Bewegungserkennung des Geräts vertraut gemacht haben In TEST Modus ist es möglich ein Bild aufzunehmen indem Sie die OK Kn...

Страница 42: ...hr für Stopp Dies ist die Standart Einstellung Ihrer Kamera Verzögerung 10s 1m 3m 5m 10m 15m 30m Wählen Sie den Zeitabstand zwischen zwei Fotos oder Videos aus Zusätzliche Einstellung Es ist möglich mit folgenden Schritten die Verzögerungszeit zwischen einzelnen Auslösungen auf 10 Sekunden zu senken anstelle von 1 Minute Achtung dies verringert die Batterielaufzeit Die Kamera ausschalten Drücken u...

Страница 43: ...zierung wenige Objekte vor der Kamera befinden Sonst kann es bei direkter Sonneneinstrahlung durch bewegte Objekte zu ungewollten Bildern kommen z B durch einen Ast Datum Datumseinstellung im Format Monat Tag Jahr Zeitformat 12h 24h Erlaubt dem Benutzer zwischen 12 Stunden oder 24 Stunden Zeitbereich zu wählen z B 6 00 pm oder 18 00 Uhrzeit Uhrzeiteinstellung im Format Stunde Minute Sekunde Markie...

Страница 44: ...n einzelnen Fotos abgeschaltet Die Kamera ist sofort und jederzeit bereit wenn eine Bewegung erfasst wurde Außerdem wird keine Temperatur auf den Bildern abgespeichert Infrarot Ein Eine LED Aus Erlaubt dem Benutzer die Anzahl der verwendeten LEDs zu wählen An Jede LED arbeitet wenn Nachts ein Bild oder Video aufgenommen wird EINE LED Nur eine LED arbeitet siehe Bild Diese Option ist zu wählen wenn...

Страница 45: ...ng Die Zeitraffer Funktion ist nur im FOTO Modus verfügbar aber nicht im VIDEO Modus Wenn Zeitraffer ausgewählt ist wird die Verzögerungszeit DELAY und die Mehrfachaufnahme abgeschaltet Zusätzlich ist die Auflösung der Bilder auf 800 x 600 reduziert um die Möglichkeit zu behalten die Aufnahmen zu einem Video zusammenzufügen BERICHT In dieser Einstellung wird ein Bericht aufgezeichnet Die Aufzeichn...

Страница 46: ...muss die Kamera erst ausgestellt OFF werden Schließen Sie das mitgelieferte USB Kabel der Kamera an den Computer an Der Computer erkennt die Kamera automatisch und installiert die Software selbsttätig Klicken Sie auf Mein Computer und wählen Sie Wechseldatenträger Wenn Sie nun auf DCIM und 100DSCIM klicken finden Sie alle Bild und Videoaufnahmen Alternativ können Sie die SD Karte aus Ihrer Kamera ...

Страница 47: ...ang A V IN am Fernseher an und das andere Ende an den Ausgang TV OUT an der Kamera Bei der Auswahl des Menüpunkts WIEDERGABE erscheint automatisch das letzte Bild oder Video auf dem Display Über oder können Sie das vorherige oder nächste Bild aufrufen Die Optionen sind identisch mit den oben genannten für das 2 4 Display siehe oben TONAUFNAHMEN Diese Kamera ermöglicht Ihnen im Videomodus Geräusche...

Страница 48: ...Zeit können Sie sich von der Kamera entfernen ohne dass Sie aufgenommen werden Die Kamera Bildschirm wird ausgeschaltet Die Kamera kann auf Foto oder VIDEO Modus und der Bildschirm schaltet sich nach einer Zeit von 60 Sekunden um die Batterie zu schonen Werden ZUBEHÖRTEILE Fragen Sie Ihren Fachhändler oder besuchen Sie www eurohunt eu um Zubehörartikel zu finden Die folgenden Zubehörteile sind die...

Страница 49: ...12V Stromkabel CB 12FT Mit dem 3 5m Kabel können Sie die Kamera an einen externen 12V DC Auslass anschließen Wasserdicht Akku Box KIT6V 12V Universal Kit mit zwei 6V Akkus 2 8Ah mit 6V 5 6Ah und 12V 2 8Ah Ausgangs Konfiguration AC Ladegerät mit wasserabweisendem ABS Kunststoff 12ft Netzkabel und Trageschlaufe mitgeliefert Camo Muster 12V adapter AD 12V 12V Adapter für die Steckdose passend für all...

Страница 50: ...r Kamera vor Diebstahl Verhindert gleichfalls Beschädigungen durch Menschen oder Tiere Wand und Baumbefestigung MA 360 Beweglicher Befestigungsarm kompatibel mit der standard Stativ Befestigungsschraube Sicherungskabel CL 6ft Abwschließbares 1 8m Sicherungskabel für maximalen Diebstahlschutz Aluminium Stativ TP CAM Leichtes Stativ Aluminium Farbe schwarz mit einzigartigen Anker System Max Höhe 4 9...

Страница 51: ...Lebensdauer in diesen Fällen erlischt die Garantie REPARATURDIENSTE Leistungen für Schäden die nicht von der Gerätegarantie abgedeckt sind werden in Rechnung gestellt Für technische Unterstützung wenden Sie sich bitte an info eurohunt de Beschreiben Sie Ihr Problem und hinterlassen Sie eine Telefonnummer unter der Sie erreichbar sind WICHTIG EUROHUNT akzeptiert keine Rücksendungen ohne Warenrückse...

Отзывы: