background image


P/N 20126 Rev B 

Page 14 


Wireless Network Configuration 


1.


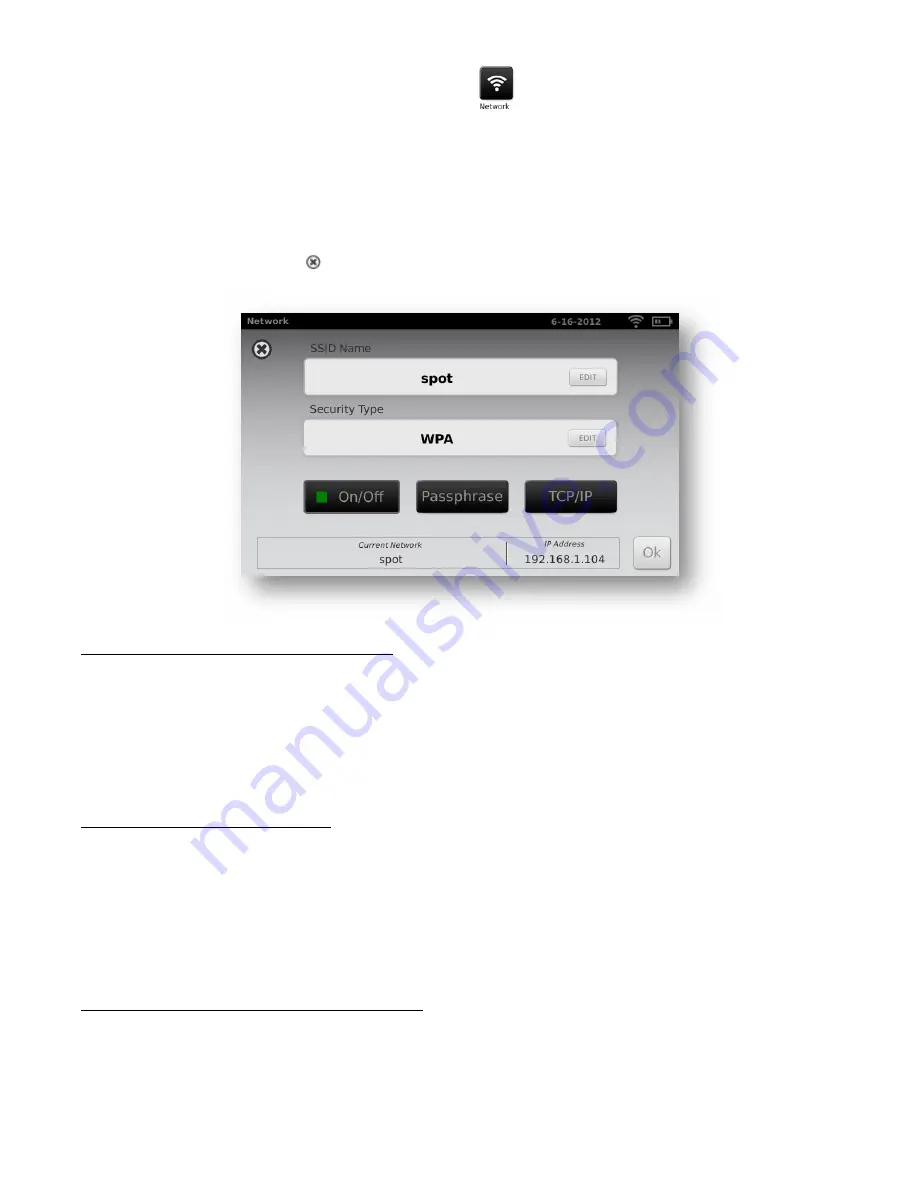
From the “Tools” menu, select the Network icon.


2.


Current network settings are displayed on the screen (

Figure 12

).   

3.


To add or edit any of the fields, see instructions below.     

4.


If they are correct, select


to be returned to the “Tools” menu.   


To add/change the network name (SSID): 

1.


Touch the SSID Name field; a keyboard will appear.   

2.


Enter the SSID (case sensitive); select 

“ok”

 to save your changes and return the previous screen. 

“Ok” button will turn dark when changes have been made and are available to be saved. 


To add/select the security type:   

1.


Touch the security type field. 

2.


Select the appropriate security type None, WEP, or WPA. 

NOTE

:

 WPA option supports WPA Personal/WPA2 Personal. 


To add/change the passphrase (password):   

1.


Touch the passphrase button; a keyboard will appear (this


is only available when the security field 

is set to WEP or WPA). 


2.


Enter the passphrase (case sensitive) and select “ok” 


F i g u r e   1 2  


Содержание VS100 Vision Screening Device

Страница 1: ...Spot VS100 Vision Screening Device Instructions for Use P N 20126 Rev B ...

Страница 2: ... Monocular Mode 11 Viewing the Results 12 Understanding the Results 12 Tools 13 Wireless Network Configuration 14 Printer Configuration 15 Import Export 18 Web Access 21 Spot Licensing 22 B Ba as si ic c T Tr ro ou ub bl le es sh ho oo ot ti in ng g 23 T Te ec ch hn ni ic ca al l D De es sc cr ri ip pt ti io on n 25 E En nv vi ir ro on nm me en nt ta al l P Pr ro ot te ec ct ti io on n 26 EMC Info...

Страница 3: ...ications for Use Spot VS100 is indicated for use when evaluation of individuals for poor vision and refractive errors is needed Box Contents The main shipping box contains Spot this Spot Instructions for Use document and the Accessory box The Accessory box contains 1 AC Power Cord 2 Power Supply Charger 3 Cleaning Cloth 4 Velcro Cable Straps NOTE Please do not discard the box and foam Damages incu...

Страница 4: ...shoot camera Spot provides visual and audible cue to attract subject s attention and gaze Spot provides a fast data collect for easy evaluation of the most difficult pediatric subjects of limited compliance Each evaluation provides simultaneous binocular assessment of the subject s refraction pupil size and gaze Product Registration IMPORTANT You will need to register with PediaVision before you b...

Страница 5: ...er ra at ti io on n Terminology Spot Details NOTE The USB port will only be used for PediaVision Spot software installations and import export of Spot data via a USB flash drive No cable connection to any other device is permissible Figure 3 Figure 2 ...

Страница 6: ... 8 DO NOT use the wrist strap as a means to carry the device it is not designed to carry the weight of Spot 9 DO NOT push or scratch the touchscreen display surface with anything stiff or rigid A stylist is acceptable for use with the device 10 DO NOT spill liquids on Spot Please wipe off drops of liquid like saliva and water on LCD panel surface immediately Warnings 1 Changes or modifications not...

Страница 7: ...e in a room with any light source If the pupils are too small Spot will notify you on screen to adjust the lighting in the room For best results subject s pupils should be 5mm or greater GettingStarted Charging Spot 1 Connect provided AC cord set and power supply charger together 2 Gently lift the back of Spot to view the available connections 3 Locate the DC power connector on Spot and connect th...

Страница 8: ...creen will dim after 5 minutes the screen will automatically turn black to conserve battery power Tap the screen to wake up Spot or press the power button If the screen does not light up plug in the power cord and try again Exporting Delete Historical Records Verify you have successfully exported desired data to a USB drive before you select Delete All Records Routinely Delete ALL Records from Spo...

Страница 9: ...t screening results OR Select an Age Range To begin instant screening with no personal subject data select an age range of the subject from the Home screen You will be able to enter subject data after the screening if desired Icons on bottom of screen Queue View select or search for queued subjects from a list to begin the screening process History View already screened subjects completed records ...

Страница 10: ...icker results and help ensure you are not capturing other objects 3 A blue screen indicates you are too close or too far from the subject 4 Position yourself with one foot in front of the other slowly rock forward and back until the screen turns grey indicating you are in the capture range When using a tripod move the tripod as needed to ensure focus on the subject s pupils until the screen turns ...

Страница 11: ... screen This should be attempted when binocular screening does not capture the subjects pupils 1 Touch the side of the screen that corresponds with the eye you would like to screen OD subjects right eye OS subjects left eye 2 When complete you can repeat the process with the other eye by choosing Monocular from the Results Menu ...

Страница 12: ... indicated in red All results viewing options are in the Tools menu under Results including defaulting to a summary screen or the detailed results screen hiding recommendations or measurements cylinder convention options and raw or rounded data Understanding the Results Figure 11 below outlines the results screen and what it shows you Figure 10 Figure 11 ...

Страница 13: ...location Allows you to connect Spot to a wireless network You can manually enter your network name SSID select the security type and enter the passphrase for your network From this page you can view and change your TCP IP settings Allows you to configure a network printer and print a test page It also lets you view printer status Allows you to configure how data is displayed on the Results screen ...

Страница 14: ...ear 2 Enter the SSID case sensitive select ok to save your changes and return the previous screen Ok button will turn dark when changes have been made and are available to be saved To add select the security type 1 Touch the security type field 2 Select the appropriate security type None WEP or WPA NOTE WPA option supports WPA Personal WPA2 Personal To add change the passphrase password 1 Touch th...

Страница 15: ...onfigurations select Static to manually configure your network address and settings Also available is the MAC address of your Spot Figure 12 Printer Configuration Spot is capable of connecting and printing to most network capable Hewlett Packard HP printers Spot also contains some generic PCL drivers that can be used with non HP printers as well as a custom driver that supports the Brother QL 720N...

Страница 16: ...ouch the button to delete 2 A pop up will appear asking you to confirm deletion of the printer To reset the printer system which will delete all printers 1 Touch the trashcan icon 2 A pop up will appear select Delete This will remove all current printer configurations Adding a Printer 1 From the Printers Available screen select the plus sign to add a printer Figure 13 2 If any printers are found o...

Страница 17: ...saved the Print Test Page will appear dark 6 A print icon will appear in the menu bar indicating the job is processing The number of jobs in the print queue will show up in the Jobs box at the top of the Printer Details screen along with the current printer Status See Figure 15 NOTE If you are having a problem with your printer or a print job is stuck in the queue select the reset button to clear ...

Страница 18: ... recognizes a valid import file Number of import files found will be shown on the screen NOTE If the buttons do not highlight within five seconds of inserting the USB drive remove the USB insert it into your PC and remove all files from the drive before attempting to retry Export Select the Export button If you wish to export one file containing no subject specific data select Exclude Personal Dat...

Страница 19: ...st follow the correct naming convention for a successful import i e banner png SpotCriteria csv SpotSubjects csv Remember SpotSubjects can have a location as the name of the file Spot Criteria To modify current screening criteria 1 Perform an export and insert the USB drive into your PC 2 Go to the USB drive folder and open the Spot folder that you just exported select the import folder 3 Copy the...

Страница 20: ... combination of alpha characters Date of Birth Enter the date of birth in the format MM DD YYYY You can enter the age of subject in years months or a combination of both This field is required for the import to work o For example If a subject were 2 years and 10 months old you would enter 2Y10M Use numeric and alpha characters Gender Select Male or enter M select Female or enter F o Alpha characte...

Страница 21: ... Your new banner will be printed on the bottom of the report Web Access When connected to a wireless network Spot gives you the ability to view Spot files from a web browser Internet Explorer Firefox Safari etc on a PC on the same network To access the webserver on Spot 1 From your computer open a web browser enter Spot s IP address in the address bar this is located on the top black bar on the Ho...

Страница 22: ...button 3 After a moment a dialog box will appear indicating that the registration file has been exported to the USB drive 4 Send the file titled spot serial number reg to PediaVision Support at support pediavision com PediaVision Support will review your registration file and email you back a valid license key Once you receive the key perform the following 1 Save the file to the top level root dir...

Страница 23: ...ss and hold the power button until the screen goes black then release the power button 4 Wait about one minute then perform the normal start up process NOTE This may cause some data loss ex printer configuration and subject data Printer Issues Check that your printer is turned on and has sufficient ink or toner 1 Print a test print page directly from the printer After you confirm your printer is i...

Страница 24: ...If the problem persists contact PediaVision Support Problem Encountered Spot needs to reboot Reboot The system was not able to start and has attempted to correct the issue Select Reboot and try again If problem persists contact PediaVision Support The screening system is not available None The Exam system did not initialize or is unresponsive Power cycle the device and try again If problem persist...

Страница 25: ... is suitable for continuous operation Spot quickly and easily detects vision issues across all age groups starting at 6 months Spot helps ensure children have an opportunity to reach their full potential Designed to work as easily with toddlers as with teenagers Spot provides reliable data in seconds With Spot educators healthcare professionals and charitable organizations can now confidently asse...

Страница 26: ...other than domestic and those directly connected to the public low voltage power supply network that supplies buildings used for domestic purposes This equipment generates uses and can radiate radio frequency energy and if not installed and used in accordance with the instruction manual may cause harmful interference to radio communications However there is no guarantee that interference will not ...

Страница 27: ...ity of the equipment or system The equipment or system should not be used adjacent to or stacked with other equipment If adjacent or stacked use is necessary the equipment or system should be observed to verify normal operation in the configuration in which it will be used EMC Table Emission Guidance The Pediavision Spot is intended for use in the electromagnetic environment specified below The op...

Страница 28: ...ing during power supply interruptions it is recommended a backup power supply unit UPS or battery Magnetic field at power frequency EN 61000 4 8 3 A m 3 A m Power frequency magnetic fields should have characteristic levels of a typical commercial or clinical environment Immunity Radio Frequency Guidance Spot is manufactured to work in the electromagnetic environment specified below The operator or...

Страница 29: ...turer Notes 1 At 80 MHz and 800 MHz it is applicable the higher frequency range 2 This line guide could not be applicable in every circumstance The electromagnetic propagation is affected by the absorption and the reflection of structures people or objects FCC Compliance Statement This device complies with Part 15 of the FCC Rules Operation is subject to the following two conditions 1 this device ...

Страница 30: ...ative Humidity non condensing Storage Shipping Atmospheric Pressure 800 hPA to 1060 hPA Expected Battery Life 2 5 Years Under Normal Usage Measurements Refraction Spherical Equivalent Range 7 50D to 7 50D in 0 25D increments Accuracy 3 50D to 3 50D 0 50D 7 50D to 3 50D 1 00D 3 50D to 6 00D 1 00D Cylindrical Range 0 00D to 3 00D in 0 25D increments Accuracy 0 00D to 1 50D 0 50D 1 50D to 3 00D 1 00D...

Страница 31: ...placeable Battery Charging Flashing Charged Continuous Power On Off Non ionizing Electromagnetic Radiation Refer to Instruction Manual This symbol is applicable for EC member countries only To avoid potential negative consequences for the environment and possibly human health this instrument should be disposed of i for EU member countries in accordance with WEEE Directive on Waste Electrical and E...

Страница 32: ...work Graphics Display Icon No Wireless Network in Range Graphics Display Icon No IP Address Assigned by the Router Graphics Display Icon Unknown Network Graphics Display Icon Cannot Connect to Configured Network Graphics Display Icon Sound Off Graphics Display Icon Sound On Graphics Display Icon Continue Icon Back Icon Exit to Previous Screen or Main Menu Print Job in Progress ...

Страница 33: ...very of the Equipment to End User for maintenance or support of the Equipment only for warranty services This warranty is not a guarantee that the Equipment will not through use or handling develop wear tear and mechanical breakdown from time to time the repair of which is the sole responsibility of the End User if beyond the stated warranty period or excluded from warranty coverage for the reason...

Страница 34: ...it us online anytime at pediavision com email your questions or call during normal business hours PediaVision s main telephone number is 888 514 7338 Contact Email Phone Technical Support support pediavision com Option 3 Sales Information sales pediavision com Option 2 General Information info pediavision com Option 0 Address PediaVision Holdings LLC 200 Waymont Court Suite 122 Lake Mary FL 32746 ...

Отзывы: