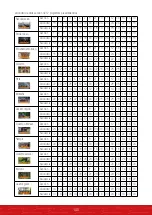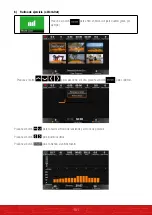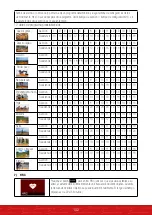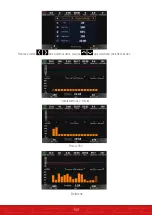
background image

107

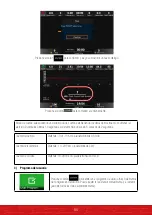
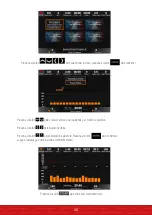
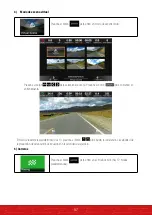
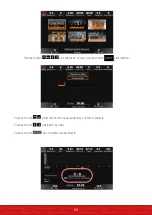
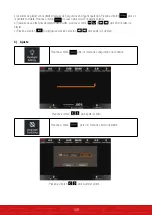
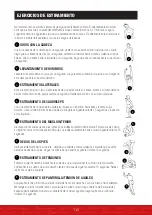
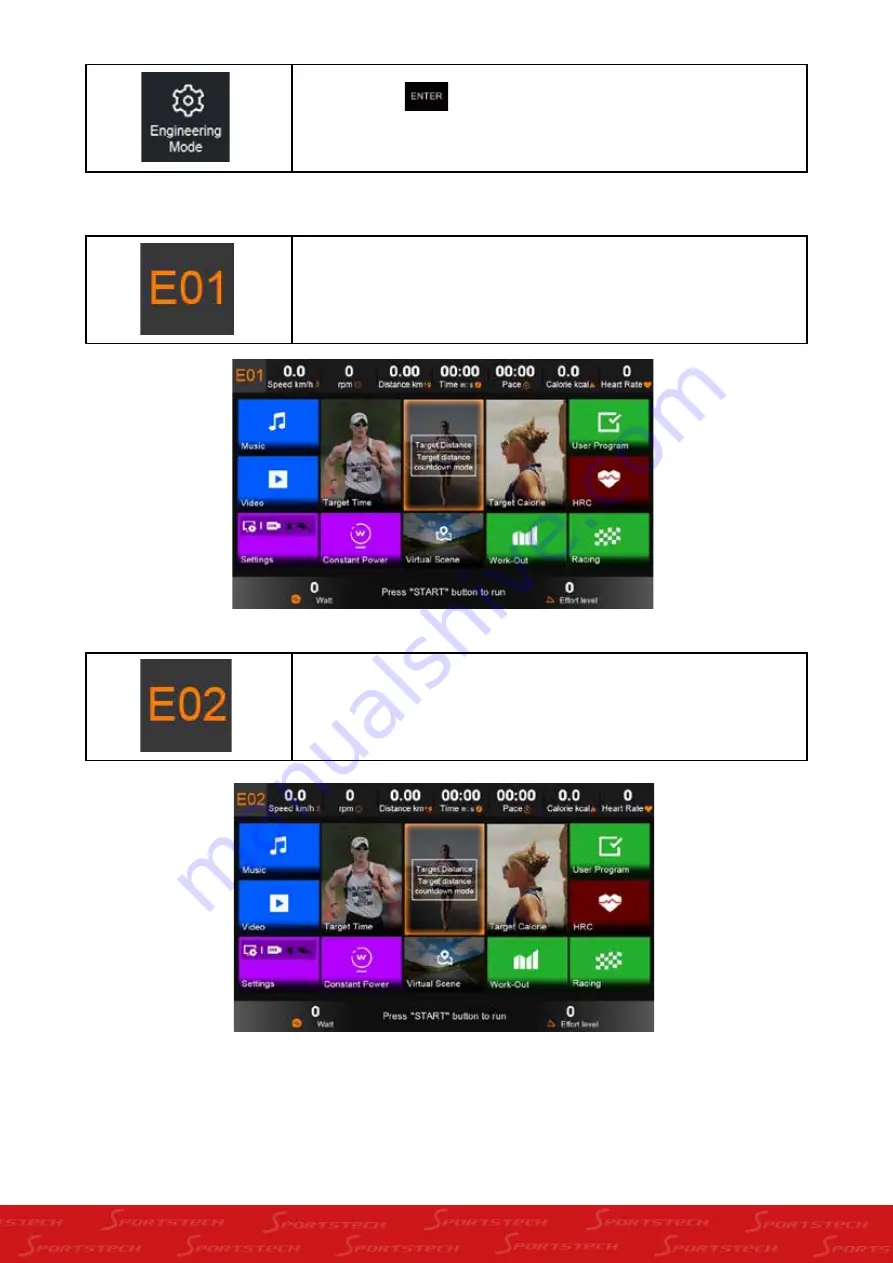
Presione el botón            para ir al modo de ingeniería, diseñado para el 
mantenimiento del sistema. Se necesita un código de acceso para acceder.

6.  Códigos de error

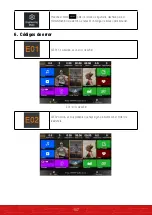
Si E01 ha sucedido, es un error de señal.

EO1: error de señal

Si E02 ocurrió, es muy probable que haya algún problema con el motor de 
resistencia.

Содержание LCX800

Страница 1: ...DE EN ES FR IT LCX800 Crosstrainer ...

Страница 2: ...BENUTZERHANDBUCH DEUTSCH ...

Страница 3: ...torials für dich In 3 einfachen Schritten zum schnellen und sicheren Start 1 QR Code scannen 2 Videos anschauen 3 schnell und sicher starten Aufbau Benutzung Abbau Link zu den Videos https sportstech de qr lcx800 html ...

Страница 4: ... entsprechend Die Betriebssicherheit und die Funktion des Gerätes können nur dann gewährleistet werden wenn sowohl die allgemeinen Sicherheits und Unfallverhütungsvorschriften des Gesetzgebers als auch die Sicherheitshinweise in diesem Benutzerhandbuch beachtet werden Wir übernehmen keine Haftung für Schäden die durch unsachgemäßen Gebrauch bzw fehlerhafte Bedienung entstehen i Bitte stellen Sie s...

Страница 5: ...nhalt Wichtige Sicherheitshinweise 6 Lieferumfang 7 Teileliste 8 Explosionszeichnung 10 Montage 11 Bedienungsanleitung für die Anzeigen 15 Bedienungsanleitung 34 Dehnübungen 36 Applikation Software App 38 ...

Страница 6: ...Sie vor Beginn des Trainings sämtliche Gegenstände in einem Umkreis von 2 Metern um das Gerät herum 5 Wenn das Gerät korrekt zusammengebaut ist konsultieren Sie bitte unsere Anleitung zum Aufwärmen am Ende dieser Broschüre bevor Sie mit dem Training beginnen 6 Verwenden Sie dieses Gerät nur wenn es ordnungsgemäß funktioniert Bei etwa notwendigen Reparaturen nur Original Ersatzteile verwenden 7 Hal...

Страница 7: ...7 LIEFERUMFANG ...

Страница 8: ...ellringdichtung Ø17 5xØ24x0 6 2 31 Kardangelenk 2 32 Nylonmutter M8 11 33 Flanschmutter M10x1 25 4 34 Lager 6003Z 4 35 Lager 608Z 12 36 Lager 2203 2 NR Beschreibung Stückzahl 37 Aluminiumplatte 4 38 Buchse Ø16 2xØ23x18 5 2 39 Ø14xØ8 5x59 7 2 40 Sicherungsring D40 2 41 Griffstangensäulen Abdeckung 1 Paar 42 Linke Nabenabdeckung 1 Paar 43 Rechte Nabenabdeckung 1 Paar 44 Pedalstangen Abdeckung 2 Paar...

Страница 9: ...9 NR Beschreibung Stückzahl 75 Wellscheibe D12 2 76 Mutter M6 4 77 Schraubbolzen 2 78 Gummiring 1 ...

Страница 10: ...10 EXPLOSIONSZEICHNUNG ...

Страница 11: ... am Hauptrahmen 1 befestigen 3 Drücken Sie den Gummiring 78 auf den Hauptrahmen 1 Schritt 2 1 Sensorkabel 61 und Hauptleitung 62 miteinander verbinden 2 Befestigen Sie die Griffstangensäule 3 mit Innensechskant Flachkopfschraube 18 Federscheibe 23 und gewölbter Scheibe 29 in den Seitenlöchern am Hauptrahmen 1 Die Griffstangensäule 3 mit Innensechskant Flachkopfschraube 18 Federscheibe 23 und Unter...

Страница 12: ...n 3 Zuletzt die Innensechskantschraube 18 befestigen Schritt 4 1 Die Griffstange 6L R mit der Innensechskantschraube 18 der Federscheibe 23 und der gewölbten Scheibe 29 an der Pendelstange 4L R befestigen 2 Ziehen Sie das Pulskabel 65 durch die Öffnung auf der Rückseite der Griffstangensäule 3 Dann ziehen Sie es aus der oberen Öffnung der Griffstangensäule 3 heraus 3 Befestigen Sie den Handlauf 7 ...

Страница 13: ...schraube 14 und Manschette 71 zuerst am Pedalrahmen 8R anbringen und dann mit Innensechskantflachkopf 48 Wellscheibe 75 Unterlegscheibe 25 und Mutter 74 am einstellbaren Kurbelarm 9 befestigen Schließlich wiederholen Sie die obigen Schritte sinngemäß für die linke Seite Bitte wählen Sie die für Sie passende Schrittlänge über die Bohrungen im Kurbelarm aus 9 ...

Страница 14: ...tage des Geräts abgeschlossen Wir raten vor dem Gebrauch zu überprüfen ob jedes Teil sicher befestigt ist Schritt 7 1 Hauptleitung 62 und Pulskabel 65 an die Anzeige 63 anschließen Dann das Display 63 mit Kreuzschlitz Flachkopfschraube 63 befestigen 2 Die Griffstangensäulen Abdeckung 41a b mit Kreuzschlitz Flachkopfblechschraube 60 an der Griffstangensäule 3 befestigen 3 Befestigen Sie die Handlau...

Страница 15: ...15 BEDIENUNGSANLEITUNG FÜR DIE ANZEIGE 1 Einführung in die verschiedenen Schaltflächen Starttaste Stop Taste Home Taste Zurück Taste Widerstand erhöhen ...

Страница 16: ...16 Widerstand reduzieren Anhalte Taste Aufwärts Taste Abwärts Taste Taste für Links Taste für Rechts Eingabe Taste Lautstärke erhöhen Lautstärke reduzieren Abspielen anhalten Das Vorherige Das Nächste ...

Страница 17: ...max 1280x768 Auflösung MP4 MKV Dateien die von H 264 dekodiert und komprimiert wurden FLASH 8M NOR 8G EMMC 3 Bedienung und Funktion der Symbole 1 Homepage Einführung I Einführung über die Symbole 1 Speed Geschwindigkeit Zeigt die aktuelle Geschwindigkeit an Einheit km h Umdrehungen pro Minute Distance Entfernung Anzeige der Laufstrecke Einheit km Time Zeit Anzeige der Laufzeit Pace Tempo Zeigt die...

Страница 18: ... Benutzer sein Widerstandsniveau selbst einstellen Abschließend wird das System alle eingestellten Daten speichern Ausgewählt HRC Es ist ein Trainingsprogramm bei dem der Widerstand des Systems entsprechend der Zielherzfrequenz des Benutzers geändert wird Jedes HRC Programm ist in drei Phasen unterteilt Diese sind Aufwärmen HRC Prozess Abkühlen Ausgewählt Virtueller Kulissenmodus Es sind 6 Szenari...

Страница 19: ...sk permanent auf Oder es wird immer heller werden Wenn Bluetooth erfolgreich verbunden wurde wird das Symbol anbleiben Oder es wird immer heller werden Hinweis Die Bluetooth Funktion ist optional 4 Einführung in die Funktion des Homepage Symbols 1 Schnellstart Drücken Sie die Taste und das System geht in den manuellen Modus Drücken Sie die Widerstands Kontrolltaste um den Widerstand einzustellen ...

Страница 20: ...er Trainingsdatensatz wird nach dem Drücken der Taste sofort angezeigt 2 Countdown Modus Wählen Sie das Zielzeit Symbol drücken Sie zur Bestätigung nehmen Sie einfach den Zeit Countdown Modus als Beispiel Drücken Sie die Taste zum Einstellen der Zielzeit ...

Страница 21: ... Sekunden wird das System 5 Mal nach jeweils 2 Sekunden Alarm geben Zeit Countdown Bereich 0 01 10 Stunden Standardeinstellung 0 30 00 Entfernungs Countdown Modus Bereich 1 0 200km Standard 5km Kalorien Countdown Modus Bereich 10 2 000Kcal Standard 50Kcal 3 Benutzererprogramm Drücken Sie um in das Benutzerprogramm zu gelangen Es enthält 6 Benutzereinstellungen Sie können den Widerstand manuell ein...

Страница 22: ...en Widerstandsmodus und den Leistungsmodus umzuwandeln Drücken Sie die Taste zum Einstellen der Daten Drücken Sie die Taste um den Widerstand zu ändern Drücken Sie zur Bestätigung Und dann hält das System die Daten automatisch gespeichert Drücken Sie die Taste um in den virtuellen Kulissenmodus zu gelangen ...

Страница 23: ...m das Symbol auszuwählen drücken Sie um mit dem Training zu beginnen Standardwiderstandsstufe ist 10 drücken Sie um den Widerstand individuell einzustellen Die Videowiedergabegeschwindigkeit wird Ihrer Trainingsgeschwindigkeit entsprechen 5 Rennen Drücken Sie um in den Rennmodus zu gelangen es gibt 12 voreingestellte Modi ...

Страница 24: ...as Symbol auszuwählen drücken Sie zur Bestätigung Drücken Sie die Taste um den Widerstandsmodus und den Leistungsmodus umzuwandeln Drücken Sie die Taste zum Einstellen der Daten Drücken Sie die Taste um mit dem Training zu beginnen ...

Страница 25: ...n Drücken Sie das Racing Symbol auf der Startseite um zur Übungsseite zu gelangen Wenn Sie ein anderes Symbol drücken z B virtuelle Kulissen Benutzerprogramm usw wird gleich danach ein neuer Dialog angezeigt Drücken Sie um zu stoppen danach können Sie andere Übungen beginnen Drücken Sie Abbrechen um mit dieser Übung fortzufahren ...

Страница 26: ...nd 14 14 16 16 16 16 14 14 14 14 16 16 16 16 14 14 Abschnitt 1 2 3 4 5 6 7 8 9 10 11 12 13 14 15 16 Geschwindigkeit 24 24 30 30 34 34 36 36 34 30 30 30 30 30 24 24 Widerstand 10 10 12 10 10 14 12 12 12 16 16 14 14 18 14 14 Abschnitt 1 2 3 4 5 6 7 8 9 10 11 12 13 14 15 16 Geschwindigkeit 24 24 30 30 34 34 36 36 34 30 30 30 30 30 24 24 Widerstand 12 12 14 12 14 16 14 14 14 18 18 16 16 20 16 16 Absch...

Страница 27: ...z B Fettverbrennung Drücken Sie die Taste um das Symbol auszuwählen drücken Sie zur Bestätigung Drücken Sie die Taste um den Widerstandsmodus und den Leistungsmodus umzuwandeln Drücken Sie die Taste zum Einstellen der Daten Drücken Sie die Taste um mit dem Training zu beginnen ...

Страница 28: ... 4 5 6 7 8 9 10 11 12 13 14 15 16 Widerstand 10 10 12 12 12 14 14 20 20 20 20 12 12 12 10 10 Abschnitt 1 2 3 4 5 6 7 8 9 10 11 12 13 14 15 16 Widerstand 10 10 12 12 12 12 10 10 10 10 12 12 12 12 10 10 Abschnitt 1 2 3 4 5 6 7 8 9 10 11 12 13 14 15 16 Widerstand 10 12 16 20 10 12 16 20 10 12 16 20 10 12 16 20 Abschnitt 1 2 3 4 5 6 7 8 9 10 11 12 13 14 15 16 Widerstand 10 10 14 10 10 18 10 14 14 10 1...

Страница 29: ...29 Drücken Sie um Daten einzustellen drücken Sie um verschiedene Elemente auszuwählen Aufwärmen 2 Minuten HRC Prozess Abkühlen ...

Страница 30: ...Herzfrequenzsignal erkannt wird sehen Sie sich bitte die obenstehende Abbildung an Drücken Sie um in den Konstantleistungs Modus zu wechseln Statischer Konstantleistungs Modus Drücken um mit dem Training zu beginnen ...

Страница 31: ...nd Einstellungen 1 Musik Drücken Sie um ins Musikmenü zu gelangen Drücken Sie um Musik auszuwählen drücken Sie zur Wiedergabe Abspielen Anhalten Lautsärke das Vorherige das Nächste 2 Video Drücken Sie um in das Video Menü zu gelangen ...

Страница 32: ...ndet sind drücken Sie und um die Playlists wieder aufzurufen c Drücken Sie um abzuspielen anzuhalten drücken Sie um die Lautstärke einstellen 3 Einstellungen Drücken Sie um ins Einstellungsmenü für die Hintergrundbeleuchtung zu gelangen Drücken Sie die Taste um die Helligkeit einzustellen Drücken Sie um zum Sprachumschaltmenü zu gelangen Drücken Sie die Taste um die gewünschte Sprache einzustellen...

Страница 33: ...t für die Systemwartung konzipiert Sie brauchen dafür einen Zugangscode 6 Fehlercode Wenn E01 angezeigt ist bedeutet dies einen Signalfehler E01 Signalfehler Wenn E02 angezeigt wird ist es höchstwahrscheinlich dass etwas mit dem Widerstandsmotor nicht stimmt ...

Страница 34: ...20 133 167 25 132 166 30 130 164 35 129 162 40 127 161 45 125 159 50 124 156 55 122 155 60 121 153 65 119 151 70 118 150 75 117 147 80 115 146 85 114 144 Hinweis Dies ist nur eine Richtlinie und die Leistung hängt von der Fitness und dem Gesundheitszustand der Person ab die das Gerät benutzt Work Out Tipps Führen Sie die Dehnübungen immer vor und nach Ihren Work Outs durch Beginnen Sie langsam Wen...

Страница 35: ... wie Sie sich fühlen wenn Sie trainieren Wenn Ihnen schwindelig wird hören Sie sofort mit dem Training auf und machen Sie eine Pause Falls Sie jedoch noch nicht ins Schwitzen gekommen sind erhöhen Sie das Tempo Stretching Guide Tipps zur Dehnung Beginnen Sie damit Ihre Gelenke zu bewegen z B können Sie ganz einfach Ihre Handgelenke im Kreis bewegen Ihre Arme beugen und Ihre Schultern kreisen Dies ...

Страница 36: ... den rechten Fuß nach oben ziehen Die Ferse so nahe wie möglich an das Gesäß heranbringen Halten Sie diese Stellung für 15 Sekunden und wiederholen es mit dem linken Fuß 5 INNENSCHENKEL DEHNUNG Setzen Sie sich hin mit den Fußsohlen gegeneinander und Ihre Knie weisen nach außen Die Füße so nahe wie möglich an den Unterleib heranziehen Drücken Sie die Knie behutsam auf den Boden 15 Sekunden lang hal...

Страница 37: ...eizubehalten Atmen Sie regelmäßig und tief während des Trainings halten Sie keinesfalls den Atem an ABKÜHLEN Beenden Sie jedes Training mit einem leichten Joggen oder Gehen Sie mindestens 1 Minute lang Zur Vervollständigung machen Sie über 5 bis 10 Minuten hinweg Dehnungsübungen um ganz abzukühlen Dies erhöht die Flexibilität Ihrer Muskeln und beugt Problemen nach dem Training vor ...

Страница 38: ...e Play Store nach FitShow suchen oder es über den QR Code herunterladen iOS Sie können im App Store nach FitShow suchen oder es über den QR Code herunterladen iOS Hinweise zur Nutzung der App Als Android Nutzer stellen Sie bitte sicher dass unter dem Punkt Einstellungen Gerätesicherheit ein Haken unter Unbekannte Quellen gesetzt ist 1 Nachdem Sie die APP heruntergeladen haben klicken Sie auf das S...

Страница 39: ...USER MANUAL ENGLISH ...

Страница 40: ... video tutorials for you 3 simple steps for a fast and safe start 1 scan the QR code 2 watch videos 3 start fast and safely construction use reduction Link to the videos https sportstech de qr lcx800 html ...

Страница 41: ...the device according to the instructions The operational safety and function of the device can only be guaranteed if the legal provisions on general safety and accident prevention as well as the safety instructions in this user manual are observed We shall not assume any liability for damages resulting from improper use or incorrect operation i Please ensure that all persons using the device have ...

Страница 42: ...2 Content Important Safety Information 43 Package List 44 Part list 45 Explosive drawing 47 Assembly 48 Display operation manual 52 Instruction for use 71 Stretch Exercise 73 Application software app 75 ...

Страница 43: ...ing training remove all objects within a radius of 2 meters from the machine 5 Once the machine is correctly assembled please consult our Warm up guide towards the end of this booklet before you start your exercise regime 6 Only use this machine when it is in correct working order Use only original spare parts for any necessary repairs 7 Keep the Machine away from excessive moisture and dust 8 Thi...

Страница 44: ...44 PACKAGE LIST ...

Страница 45: ...17 5xØ24x0 6 2 31 Universal joint 2 32 Nylon nut M8 11 33 Flange nut M10x1 25 4 34 Bearing 6003Z 4 35 Bearing 608Z 12 36 Bearing 2203 2 NO description QTY 37 Aluminum plate 4 38 Bush Ø16 2xØ23x18 5 2 39 Ø14xØ8 5x59 7 2 40 Circlip D40 2 41 a b Handlebar post cover 1pair 42 a b Left reciprocating cover 1pair 43 a b Right reciprocating cover 1pair 44 L R Pedal bar cover 2pairs 45 Shaft sleeve 4 46 O ...

Страница 46: ...46 NO description QTY 75 Corrugated washer D12 2 76 Nut M6 4 77 Bolt 2 78 Rubber ring 1 ...

Страница 47: ...47 EXPLOSIVE DRAWING ...

Страница 48: ...er 22 washer 26 to the mainframe 1 3 press the rubber ring 78 onto the mainframe 1 Step 2 1 Connect sensor wire 61 and trunk wire 62 2 Fasten the handlebar post 3 to the mainframe 1 with inner hex pan head bolt 18 spring washer 23 curve washer 29 for the side holes Fix the handlebar post 3 to the mainframe 1 with inner hex pan head bolt 18 spring washer 23 and washer 28 for the front holes ...

Страница 49: ...3 washer 28 and nylon nut 32 3 At last fasten the inner hex pan head bolt 18 Step 4 1 Fix the handlebar 6L R to the reciprocating bar 4L R with inner hex bolt 18 spring washer 23 and curve washer 29 2 Draw the pulse wire 65 through the hole in the back of handlebar post 3 And pull it out from the top hole of the handlebar post 3 3 Fix the handrail 7 to the handlebar post 3 with inner hex pan head ...

Страница 50: ...1 to the pedal frame 8R with inner hex pan head bolt 14 sleeve 71 first and then fasten it to the adjustable crank 9 with inner hex pan head 48 corrugated washer 75 washer 25 and nut 74 At last repeat the above steps to fix the left side please choose suitable stride length according to your need by adjust the hole on the crank 9 ...

Страница 51: ... have finished assembling the machine Before use we suggest check each part is securely fastened Step 7 1 Connect trunk wire 62 pulse wire 65 to the display 63 And the fix the display 63 with cross pan head screw 63 2 Fix the handlebar post cover 41a b to the handlebar post 3 with cross pan head self drilling screw 60 3 Fix the handrail cover 51a b to the handlebar post 3 with cross pan head self ...

Страница 52: ...52 DISPLAY OPERATION MANUAL 1 Button introduction Start key Stop key HOME key Back key Resistance up ...

Страница 53: ...53 Resistace down Pause Up key Down key Left key Right key Enter key Volume up Volume down Play pause The previous The next ...

Страница 54: ...X768 resolution Mp4 MKV files that decoded and packed by H 264 FLASH 8M NOR 8G EMMC 3 Icon operation and function 1 Homepage introduction I Icon introduction 1 Speed Displays the current speed unit Km h Rotation per minute Distance Display running distance unit Km Time Display running time Pace display the time per kilometer ...

Страница 55: ... user can set resistance level at his own At last system will keep all the set data Selected HRC it is a training program that system s resistance will be changed according to the user s target heart rate Each HRC program is divided into three stages They are warm up HRC process cool down Selected Virtual scene mode there are 6 scenes built in Selected Racing mode there are 12 preset modes in the ...

Страница 56: ...time after U disk inserted Or it will be kept lightening out If the blue tooth icon is paired successfully it will be kept lightening on Or it will be kept lightening out Note the blue tooth function is optional 4 Homepage icon function introduction 1 Quick start Press key system will enter into manual mode Press resistance control key to adjust resistance ...

Страница 57: ...y to stop exercise Exercise record will be displayed after you press key immediately 2 Countdown mode Select Target Time icon press to confirm just take time countdown mode for example Press key to set target time ...

Страница 58: ...e last 10 seconds system will keep alarming for 5 times per 2 seconds Time countdown Range 0 01 10 hour default 0 30 00 Distance countdown Range 1 0 200Km default 5Km Calorie countdown Range 10 2000Kcal default 50Kcal 3 User program Press to enter into user program there 6 user setting items inside You can set the resistance by manual and system will keep the data automatically ...

Страница 59: ...icon press to confirm Press key to convert resistance mode and power mode Press key to set data Press key to change the resistance Press to confirm And then system will keep the data automatically Press key to begin exercise ...

Страница 60: ...cene mode Press key to select icon press to begin exercise Default resistance level is 10 press to adjust resistance The video playing speed will be in accordance with your exercise speed 5 Racing Press to enter into racing mode there are 12 preset modes ...

Страница 61: ...61 Press key to select icon press to confirm Press key to convert resistance mode and power mode Press key to set data Press key to begin exercise ...

Страница 62: ...to go to home page Press Racing icon in homepage to go to exercising page If you press other icon for example virtual scene user program and so on a new dialogue will be display soon press to stop after that you can begin other exercises Press cancel to go on this exercise ...

Страница 63: ...stance 14 14 16 16 16 16 14 14 14 14 16 16 16 16 14 14 Section 1 2 3 4 5 6 7 8 9 10 11 12 13 14 15 16 Speed 24 24 30 30 34 34 36 36 34 30 30 30 30 30 24 24 Resistance 10 10 12 10 10 14 12 12 12 16 16 14 14 18 14 14 Section 1 2 3 4 5 6 7 8 9 10 11 12 13 14 15 16 Speed 24 24 30 30 34 34 36 36 34 30 30 30 30 30 24 24 Resistance 12 12 14 12 14 16 14 14 14 18 18 16 16 20 16 16 Section 1 2 3 4 5 6 7 8 9...

Страница 64: ...rk out Press key to enter into Work Out take fat burn for example Press key to select icon press to confirm Press key to convert resistance mode and power mode Press key to set data Press key to begin exercise ...

Страница 65: ...14 14 14 10 10 10 18 18 18 18 10 Section 1 2 3 4 5 6 7 8 9 10 11 12 13 14 15 16 resistance 10 10 12 12 12 14 14 20 20 20 20 12 12 12 10 10 Section 1 2 3 4 5 6 7 8 9 10 11 12 13 14 15 16 resistance 10 10 12 12 12 12 10 10 10 10 12 12 12 12 10 10 Section 1 2 3 4 5 6 7 8 9 10 11 12 13 14 15 16 resistance 10 12 16 20 10 12 16 20 10 12 16 20 10 12 16 20 Section 1 2 3 4 5 6 7 8 9 10 11 12 13 14 15 16 re...

Страница 66: ...66 Press to set data press to select different items Warm up 2min HRC process Cool down ...

Страница 67: ...67 If no heart rate signal detected please see the picture above Press to enter into constant power mode Static constant power mode Press to begin exercise ...

Страница 68: ... 5 Multi media and setting introduction 1 Music Press to enter into music menu Press to select music press to playback play pause volume volume the previous the next 2 Video Press to enter into video menu ...

Страница 69: ...s again to go back to the previous page b After the playlists is hidden press and to wake up the playlists c Press to play pause press to adjust volume 3 Setting Press to go to backlight setting menu Press the to set the brightness Press to go to language switching menu Press the to set the language ...

Страница 70: ...mode It is designed for system maintenance You need pass code to enter into 6 Error code If E01 happened it means signal error EO1 signal error If E02 happened it is most probably that there is something wrong with resistance motor ...

Страница 71: ...2 155 60 121 153 65 119 151 70 118 150 75 117 147 80 115 146 85 114 144 Note This is a guide only and performance will depend on the fitness and condition health of the person using the Machine Work Out Tips Always perform stretching exercises both before and after your work out See page 9 Start slowly doing too much too soon can lead to injuries If you are sore or tired give yourself a few extra ...

Страница 72: ...headed stop immediately and rest If you re not breaking into a sweat speed it up Stretching Guide Tips For Stretching Begin with gradual mobility exercises of all the joints i e simply rotate the wrists bend the arm and roll your shoulders This will allow the body s natural lubrication synovial fluid to protect the surface of the bones at these joints Always warm up the body before stretching as t...

Страница 73: ...t arm 4 QUADRICEPS STRETCH With one hand against a wall for balance reach behind you and pull your right foot up Bring your heel as close to your buttocks as possible Hold for 15 counts and repeat with left foot 5 INNER THIGH STRETCH Sit with the soles of your feet together and your knees pointing outward Pull your feet as close to your groin as possible Gently push your knees toward the floor Hol...

Страница 74: ...tensity for maximum performance Breathe regularly and deeply as you exercise never hold your breath COOL DOWN Finish each workout with a light jog or walk for at least 1 minute Then complete 5 to 10 minutes of stretching to cool down This will increase the flexibility of your muscles and will help prevent post exercise problems ...

Страница 75: ... first Android You can search in the Google Play Store for FitShow or download via the QR Code iOS You can search in the App Store for FitShow or download via the QR Code Notes on using the App As an Android user please make sure that a check mark is placed under Unknown sources in Settings Device security 1 After downloading APP press the icon to connect 2 Your are now successfully connected How ...

Страница 76: ...MANUAL DE USUARIO ESPAÑOL ...

Страница 77: ...n video para usted En 3 sencillos pasos para un arranque rápido y seguro 1 Escanear el código QR 2 Ver vídeos 3 Comienza rápido y seguro Construcción Utilizar Reducción Enlace a los videos https sportstech de qr lcx800 html ...

Страница 78: ...ciones La seguridad y funcionamiento operativos del dispositivo solo puede garantizarse si se tienen presentes las disposiciones legales sobre seguridad general y prevención de accidentes así como también las instrucciones de seguridad en este manual de usuario Nosotros no asumimos ninguna responsabilidad por daños resultantes del uso inadecuado o incorrecto del dispositivo i Por favor asegúrese d...

Страница 79: ...ión Importante de Seguridad 80 Lista de los paquetes 81 Lista de las piezas 82 Dibujo de piezas 84 Montaje 85 Manual de operación del monitor 106 Instrucciones de uso 108 Ejercicios de estiramiento 110 Software de la aplicacion 112 ...

Страница 80: ...ntrenamiento retire todos los objetos dentro de un radio de 2 metros de la máquina 5 Una vez que la máquina esté correctamente ensamblada consulte nuestra guía de calentamiento al final de este folleto antes de comenzar su programa de ejercicio 6 Utilice solamente esta máquina en buen estado de funcionamiento Únicamente repuestos originales para cualquiera reparación necesaria 7 Mantenga la máquin...

Страница 81: ...81 LISTA DE PAQUETES ...

Страница 82: ...rva D8xD20x1 5 10 30 junta corrugada Ø17 5xØ24x0 6 2 31 Junta universal 2 32 Tuerca de nylon M8 11 33 Brida tuerca M10x1 25 4 34 Teniendo 6003Z 4 N Descripción CANT 35 Teniendo 608Z 12 36 Teniendo 2203 2 37 Plato de aluminio 4 38 Bush Ø16 2xØ23x18 5 2 39 Ø14xØ8 5x59 7 2 40 Circlip D40 2 41 a b Cubierta del poste del manillar 1 par 42 a b Cubierta recíproca izquierda 1 par 43 a b Cubierta recíproca...

Страница 83: ...83 N Descripción CANT 72 Espuma Ø24xT3x120 2 73 Adaptador 1 74 Tuerca 10 2 75 Arandela corrugada D12 2 76 Tuerca M6 4 77 Tornillo 2 78 Anillo de goma 1 ...

Страница 84: ...84 DIBUJOS DE LA PIEZAS ...

Страница 85: ...or principal 1 3 Presione el anillo de goma 78 en el bastidor principal 1 Paso 2 1 Conecte el cable del sensor 61 y el cable troncal 62 2 Fije el poste del manillar 3 al bastidor principal 1 con el perno de la cabeza de la bandeja interior hexagonal 18 arandela elástica 23 arandela curva 29 para los orificios laterales Fije el poste del manillar 3 al bastidor principal 1 con el perno de cabeza hex...

Страница 86: ... tuerca de nylon 32 3 Al fin apriete el perno de cabeza hexagonal interior 18 Paso 4 1 Fije el manillar 6D I a la barra recíproca 4 D I con el perno hexagonal interno 18 la arandela de resorte 23 y la arandela curva 29 2 Dibuje el cable de pulso 65 a través del orificio en la parte posterior del poste del manillar 3 Luego sáquelo del orificio superior del poste del manillar 3 3 Fije la baranda 7 a...

Страница 87: ...rco del pedal 8R con el perno de cabeza hexagonal interna 14 la manga 71 primero y sujétalo a la manivela ajustable 9 con la cabeza hexagonal interna 48 arandela corrugada 75 arandela 25 y tuerca 74 Por último repita los pasos anteriores para corregir el lado izquierdo Elija la longitud de zancada adecuada según su necesidad ajustando el orificio en la manivela 9 ...

Страница 88: ...tar la máquina Antes de usar sugerimos verificar que cada pieza esté bien sujeta Paso 7 1 Conecte el cable troncal 62 el cable de pulso 65 a la pantalla 63 Arregle la pantalla 63 con el tornillo de cabeza troncocónica 63 2 Fije la cubierta del poste del manillar 41a b al poste del manillar 3 con el tornillo autorroscante de la cabeza de la bandeja transversal 60 3 Fije la cubierta de la baranda 51...

Страница 89: ...89 MANUAL DE OPERACIÓN DEL MONITOR 1 Introducción de los botones START para empezar STOP para parar INICIO ATRÁS para volver Más resistencia ...

Страница 90: ...90 Menos resistencia Pausa Arriba Abajo Izquierda Derecha Entrar Más volumen Menos volumen En marcha pausa Anterior Siguiente ...

Страница 91: ... decodificados y empaquetados por H 264 8M NOR 8G EMMC FLASH 8M NOR 8G EMMC 3 Operación y función de los iconos 1 Introducción a la página de inicio I Introducción del icono 1 Velocidad muestra la velocidad actual Unidad km h Rotación por minuto Distancia distancia recorrida de pantalla Unidad km Tiempo muestra el tiempo de ejecución Ritmo muestra el tiempo por kilómetro ...

Страница 92: ...suario integrados Además el usuario puede ajustar el nivel de resistencia por su cuenta Por último el sistema mantendrá todos los datos establecidos Seleccionado HRC it is a training program that system s resistance will be changed according to the user s target heart rate Each HRC program is divided into three stages They are warm up HRC process cool down Selected Modo de escena virtual hay 6 esc...

Страница 93: ...empo después de insertar el disco U O se mantendrá aligerando Si el icono de Bluetooth se empareja con éxito se man tendrá aligerando O se mantendrá aligerando Nota La función Bluetooth es opcional 4 Introducción a la función del icono de inicio 1 Inicio Rápido Presione el botón el sistema entrará en modo manual Presione el botón de control de resistencia para ajustar la resistencia ...

Страница 94: ...e ejercicio se mostrará después de presionar inmediatamente 2 Modo de cuenta Seleccione el Ícono de tiempo objectivo presione el botón para confirmar simplemente tome el modo de cuenta regresiva por ejemplo Presione el botón para ajustar el tiempo objetivo ...

Страница 95: ...ndos el sistema hará un sonido 5 veces cada 2 segundos Cuenta del tiempo Distancia 0 01 10 hora predeterminada 0 30 00 Cuenta de la distancia Distancia 1 0 200 km predeterminada 5 km Cuenta de calorías Distancia 10 2000 kcal predeterminada 50 kcal 3 Programa del usuario Presione el botón para entrar en el programa de usuario hay 6 elementos de configuración del usuario Puede ajustar la resistencia...

Страница 96: ... el botón para convertir el modo de resistencia y el modo de potencia Presione el botón para ajustar los datos Presione el botón para cambiar la resistencia Presione el botón para confirmar Luego el sistema guardará los datos automáticamente Presione el botón para comenzar el entrenamiento ...

Страница 97: ... icono Presione el botón para comenzar el entrenamiento El nivel de resistencia predeterminado es 10 presione el botón para ajustar la resistencia La velocidad de reproducción de video estará de acuerdo con la velocidad del ejercicio 5 Carreras Presione el botón para entrar en el modo carrera hay 12 modos preestablecidos ...

Страница 98: ...ra seleccionar el icono presione el botón para confirmar Presione el botón para convertir el modo de resistencia y el modo de potencia Presione el botón para ajustar los datos Presione el botón para comenzar el entrenamiento ...

Страница 99: ...resione el botón el icono Racing en la página de inicio para ir a la página de ejercicios Si presiona otro ícono por ejemplo escena virtual programa de usuario etc pronto se mostrará un nuevo diálogo Presione el botón para parar después de eso puede comenzar otros ejercicios Presione cancel para continuar con este ejercicio ...

Страница 100: ...esistencia 14 14 16 16 16 16 14 14 14 14 16 16 16 16 14 14 Sección 1 2 3 4 5 6 7 8 9 10 11 12 13 14 15 16 Velocidad 24 24 30 30 34 34 36 36 34 30 30 30 30 30 24 24 Resistencia 10 10 12 10 10 14 12 12 12 16 16 14 14 18 14 14 Sección 1 2 3 4 5 6 7 8 9 10 11 12 13 14 15 16 Velocidad 24 24 30 30 34 34 36 36 34 30 30 30 30 30 24 24 Resistencia 12 12 14 12 14 16 14 14 14 18 18 16 16 20 16 16 Sección 1 2...

Страница 101: ...Out para quemar grasa por ejemplo Presione el botón para seleccionar el icono presione el botón para confirmar Presione el botón para convertir el modo de resistencia y el modo de potencia Presione el botón para ajustar los datos Presione el botón para comenzar el entrenamiento ...

Страница 102: ...10 18 18 18 18 10 Sección 1 2 3 4 5 6 7 8 9 10 11 12 13 14 15 16 Resistencia 10 10 12 12 12 14 14 20 20 20 20 12 12 12 10 10 Sección 1 2 3 4 5 6 7 8 9 10 11 12 13 14 15 16 Resistencia 10 10 12 12 12 12 10 10 10 10 12 12 12 12 10 10 Sección 1 2 3 4 5 6 7 8 9 10 11 12 13 14 15 16 Resistencia 10 12 16 20 10 12 16 20 10 12 16 20 10 12 16 20 Sección 1 2 3 4 5 6 7 8 9 10 11 12 13 14 15 16 Resistencia 10...

Страница 103: ...103 Presione el botón para ajustar los datos presione para seleccionar diferentes artículos Calentamiento de 2 minutos Proceso HRC Enfrîamento ...

Страница 104: ...tecta ninguna señal de frecuencia cardíaca consulte la imagen de arriba Presione el botón para entrar en modo de potencia constante Modo estático de potencia constante Presione el botón para comenzar el entrenamiento ...

Страница 105: ...ón 1 Música Presione el botón para entrar al menú de música Presione el botón para seleccionar música presione el botón para escuchar play pausa más volumen menos volumen anterior siguiente 2 Video Presione el botón para entrar al menú de video ...

Страница 106: ...or b Después de que las listas de playlist estén ocultas presione el botón y para abrir la listas de playlist c Presione el botón to play pausa presione el botón para ajustar el volumen 3 Ajuste Presione el botón para ir al menú de configuración de contraluz Presione el botón para ajustar el brillo Presione el botón para ir al menú de cambio de idioma Presione el botón para ajustar el idioma ...

Страница 107: ...ía diseñado para el mantenimiento del sistema Se necesita un código de acceso para acceder 6 Códigos de error Si E01 ha sucedido es un error de señal EO1 error de señal Si E02 ocurrió es muy probable que haya algún problema con el motor de resistencia ...

Страница 108: ... 150 75 117 147 80 115 146 85 114 144 Nota Este documento es solo una guía El rendimiento dependerá de la condición física salud de la persona que usa la máquina Consejos de entrenamiento Siempre realice ejercicios de estiramiento tanto antes como después del entrenamiento Ver página 9 Comience lentamente hacer mucho demasiado pronto puede provocar lesiones Si está adolorido o cansado tómese unos ...

Страница 109: ...te durante el ejercicio Si se siente mareado o aturdido deténgase inmediatamente y descanse Si no está sudando apresúrese Guía de estiramiento Consejos para estiramiento Comience gradualmente con ejercicios de movilidad de todas las articulaciones es decir simplemente gire las muñecas flexione el brazo y ruede los hombros Esto permitirá a la lubricación natural del cuerpo líquido sinovial de prote...

Страница 110: ...una mano hacia la pared para equilibrarse mueva su otra mano hacia atrás y levante su pie derecho Lleve su talón lo más cerca posible de sus glúteos Aguante durante 15 segundos y repita con el pie izquierdo 5 ESTIRAMIENTO DEL MUSLO INTERIOR Siéntese con las suelas de sus pies juntas y sus rodillas apuntando hacia afuera Empuje sus pies hacia su ingle tan cerca como sea posible Empuje sus rodillas ...

Страница 111: ...ndimiento Respire de manera constante y profunda mientras se ejercita nunca aguante la respiración ENFRIAMIENTO Termine cada ejercicio con un trote ligero o camine durante al menos 1 minuto Después complete de 5 a 10 minutos de estiramiento para el enfriamiento Esto aumentará la flexibilidad de sus músculos y le ayudará a evitar problemas después del ejercicio ...

Страница 112: ...roid iOS puede buscar FitShow en Google Play Store o descargarla a través del código QR iOS iOS puede buscar FitShow en App Store o descargarla a través del código QR Notas sobre el uso de la aplicación Si es usuario Android asegúrese de que en Configuraciones Seguridad del dispositivo esté marcada la opción Fuentes desconocidas 1 Después de descargar la APP haga clic en el ícono para conectarse 2...

Страница 113: ...MANUEL FRANÇAIS ...

Страница 114: ... 3 étapes simples pour un démarrage rapide et sécurisé 1 Scannez le code QR 2 Regarder les vidéos 3 Démarrez rapidement et en toute sécurité construction utilisation réduction Lien vers les vidéos https sportstech de qr lcx800 html ...

Страница 115: ... La sécurité et le fonctionnement opérationnelles de l appareil ne peuvent être garanties que si les dispositions légales relatives à la sécurité générale et à la prévention des accidents ainsi que les consignes de sécurité contenues dans ce manuel d utilisation sont respectées Nous n assumons aucune responsabilité pour les dommages résultant d une mauvaise utilisation ou d un fonctionnement incor...

Страница 116: ...ité importantes 117 Liste des pièces principales 118 Liste des composants 119 Vue en éclaté 121 Assemblage 122 Manuel d utilisation de l interface 126 Instructions d utilisation 145 Excercice d étirement 147 Logiciel d application application 149 ...

Страница 117: ...r de l appareil 5 Une fois l appareil correctement assemblé et avant de commencer votre entrainement consultez notre guide d échauffement qui se situe à la fin de ce manuel 6 N utilisez cet appareil que s il est en bon état de fonctionnement Utilisez uniquement des pièces originales pour tous besoin de remplacement ou de réparation 7 Maintenez l appareil éloigné de toute source d humidité ou de po...

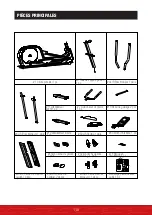
Страница 118: ...1 paire 12 Stabilisateur arrière 1 pc 51a b Cache de guidon 1 paire 42a b Cache de bras inférieur g 1 paire 78 Bague en caoutchouc 1 pc Emballage plastique avec outils 1 pc 43a b Cache de bras inférieur d 1 paire 44L R Cache de pédalier 2 paires 41a b Cache de support guidon 1 paire 4L R Bras inférieurs 1 paire 7 Guidon avec capteurs 1 pc 11 Stabilisateur avant 1 pc ...

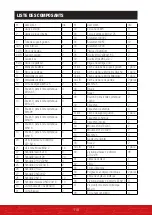
Страница 119: ...8xD20x1 5 10 30 Joint ondulé Ø17 5xØ24x0 6 2 31 Joint universel 2 N Description Qté 32 Écrou nylon M8 11 33 Écrou à embase M10x1 25 4 34 Roulement 6003Z 4 35 Roulement 608Z 12 36 Roulement 2203 2 37 Plaque d aluminium 4 38 Douille Ø16 2xØ23x18 5 2 39 Douille Ø14xØ8 5x59 7 2 40 Bague de serrage D40 2 41 a b Cache de tube de support guidon 1 paire 42 a b Cache de barre alternative gauche 1 paire 43 ...

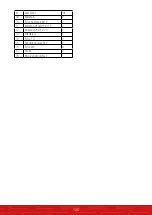
Страница 120: ...escription Qté 69 Manchon 2 70 Écrou hexagonal M12 2 71 Manchon Ø12xØ18x14 5 2 72 Mousse Ø24xT3x120 2 73 Adaptateur 1 74 Écrou 10 2 75 Rondelle ondulée D12 2 76 Écrou M6 4 77 Boulon 2 78 Bague en caoutchouc 1 ...

Страница 121: ...121 VUE EN ÉCLATÉ ...

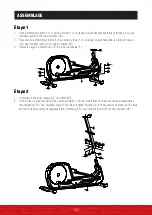
Страница 122: ...5 des rondelles ressort 22 et des rondelles 26 3 Insérez la bague en caoutchouc 78 sur le cadre principal 1 Étape 2 1 Connectez le câble de capteur 61 et le câble 62 2 Fixez le tube de support guidon 3 au cadre principal 1 par les trous latéraux à l aide des boulons hexagonaux à tête cylindrique 18 des rondelles ressort 23 et des rondelles incurvées 29 Faites ensuite de même par les trous avant à ...

Страница 123: ...8 et de l écrou nylon 32 3 Enfin serrez le boulon hexagonal à tête cylindrique 18 Étape 4 1 Fixez les bras mobiles 6L R aux bras inférieurs 4L R à l aide des boulons hexagonaux 18 des rondelles ressort 23 et des rondelles incurvées 29 2 Passez le câble du capteur cardiaque 65 à travers le trou à l arrière du tube de support guidon 3 Sortez le ensuite par le trou supérieur 3 Fixez le guidon 7 au tu...

Страница 124: ... boulons hexagonaux à tête cylindrique 14 et les manchons 71 et serrez les ensuite sur les manivelles ajustables 9 avec les boulons hexagonaux à tête cylindrique 48 les rondelles ondulées 75 les rondelles 25 et les écrous 74 Faites ce processus pour chaque côté veuillez choisir la longueur de foulée en fonction de vos souhaits en ajustant la manivelle au niveau du trou 9 ...

Страница 125: ...ilisation pensez à bien vérifier que chaque pièce soit bien fixée et sécurisée Étape 7 1 Connectez le câble 62 et la câble de capteur cardiaque 65 à l écran d interface Fixez ensuite l écran d interface 63 avec les vis cruciformes à tête cylindrique 67 2 Fixez la cache du tube de support guidon 41a b au tube de support guidon 3 avec les vis autoperceuses 60 3 Enfin fixez le cache du guidon 51a b a...

Страница 126: ...126 MANUEL D UTILISATION DE L INTERFACE 1 Liste des boutons Allumer Éteindre Accueil Retour Augmenter la résistance ...

Страница 127: ...127 Diminuer la resistance Pause Haut Bas Gauche Droite Entrée Augmenter le volume Diminuer le volume Lecture pause Précédent Suivant ...

Страница 128: ...4 et MKV décodés et compressés selon la norme de codage vidéo H 264 8M NOR 8G EMMC FLASH 8M NOR 8G EMMC 3 Fonctions et utilisation des icones 1 Introduction à la page d accueil I Icônes et données Vitesse affiche la vitesse actuelle Unité km h Rotations par minute Distance affiche la distance actuelle Unité km h Temps affiche le temps de course Cadence affiche le temps par kilomètre ...

Страница 129: ...De plus vous pouvez ajuster la résistance à votre souhait L appareil conservera alors tous les paramètres configures Lorsque sélectionné HRC dans ce programme d entrainement la résistance est ajustée en fonction du rythme cardiaque souhaité de l utilisateur Chaque programme HRC est divisé en trois niveaux Ces niveaux sont échauffement entrainement HRC refroidissement Lorsque sélectionné Mode paysa...

Страница 130: ...né IV Icônes de statut L icône est allumée lorsque qu une clé USB est insérée Si la connexion Bluetooth est effectuée avec succès l icône s allume 4 Fonction des icônes de la page d accueil 1 Démarrage rapide Appuyer sur pour que le système entre en mode manuel Ajuster la résistance en appuyer sur les boutons ...

Страница 131: ...données et résultats de l exercice s affichent dès que vous appuyez sur le bouton 2 Mode compte à rebours Sélectionnez votre objectif et appuyez sur pour confirmer Exemple pour le compte à rebours de temps Appuyez sur les boutons pour sélectionner le temps ...

Страница 132: ...e système émettra 5 signaux sonores toutes les 2 secondes Compte à rebours de temps De 1 minute à 10 heures par défaut 30 minutes Compte à rebours de distance De 1 à 200 km par défaut 5 km Compte à rebours de calories De 10 à 2000 Kcal par défaut 50 Kcal 3 Programme personnalisé Appuyez sur pour accéder au mode Programme personnalisé inclus 6 paramètres intégrés Vous pouvez manuellement ajuster la...

Страница 133: ...nfigurer Appuyez sur les boutons pour passer du mode résistance au mode puissance et vice versa Appuyez sur les boutons pour sélectionner la valeur Appuyez sur les boutons pour changer la résistance Appuyez sur pour confirmer Le système conservera automatiquement les données Appuyez sur le bouton pour commencer l exercice ...

Страница 134: ...icône souhaitée puis sur pour commencer l exercice Le niveau de résistance par défaut est de 10 appuyez sur les boutons pour ajuster la résistance La vitesse de lecture de la vidéo s ajustera en fonction de votre vitesse de course 5 Course Appuyez sur pour accéder au mode Course Ce mode inclus 12 programmes préconfigurés ...

Страница 135: ...ner la course souhaitée puis sur pour confirmer Appuyez sur les boutons pour passer du mode résistance au mode puissance et vice versa Appuyez sur les boutons pour entrer les valeurs souhaitées Appuyez sur les boutons pour commencer l exercice ...

Страница 136: ...ourse sur la page d accueil pour retourner à la page d exercice Si vous appuyez sur une autre icone par exemple Paysage virtuel Programmes personnalisés etc une nouvelle boite de dialogue s affichera Appuyez sur pour arrêter l exercice Vous pouvez ensuite commencer un autre exercice Appuyez sur Cancel pour retourner à l exercice en cours ...

Страница 137: ...sistance 14 14 16 16 16 16 14 14 14 14 16 16 16 16 14 14 Section 1 2 3 4 5 6 7 8 9 10 11 12 13 14 15 16 Vitesse 24 24 30 30 34 34 36 36 34 30 30 30 30 30 24 24 Résistance 10 10 12 10 10 14 12 12 12 16 16 14 14 18 14 14 Section 1 2 3 4 5 6 7 8 9 10 11 12 13 14 15 16 Vitesse 24 24 30 30 34 34 36 36 34 30 30 30 30 30 24 24 Résistance 12 12 14 12 14 16 14 14 14 18 18 16 16 20 16 16 Section 1 2 3 4 5 6...

Страница 138: ...rogramme Fonte de Calories Appuyez sur les boutons pour sélectionner le programme souhaite puis appuyez sur pour confirmer Appuyez sur les boutons pour passer du mode résistance au mode puissance et vice versa Appuyez sur les boutons pour ajuster les valeurs Appuyez sur les boutons pour commencer l exercice ...

Страница 139: ...5 6 7 8 9 10 11 12 13 14 15 16 Résistance 10 10 12 12 12 14 14 20 20 20 20 12 12 12 10 10 Section 1 2 3 4 5 6 7 8 9 10 11 12 13 14 15 16 Résistance 10 10 12 12 12 12 10 10 10 10 12 12 12 12 10 10 Section 1 2 3 4 5 6 7 8 9 10 11 12 13 14 15 16 Résistance 10 12 16 20 10 12 16 20 10 12 16 20 10 12 16 20 Section 1 2 3 4 5 6 7 8 9 10 11 12 13 14 15 16 Résistance 10 10 14 10 10 18 10 14 14 10 10 18 10 1...

Страница 140: ...140 Appuyez sur les boutons pour ajuster les valeurs et sur les boutons pour sélectionner le type de valeur à ajuster Échauffement 2 min Entrainement HRC Fin d entrainement ...

Страница 141: ...1 Si aucun rythme cardiaque n est détecté l affichage apparait comme ci dessus Appuyez sur pour accéder au mode Puissance constante Mode puissance constante à l arrêt Appuyez sur pour commencer l exercice ...

Страница 142: ...1 Musique Appuyez sur pour accéder au menu de musique Appuyez sur les boutons pour sélectionner la musique et appuyez sur pour lancer la lecture lecture pause volume volume précédent suivant 2 Vidéo Appuyez sur pour accéder au menu vidéo ...

Страница 143: ...s la playlist masquée appuyez sur les boutons et pour la faire réapparaître c Appuyez sur pour mettre la lecture en pause et la relancer et appuyez sur pour ajuster le volume 3 Paramètres Appuyez sur pour accéder au menu de rétro éclairage Appuyez sur les boutons pour ajuster la luminosité Appuyez sur pour accéder au menu des langues Appuyez sur les boutons pour choisir la langue ...

Страница 144: ...e du système interne et n est accessible qu à l aide d un code 6 Codes d erreur Lorsque le code E01 s affiche cela signifie qu il y a eu une erreur dans le système EO1 signal d erreur Si le code E02 s affiche cela signifie qu il y a probablement un problème avec le moteur de résistance ...

Страница 145: ...65 119 151 70 118 150 75 117 147 80 115 146 85 114 144 Note ceci n est qu un guide de référence Les performances de l utilisateur dépendent également de sa santé et de sa condition physique Conseils pour votre entraînement Veillez à toujours faire des étirements avant et après votre entraînement Voir page 9 Commencez doucement Vouloir en faire trop très rapidement peut causer des blessures Si vous...

Страница 146: ...ent et reposez vous Si vous ne transpirez pas augmentez la cadence Guide d étirements Conseils pour vous étirer Commencez par des exercices de mouvement pour toutes vos articulations Tournez les poignets pliez le bras et faites rouler vos épaules Cela activera les processus de lubrification naturelle de votre corps liquide synovial afin de protéger la surface des os et articulations Chauffez toujo...

Страница 147: ...DU QUADRICEPS D une seule main contre un mur pour l équilibre essayez d atteindre votre derrière et etendez votre pied droit Apportez votre talon aussi près que possible de vos fesses Comptez 15 fois et répétez avec le pied gauche 5 ETIREMENT DE LA CUISSE Asseyez vous avec les plantes de vos pieds ensemble et vos genoux pointant vers l extérieur Tirez vos pieds aussi près de votre aine que possibl...

Страница 148: ...ormance maximale Respirez régulièrement et profondément pendant que vous faites un exercice ne retenez jamais votre respiration REFROIDIR Terminez chaque entraînement avec un jogging léger ou marchez pendant au moins 1 minute Puis compléter 5 à 10 minutes d étirements pour refroidir Cela augmentera la flexibilité de vos muscles et aidera à prévenir les problèmes post exercice ...

Страница 149: ...her FitShow dans Google Play Store ou la télécharger en utilisant le code QR iOS Vous pouvez rechercher FitShow dans l App Store ou la télécharger en utilisant le code QR Remarques sur l utilisation de l application En tant qu utilisateur Android assurez vous que sous Paramètres Sécurité du périphérique cochez la case Sources inconnues 1 Après avoir téléchargé l application cliquez sur l icône pou...

Страница 150: ...MANUALE D USO ITALIANO ...

Страница 151: ...o Tutorial per te 3 semplici passaggi per un inizio veloce e sicuro 1 Scannerizza il QR Code 2 Guarda il Video 3 Inizia ad allenarti Montaggio Utilizzo Smontaggio Link per il Video https sportstech de qr lcx800 html ...

Страница 152: ...ioni La sicurezza e la funzionalità del dispositivo possono essere garantite solo se vengono rispettate le disposizioni legali sulla sicurezza generale e per la prevenzione degli incidenti nonché le istruzioni di sicurezza contenute nel presente manuale d uso Non ci assumiamo alcuna responsabilità per i danni derivanti da un uso improprio o da un uso errato del dispositivo Salvo errori e modificaz...

Страница 153: ...zza 154 Contenuto della consegna 155 Elenco componenti 156 Esploso 158 Istruzioni per l assemblaggio 159 Utilizzo del display 163 Istruzioni d uso 182 Esercizi di stretching 184 Aplicación de software aplicación 186 Declaration of Conformity 187 ...

Страница 154: ...ll attrezzatura 5 Dopo aver assemblato correttamente l attrezzatura consultare il nostro programma di riscaldamento riportato alla fine di questo manuale d uso prima di iniziare l allenamento 6 Utilizzare l attrezzatura soltanto se tutte le parti funzionano correttamente Per le riparazioni adoperare soltanto parti di ricambio originali 7 Tenere l attrezzatura lontana dall eccessiva polvere e dall ...

Страница 155: ...155 CONTENUTO DELLA CONSEGNA ...

Страница 156: ...ne ondulata Ø17 5xØ24x0 6 2 31 Giunzione universale 2 32 Dado nylon M8 11 33 Dado con flangia M10x1 25 4 34 Cuscinetto 6003Z 4 Nr Descrizione Quantità 35 Cuscinetto 608Z 12 36 Cuscinetto 2203 2 37 Piastra in alluminio 4 38 Boccola Ø16 2xØ23x18 5 2 39 Ø14xØ8 5x59 7 2 40 Anello D40 2 41 a b Cover manubrio 1 paio 42 a b Cover di ricambio sinistra 1 paio 43 a b Cover di ricambio destra 1 paio 44 L R C...

Страница 157: ...157 Nr Descrizione Quantità 73 Adattatore 1 74 Dado 10 2 75 Rondella ondulata D12 2 76 Dado M6 4 77 Bullone 2 78 Anello di gomma 1 ...

Страница 158: ...158 ESPLOSO ...

Страница 159: ...stica 22 e la rondella 26 nell unità centrale 1 3 Pressare l anello di gomma 78 nell unità centrale 1 Passo 2 1 Connettere il sensore 61 e il sensore 62 2 Inserire il sostegno manubrio 3 nell unità centrale 1 e fissarlo sui fori laterali con il bullone a testa esagonal interno 18 la rondella elastica 23 e la rondella curva 29 Ripetere l operazione anche sui fori anteriori del sostegno manubrio 3 c...

Страница 160: ...nylon 32 3 Adesso è possibile fissare il bullone a testa esagonale interno 18 Passo 4 1 Fissare il manubrio 6L R nell asta 4L R il bullone a testa esagonale interno 18 la rondella elastica 23 e la rondella curva 29 2 Far passare il sensore 65 attraverso il foro situato sul retro del sostegno manubrio 3 e farlo fuoriuscire dal foro superiore del sostegno manubrio 3 3 Fissare il manubrio 7 nell appo...

Страница 161: ...ra 8R con il bullone a testa esagonale interno 14 e la boccola 71 Quindi fissarla con la pedivella regolabile 9 con il bullone a testa esagonale interno 48 la rondella ondulata 75 la rondella 25 e il dado 74 Infine ripetere questi passaggi per fissare il lato sinistro Si prega di scegliere la lunghezza del passo in base alle proprie esigenze regolando il foro nella pedivella 9 ...

Страница 162: ...lata Prima dell utilizzo verificare che tutte le parti siano state saldamente fissate Passo 7 1 Collegare il sensore 62 e il sensore 65 al display 63 Quindi fissare il display 63 con la vite con testa a croce 67 2 Fissare la cover del sostegno manubrio 41a b nel sostegno manubrio 3 con la vite con testa a croce 60 3 Fissare la cover del manubrio 51a b nell apposito supporto 3 con la vite con testa...

Страница 163: ...163 UTILIZZIO DEL DISPLAY 1 Panoramica comandi Avvia Arresta HOME Indietro Aumenta resistenza ...

Страница 164: ...164 Diminuisci resistenza Pausa Sopra Sotto Sinistra Destra Accedi Aumenta il volume Diminuisci il volume Play Pausa Precedente Successivo ...

Страница 165: ...a di 1280X768 Mp4 MKV files decodificati e confezionati da H 264 8M NOR 8G EMMC FLASH 8M NOR 8G EMMC 3 Operazioni e funzioni icone 1 Introduzione pagina iniziale I Introduzione icona 1 Velocità mostra la velocità attuale unità Km h Rotazione al minuto Distanza mostra la distanza unità Km Tempo mostra il tempo Marcia mostra il tempo per kilometro ...

Страница 166: ...e può anche selezionare il livello di resistenza desiderato Il sistema memo rizza le impostazioni selezionate Selezionato È un programma di allenamento che adegua la resistenza in base allla frequenza cardiaca dell utente Ciascun programma HRC è suddiviso in tre fasi riscaldamento processo HRC raffreddamento Selezionato Modalità scena virtuale è possibile scegliere tra 6 scene Selezionata Modalità...

Страница 167: ...sco U l icona USB rimane accesa o illuminata Se l icona del Bluetooth è correttamente selezionata continua a lampeggiare o rimane illuminata Nota la funzione Bluetooth è opzionale 4 Introduzione funzioni icone pagina iniziale 1 Avvio rapido Premere il sistema entra nella modalità manuale Premere il tasto controllo resistenza per regolare la resistenza ...

Страница 168: ...e l esercizio Il risultato degli esercizi compare sul display dopo aver premuto 2 Modalità countdown Selezionare l icona target time e premere per confermare tempo in modalità conto alla rovescia Premere per selezionare il tempo ...

Страница 169: ...condi il sistema invia un segnale per 5 volte ogni 2 secondi conto alla rovescia tempo Intervallo 0 01 10 ore impostazione predefinita 0 30 00 Conto alla rovescia distanza Intervallo 1 0 200Km impostazione predefinita 5Km Conto alla rovescia calorie Intervallo 10 2000Kcal impostazione predefinita 50Kcal 3 Programma utente Premere per entrare nel programma utente include 6 impostazioni utente È pos...

Страница 170: ... confermare Premere per convertire la modalità resistenza e la modalità potenza Premere per impostare i dati Premere per modificare la resistenza Premere per confermare Il sistema mantiene salvati i dati in automatico Premere per iniziare l esercizio ...

Страница 171: ...onare un icona premere per iniziare l esercizio Il livello di resistenza preimpostato è di 10 premere per regolare la resistenza La velocità di riproduzione del video dipende dalla velocità dell esercizio 5 Competizione Premere per entrare nella modalità competizione include 12 modalità predefinite ...

Страница 172: ...172 Premere per selezionare un icona premere per confermare Premere per convertire la modalità resistenza e la modalità potenza Premere per impostare i dati Premere per iniziare l esercizio ...

Страница 173: ...izione nella pagina iniziale per tornare alla pagina degli esercizi Se si premono altre icone per esempio l icona scena virtuale l icona programma utente e così via viene mostrata una nuova finestra di dialogo Premere per arrestare adesso è possibile iniziare altri esercizi Premere Cancel cancella per continuare questo esercizio ...

Страница 174: ...istenza 14 14 16 16 16 16 14 14 14 14 16 16 16 16 14 14 Sezione 1 2 3 4 5 6 7 8 9 10 11 12 13 14 15 16 Velocità 24 24 30 30 34 34 36 36 34 30 30 30 30 30 24 24 Resistenza 10 10 12 10 10 14 12 12 12 16 16 14 14 18 14 14 Sezione 1 2 3 4 5 6 7 8 9 10 11 12 13 14 15 16 Velocità 24 24 30 30 34 34 36 36 34 30 30 30 30 30 24 24 Resistenza 12 12 14 12 14 16 14 14 14 18 18 16 16 20 16 16 Sezione 1 2 3 4 5 ...

Страница 175: ...lla modalità allenamento all aperto per bruciare grassi ad esempio Premere per selezionare un icona premere per confermare Premere per convertire la modalità resistenza e la modalità potenza Premere per impostare i dati Premere per iniziare l esercizio ...

Страница 176: ... Sezione 1 2 3 4 5 6 7 8 9 10 11 12 13 14 15 16 Resistenza 10 10 12 12 12 14 14 20 20 20 20 12 12 12 10 10 Sezione 1 2 3 4 5 6 7 8 9 10 11 12 13 14 15 16 Resistenza 10 10 12 12 12 12 10 10 10 10 12 12 12 12 10 10 Sezione 1 2 3 4 5 6 7 8 9 10 11 12 13 14 15 16 Resistenza 10 12 16 20 10 12 16 20 10 12 16 20 10 12 16 20 Sezione 1 2 3 4 5 6 7 8 9 10 11 12 13 14 15 16 Resistenza 10 10 14 10 10 18 10 14...

Страница 177: ...177 Premere per impostare i dati premere per selezionare differenti items Riscaldamento 2 min Processo HRC Raffreddamento ...

Страница 178: ...178 Se la frequenza cardiaca non viene rilevata visualizzare l immagine riportata sopra Premere per entrare nella modalità di potenza costante Modalità potenza costante Premere per iniziare l esercizio ...

Страница 179: ...e multimedia e impostazioni 1 Musica Premere per entrare nel menu musica Premere per selezionare la musica premere per riprodurre play pausa volume volume precedente successivo 2 Video Premere per entrare nel menu video ...

Страница 180: ...uovo per tornare alla pagina precedente Una volta nascosta la playlist premere and to wake up the playlists b Premere to play pausa premere per regolare il volume 3 Impostazioni Premere per passare al menu impostazione retroilluminazione Press the to set the brightness Premere per passare al menu impostazione lingua Premere per impostare la lingua ...

Страница 181: ...rda la manutenzione del sistema E necessario un codice per entrare in questa modalità 6 Codice errore Se compare il codice E01 si è verificato un errore EO1 signal error Il codice E02 segnala che probabilmente la resistenza del motore non funziona correttamente ...

Страница 182: ...N MAX BPM 20 133 167 25 132 166 30 130 164 35 129 162 40 127 161 45 125 159 50 124 156 55 122 155 60 121 153 65 119 151 70 118 150 75 117 147 80 115 146 85 114 144 Avvertenze questa è solo una guida Le prestazioni dipendono dalle condizioni fisiche e di salute dell utente che utilizza la macchina Consigli per l allenamento Eseguite sempre esercizi di stretching prima e dopo l allenamento Vedere pa...

Страница 183: ...allenamento In caso di capogiri o se percepite un senso di stordimento fermate immediatamente l allenamento e riposatevi Se vi accorgete che non state sudando aumentate la velocità Guida allo stretching Consigli Iniziate gradualmente effettuando esercizi per la mobilità delle articolazioni quali rotazione dei polsi piegamento delle braccia o rotazione delle spalle Questo favorirà la lubrificazione...

Страница 184: ...tenere l equilibrio andare verso l indietro e sollevare il piede destro verso l alto Portare il tallone più vicino alle natiche possibile Trattenere per 15 conteggi e ripetere con il piede sinistro 5 STRETCHING INTERNO COSCIA Sedersi con le suole dei piedi unite e le ginocchia che puntano verso l esterno Avvicinare i piedi all inguine il più possibile Spingere delicatamente le ginocchia verso il p...

Страница 185: ...migliore performance Respira regolarmente e profondamente durante i tuoi esercizi non trattenere mai il respiro RAFFREDDAMENTO Termina ogni allenamento con una corsa o una camminata breve di almeno 1 minuto Quindi esegui dai 5 ai 10 minuti di stretching per raffreddarti Questo aumenterà la flessibilità dei tuoi muscoli e ti aiuterà a prevenire eventuali problemi post allenamento ...

Страница 186: ...telefono Android Potete cercare l applicazione FitShow sull Google Play Store o scaricarla tramite il codice QR iOS Potete cercare l applicazione FitShow sull App Store o scaricarla tramite il codice QR Consigli per l utilizzo dell app Se utilizzate il sistema android verificate che alla voce impostazioni sicurezza apparechio vi sia un segno posto alla voce fonte sconosciuta 1 Dopo aver scaricato ...

Страница 187: ...egenden Anforderungen der aufgeführten EG Richtlinien erfüllt EMC Directive 2014 30 EU EN 55014 1 2006 A1 2009 A2 2011 EN 55014 2 2015 EN 61000 3 2 2014 EN 61000 3 3 2013 Low Voltage Directive 2014 35 EU EN 60335 1 2012 A11 2014 Stationary training equipment 2014 357 EU EN ISO 20957 1 2013 Restriction of Hazardous Substances 2011 65 EU IEC 62321 3 1 2013 IEC 62321 4 2013 IEC 62321 5 2013 IEC 62321...

Страница 188: ...Verkauf durch Distributed by Distribuido por Distribué Distribuito da InnovaMaxx GmbH Potsdamer Platz 11 10785 Berlin 49 30 220 66 35 69 service innovamaxx de http www sportstech de ...

Отзывы: