P. 9
© 2004 Sportcraft, Ltd.
29
29
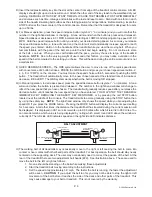
BELT ADJUSTMENT
Turn Clockwise
Belt Moves
Turn Counter-Clockwise
Belt Moves
Turn Clockwise
Belt Moves
Turn Counter-Clockwise
Belt Moves
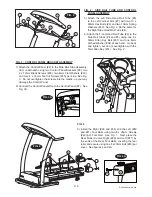
D) Insert the red plastic safety key into the slot at the center front edge of the treadmill control console. All LED
displays should light up and a tone will sound. Attach the other end of the key leash to the waistband of your
clothing. REMOVAL OF THIS KEY AT ANY TIME WILL CAUSE THE TREADMILL TO STOP IMMEDIATELY
and all values such as time, mileage and calories will be lost and reset to zero. Stand with one foot on each
side of the treadmill walking belt surface as the starting position for all operations. Before starting, locate the
STOP button at the lower center of the control console. Remember that the treadmill is designed for users
up to 250 lbs.
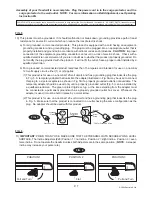
E) For Manual operation, press the speed increase button (symbol “+” on console) and you will note that the
number in the right-hand window is changing. A tone will sound when the button is pressed and released.
Speed increases or decreases in 0.1MPH increments starting at 1.0MPH and stopping at a top speed of 10.0
MPH. Hold the speed increase button until you reach your desired starting speed. As soon as you release
the speed increase button, a tone will sound and the motor will start and steadily increase speed to reach
the speed you entered. Hold on to the handrails of the treadmill while you view the moving belt. When you
feel comfortable with the pace of the belt, step onto the belt and begin walking. Do not continue to stare
at the belt. Look up. When you are comfortable with the pace, you may choose to let go of the treadmill
handrails.
NOTE
: Due to the varying weight of users and other factors, you may notice a variation in the
speed of the belt compared to the setting you chose. This will happen during the entire workout and is not
a malfunction.
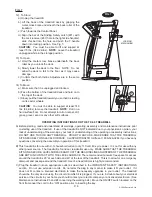
F) QUICK RESPONSE SPEED – The QRS system allows the user to move to one of the quick speed levels
with convenience of 2 button strokes. PRESS the QRS button and press your chosen speed level button, 2,
4, 6, 8 or 10 MPH, on the console. You must make the speed choice within 5 seconds of pushing the QRS
button. The treadmill will automatically move to the new chosen speed at the standard rate of increase or
decrease. BE ALERT! The QRS system works whether the belt is moving OR stopped.
G) In Manual operation, to decrease speed, press the speed decrease button (symbol “-” on console). A tone
will sound when the button is pressed and released. The number in the right-hand window will change to
reflect the new speed that you have chosen. The treadmill will gradually reduce speed after you release the
decrease button until it reaches the new speed that you have entered. YOU MAY STOP THE TREADMILL
IMMEDIATELY BY REMOVING THE SAFETY KEY MENTIONED, or by pressing the red STOP button
located near the middle of the console. The treadmill will stop more gradually using the STOP button than
by using the safety key.
NOTE
: The right-hand window only shows the speed while you are adjusting the
speed OR if you press the MODE button. Pressing the MODE button will display the current speed setting
for 5 seconds. At all other times, the distance the treadmill belt has traveled during the current session will
be displayed. It is displayed in 00.1-mile increments up to 99.9 miles after which it returns to 00.0 miles. You
can also determine which value is being displayed by noting which small, round LED above the window is
currently lit. The left side LED indicates speed and the right side LED indicates distance.
H) The walking belt of all treadmills may occasionally move to the right or left causing the belt to come into
contact or near contact with other fixed parts of the treadmill. For best operation, the belt should stay nearly
centered on the supporting deck. The user may occasionally need to correct the position of the belt. At the
rear of the treadmill there are two adjustment bolt heads (#29). See illustration above. These are used to
move the belt to the left or right as follows:
1. No one should be standing on the belt while making these adjustments.
2. Start the treadmill belt moving according to the instructions.
3. Set the speed at approximately 5.0 mph. The faster the belt is running, the faster the adjustment
will be seen.
CAUTION
: If you adjust the belt too far, you may not be able to stop the right or left
movement of the belt before it reaches the side of the deck and other parts of the treadmill. This
may cause damage to your belt or treadmill. This is not covered by the warranty.


