Spirit XE795 Скачать руководство пользователя страница 21

Customer Service 1-888-707-1880 


                                                                   Dyaco Canada Inc. 2016                                                                             

Email: [email protected]


21 

Custom User Defined Programs


There are two customizable User programs that allow you to build and save your own workout. The 
two programs, 

User 1 

and 

User 2,

 operate exactly the same way, so there is no reason to describe 

them separately. You can build your own custom program by following the instructions below, or you 
can save any other preset program you complete as a custom program. Both programs allow you to 
further personalize it by adding your name. 
1.  Select the 

User 

program (

U1 

or 

U2

), then press 

Enter

. If you have already saved a program to 

either 

U1 

or 

U2

, it will be displayed, and you are ready to begin. If not, you will have the option 

of inputting a username. In the 

Message Window, 

the letter “A” will be blinking. Use the 

Level 

Up/Down buttons 

to select the appropriate first letter of your name (pressing the 

Level Up 

button 

will switch to the letter “B”; pressing the 

Down button

 will switch to letter “Z”). Press 

Enter 

when the desired letter is displayed. Repeat this process until all of the characters of your 

name have been programmed (maximum 7 characters). When finished, press 

Stop

2.  If there is a program already stored in 

User, 

when you press the key, you will have an option to 

run the program as it is or delete the program and build a new one. At the welcome message 
screen, when pressing 

Start 

or 

Enter, 

you will be prompted: Run Program? Use the 

Level 

Up/Down 

to select Yes or No. If you select No, you will then be asked if you want to delete the 

currently saved program. It is necessary to delete the current program if you want to build a 
new one. The Message Center will ask you to enter your Age. You may enter your age using 
the 

Level Up/Down keys

, then press the 

Enter 

key to accept the new value and proceed on to 

the next screen. 

3.  If there is a program already stored in User, when you press the key, you will have an option to 

run the program as it is or delete the program and build a new one. At the welcome message 
screen, when pressing Start or Enter, you will be prompted: Run Program? Use the 

Level 

Up/Down 

to select Yes or No. If you select No, you will then be asked if you want to delete the 

currently saved program. It is necessary to delete the current program if you want to build a 
new one. 

4.  The Message Center will ask you to enter your Age. You may enter your age using the 

Level 

Up/Down keys

, then press the 

Enter 

key to accept the new value and proceed on to the next 

screen. 

5.  You are now asked to enter your Weight. You may adjust the weight value using the 

Level 

Up/Down keys 

or the numeric keypad, then press 

Enter 

to continue. 

6.  Next is Time. You may adjust the time and press 

Enter 

to continue. 

7.  Now you are asked to adjust the Max Resistance Level of the program; press 

Enter 

when 

resistance has been selected.   

8.  Now the first column will be blinking, and you are asked to adjust the resistance level for the 

first segment (SEGMENT > 1) of the workout by using the 

Level Up key

. When you finish 

adjusting the first segment, or if you don’t want to change, then press 

Enter 

to continue to the 

next segment. 

9.  The next segment will show the same workload resistance level as the previously adjusted 

segment. Repeat the same process as the last segment, then press 

Enter

. Continue this 

process until all twenty segments have been set. 

10. 

The Message Center will then tell you to press 

Enter 

to save the program. After saving the 

program, the Message Center says “PROG SAVED,” then will give you the option to start or 
modify the program. Pressing 

Stop 

will exit to the start up screen. 


Содержание XE795

Страница 1: ...OWNER S MANUAL MODEL NO 16607607950 XE795 Assembly Operation Maintenance Parts Warranty CAUTION You must read and understand this owner s manual before operating unit Retain For Future Reference...

Страница 2: ...tion Instructions 5 Assembly Instructions 6 Operation of Your Elliptical 13 Programmable Features 17 Using Heart Rate Transmitter 26 Exploded View Diagram 28 Parts List 29 General Maintenance 32 Manuf...

Страница 3: ...e your experience more informed and any difficulties easier to remedy Please take a moment at this time to record the name of the dealer their telephone number and the date of purchase below to make a...

Страница 4: ...ical trainer for any purpose other than for the purpose it is intended The hand pulse sensors are not medical devices Their purpose is to provide you with an approximate measurement in relation to you...

Страница 5: ...of any operational change you request from the computer Understand that changes in resistance do not occur immediately Set your desired resistance level on the computer console and release the adjustm...

Страница 6: ...2 Carefully remove all parts from carton and inspect for any damage or missing parts If damaged parts are found or parts are missing contact your dealer immediately 3 Locate the hardware package The h...

Страница 7: ...s lever assembly on opposite side of the unit 2 Press the 6 END CAPS 82 into the oval stabilizer tubes 3 Attach the TRANSPORT WHEELS 80 to each bracket with 2 BOLTS 92 and 2 NUTS 99 Partially tighten...

Страница 8: ...he electrical functions of the console 2 Secure the mast to the frame with 3 BOLTS 85 and 3 FLAT WASHERS 84 to each side of the mast Secure with a BOLT 85 and CURVED WASHER 86 to both the front and ba...

Страница 9: ...he left console mast axle The swing arms have been preassembled at the factory to assure a proper fit The fit will be snug Please do not force the arm on the axle or use a hammer as damage to the bear...

Страница 10: ...NNECTION BRACKET 15 and 3 BUTTON HEAD SOCKET BOLTS 91 Tighten with the 8MM L WRENCH 95 4 Line up the socket joint at the end of the pedal arm to the bracket on the bottom of the swingarm Secure togeth...

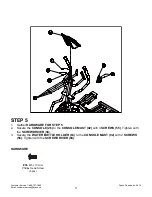
Страница 11: ...STEP 5 1 Gather HARDWARE FOR STEP 5 2 Secure the CONSOLE 26 to the CONSOLE MAST 02 with 4 SCREWS 55 Tighten with the SCREWDRIVER 94 3 Secure the WATER BOTTLE HOLDER 83 to the CONSOLE MAST 02 with 2 S...

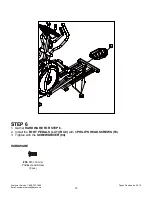
Страница 12: ...co Canada Inc 2016 Email customerservice dyaco ca 12 STEP 6 1 Gather HARDWARE FOR STEP 6 2 Install the FOOT PEDALS L 47 R 48 with 8 PHILIPS HEAD SCREWS 55 3 Tighten with the SCREWDRIVER 94 HARDWARE 55...

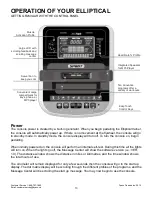
Страница 13: ...the lights go off the Message Center will show the software version i e VER 1 0 The distance window shows the distance in miles or kilometres and the time window shows the total hours of use The odom...

Страница 14: ...ay Displays the cumulative calories burned at any given time during your workout Note This is only a rough guide used for comparison of different exercise sessions and is not to be used for medical pu...

Страница 15: ...conditioned users Levels 6 10 are more challenging but the increases in resistance from one level to the next remain small Levels 11 15 start getting tough as the levels jump more dramatically Levels...

Страница 16: ...uring the Heart Rate programs to ensure the correct predicted target heart rate zone Entering your Weight aids in calculating a more correct Calorie reading Although we cannot provide an exact calorie...

Страница 17: ...me and press Enter to continue 5 Now you are finished editing the settings and can begin your workout by pressing the Start key You can also go back and modify your settings by pressing the Stop key N...

Страница 18: ...to be used as a reference only to monitor improvement from workout to workout 4 The Message Center displays Use Level Up or Down keys to adjust Calorie burn default is 300 After adjusting press Enter...

Страница 19: ...ame bodyweight age and height their calorie burn may be very different than yours The Calorie display is to be used as a reference only to monitor improvement from workout to workout The calorie count...

Страница 20: ...sing the Start key You can also go back and modify your settings by pressing the Enter key 7 If you want to increase or decrease the resistance at any time during the program press the Level Up Down k...

Страница 21: ...Age You may enter your age using the Level Up Down keys then press the Enter key to accept the new value and proceed on to the next screen 3 If there is a program already stored in User when you press...

Страница 22: ...N This program follows a quick progression up to the maximum resistance level default or user input level that is sustained for 2 3 of the workout This program will challenge your ability to sustain y...

Страница 23: ...iciently CALORIES This program follows a quick progression up to the maximum resistance level default or user input level that is sustained for 2 3 of the workout This program will challenge your abil...

Страница 24: ...0 is the zone to stay in for maximum benefit For someone who is 40 years old their target heart rate zone is calculated 220 40 180 maximum heart rate 180 x 6 108 beats per minute 60 of maximum 180 X 8...

Страница 25: ...e Borg scale is as follows Rating Perception of Effort 6 Minimal 7 Very very light 8 Very very light 9 Very light 10 Very light 11 Fairly light 12 Comfortable 13 Somewhat hard 14 Somewhat hard 15 Hard...

Страница 26: ...se enough to the console to maintain good strong reliable readings Wearing the transmitter immediately against bare skin assures you of proper operation If you wish you may wear the transmitter over a...

Страница 27: ...accept the new value and proceed on to the next screen 3 You are now asked to enter your Weight You may adjust the weight value using the Level Up Down keys then press Enter to continue 4 Next is Time...

Страница 28: ...Customer Service 1 888 707 1880 Dyaco Canada Inc 2016 Email customerservice dyaco ca 28 EXPLODED VIEW DIAGRAM...

Страница 29: ...minum Track 6 17 6079517 Aluminum Track 2 18 6079518 6005_Bearing 10 19 6079519 6203_Bearing 2 20 6079520 6003_Bearing 12 21 6079521 M12 P1 75_Rod End Bearing 2 22 6079522 Drive Belt 1 23 6079523 Indu...

Страница 30: ...m_Sheet Metal Screw 13 57 6079557 5 16m m_Tapping Screw 16 58 6079558 5 16m m_Tapping Screw 6 59 6079559 3 20m m_Tapping Screw 4 60 6079560 17_C Ring 5 61 6079561 25_C Ring 2 62 6079562 1 4 8T_Nyloc...

Страница 31: ...4 _Button Head Socket Bolt 2 93 6079593 13 14m m_Wrench 1 94 6079594 Phillips Head Screwdriver 1 95 6079595 8 m m L Allen Wrench 1 97 6079597 L Allen Wrench 1 98 6079598 12 14m m_Wrench 1 99 6079599...

Страница 32: ...GINEERING MODE MENU The console has built in maintenance diagnostic software The software will allow you to change the console settings from English to Metric and turn off the beeping of the speaker w...

Страница 33: ...warranty provided herein is lieu of all other express warranties any implied warranties including any implied warranties of merchantability of fitness for particular purpose are limited in duration to...

Страница 34: ...for information about our other brands and products manufactured and distributed by Dyaco Canada Inc spiritfitness ca solefitness ca xterrafitness ca dyaco ca products everlast html dyaco ca UFC UFC...

Страница 35: ...Customer Service 1 888 707 1880 Dyaco Canada Inc 2016 Email customerservice dyaco ca 35 T 1 888 707 1880 5955 Don Murie St Niagara Falls Ontario L2G 0A9 sales dyaco ca...

Отзывы: