6.3. CONNECTING YOUR SMART DEVICE (CONT.)
1. Make sure that your smart device has Bluetooth enabled.
2. Open the SMARTmeter app on your smart device.
3. Tap the blue banner at the top of the screen on the App to change the meter you have selected. Switch to DM6850T
4. Touch the “CONN” button on the bottom right of the screen on your smart device and follow the instructions on the screen.
a. Turn on Bluetooth on your phone/tablet
b. Turn dial on meter to select measurement
c. Hold the red button on the meter for 2 seconds to activate Bluetooth.
The meter will beep and the Bluetooth icon will appear on the screen when Bluetooth is activated.
d. Select “DM6850T” on the next screen
5. Tap “Continue” on your smart device.
6. Press the “Scan” button on your smart device.
7. A list of devices will appear. Select the device “DM6850T”
8. The devices are now connected. The Bluetooth symbol should appear on both the DM6850T and your smart device.
6.4 DATA LOGGING
Make sure that your smart device has Bluetooth enabled.
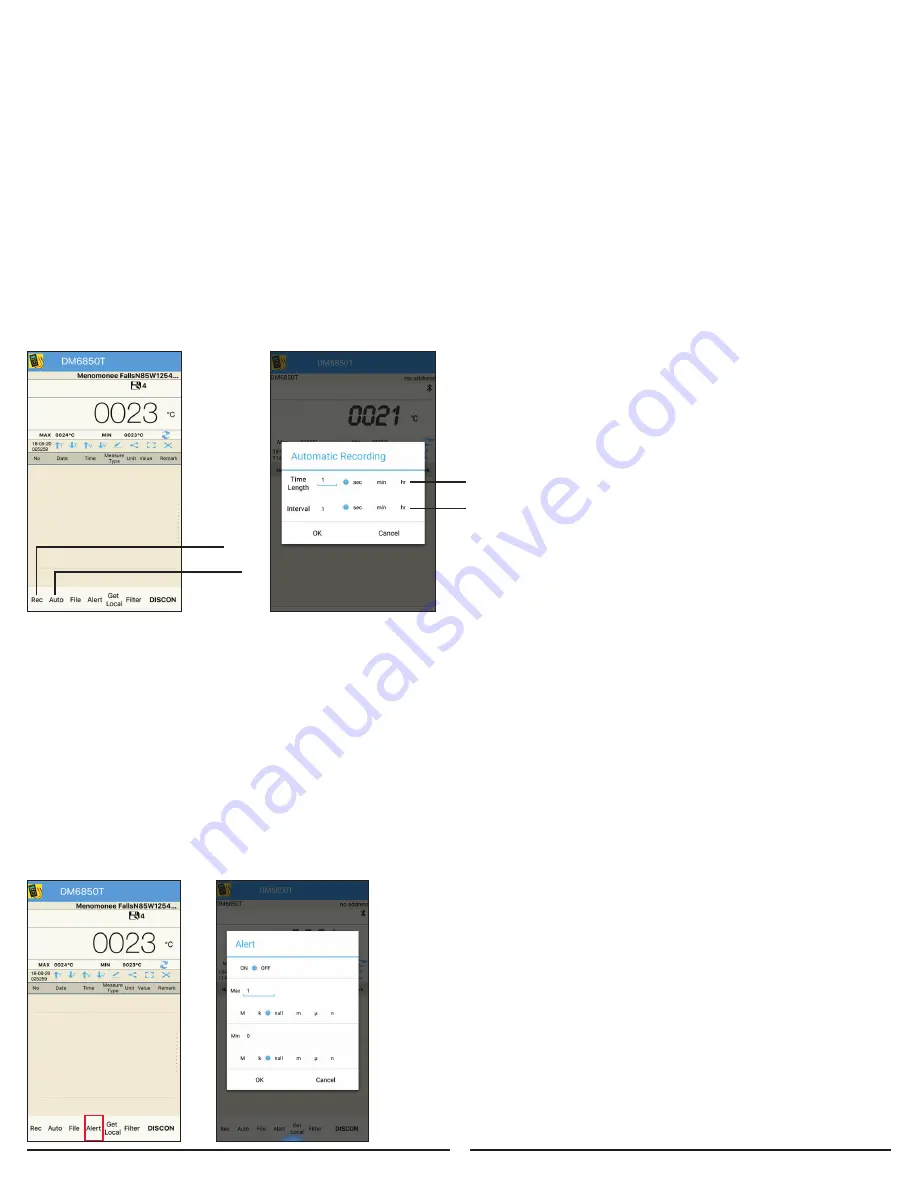
1. Data can be logged manually by pressing the “Record” button on your smart device for each measurement.
2. Data can be logged automatically by pressing the “Auto” button and inputting the recording length and interval.
3. The time base can be set to hours, minutes or seconds.
4. Once the length and interval have been entered press the “OK” button to begin recording.
5. After the “OK” button is pressed, your smart device will begin recording data points.
As it is doing this you will immediately be prompted to name the file or accept the default file name.
6. Data points will continue to be recorded for the duration and interval specified.
7. If you wish to terminate the auto recording of data points simply press the “Stop” button on your smart device.
8. After the duration has elapsed your smart device will stop recoding data points, but the readings
will continue to be displayed. (See Data file management 6.7 for instructions on viewing saved data)
6.5 ALERT
• Set audible alerts if measurements exceed specified maximum/minimum values.
• Alert function only works when meter and phone/tablet are connected via Bluetooth.
1.
Rec – Record a single data point
2.
Auto – Automatic recording
3.
*Time Length – Set the length of time to
automatically record measurements
4.
*Interval – Set the time between each
measurement which is automatically recorded
Note: The interval should be the shorter
than the time length.
1. An alert can be set up to notify the user when
readings are displayed that are outside of a set range.
2. To set up an alert press the “Alert” button and input
the maximum value and minimum value.
3. The max / min values can be input in decimal form by selecting
“Null” or by using the SI unit of measure prefixes n, μ, m, k, M.
4. After entering the values, select
“On” and press “OK”.
5. Your smart device will emit a beeping sound if the
value displayed exceeds the range entered.
6. To deactivate the alert press the
“Alert” button,
select
“Off” and press “OK”.
1
2
3
4
10


