


Installation
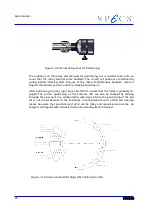
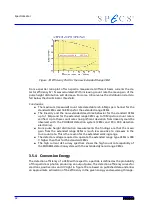
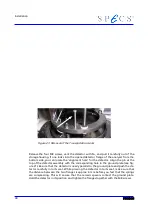
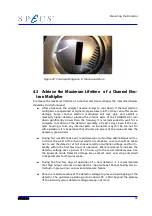
Figure 21: Removal of the Transportation Locks
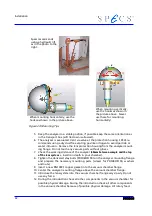
Release the four M8 screws, vent the detector with N
2
, and pull it carefully out of the
storage housing. If one looks into the opened detector flange of the analyzer from the
bottom side, you can locate the 'alignment hole' for the detector. Align the pin at the
top of the detector assembly with the corresponding hole in the ground plate (see fig-
ure 21). Be sure that the detector is nearly parallel to the ground plate and push the de-
tector carefully into its seat. While pressing the detector into its seat, make sure that
the distance between the two flanges is approx. 4 mm before you feel that the springs
are compressing. This will ensure that the ceramic spacers contact the ground plate.
Hold the detector in its position and tighten the flanges together with the M8 screws.
38
Содержание PHOIBOS 100
Страница 1: ...PHOIBOS Hemispherical Energy Analyzer Series PHOIBOS 100 PHOIBOS 150 3 1...
Страница 6: ...Table of Contents PHOIBOS...
Страница 10: ...Introduction 4 PHOIBOS...
Страница 13: ...Electrical Connections Figure 2 Connection Scheme PHOIBOS 7...
Страница 14: ...Components and Connections Figure 3 Analyzer Housing PHOIBOS100 8 PHOIBOS...
Страница 15: ...Electrical Connections Figure 4 Analyzer Housing PHOIBOS150 PHOIBOS 9...
Страница 42: ......
Страница 51: ...SpecsLab Hardware and Software Installation PHOIBOS 45...
Страница 52: ......
Страница 62: ......
Страница 78: ...Analyzer Checks Figure 33 Schematics of the 12 pin Analyzer Feedthrough 72 PHOIBOS...
Страница 80: ......
Страница 86: ......
Страница 92: ...List of Figures Figure 39 Alignment Pin 84 II PHOIBOS...
Страница 93: ...List of Figures PHOIBOS III...
Страница 94: ......
Страница 96: ......
Страница 98: ...Index PHOIBOS...


