background image

STEP 1 


3.


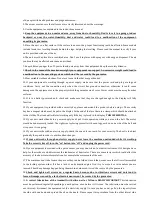
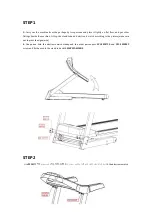
Carry out the machine from the package by two persons and place it lightly on flat floor, and put other 

fittings beside the machine. Lift up the stand tube and electronic watch according to the picture(

make sure 

not to press the signal wire)


4.


One  person  hold  the  electronic  watch  steady  and  the  other  person  puts 

4PCS  M8*20 

and

  2PCS  M8X45 

screw and fix them onto the stand tube with 

FLAT WASHERS

.


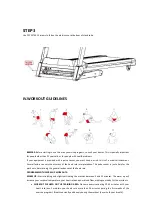
STEP 2 

  Use 

2PCS M8*20 

screws and 

FLAT WASHERS

 to screw up the left and right stand tube with the electronic watch. 


Содержание SP RUN104

Страница 1: ...el d utilisation du tapis de course SP RUN104 Attention Lisez toutes les précautions et les instructions contenues dans ce manuel avant d utiliser cet équipement Conservez ce manuel pour vos futures achats ...

Страница 2: ...NT SI LA CLE EST PLACEE SUR LA CONSOLE D AFFICHAGE Afin de réduire les risques de blessures graves lisez attentivement toutes les instructions et tous les avertissements importants concernant l utilisation du tapis de course avant de l utiliser Notre société décline toute responsabilité pour les dommages corporels ou matériels résultant de l utilisation de ce produit MINIMUN USER HEIGHT 140 cm MAX...

Страница 3: ... pourrait entraîner un dysfonctionnement du système d exploitation qui ne serait pas couvert par la garantie 9 Portez des vêtements et des chaussures appropriés Ne pas utiliser de vêtement ample qui pourrait être accroché 10 Si votre équipement fonctionne avec une alimentation assurez vous que le câble d alimentation et la prise sont en bon état N effectuez le branchement que lorsque la prise est ...

Страница 4: ...vez un soulevez le côté du tapis roulant avec la main avec un main et répandre l huile sur le support du tapis Veuillez répéter cette procédure de l autre côté latéral Branchez l équipement sur l alimentation si vous en avez une et tournez le bouton On bouton rouge sur la position correcte I insérez la clé de sécurité et laissez le tapis de course fonctionner pendant plusieurs minutes sans le moin...

Страница 5: ...AGE Tension d entrée 220V 10 Frequence 50 60 HZ Taille du tapis de course 1230X420mm Fonction Temps Vitesse distance Calorie Pouls entrée MP3 Bluetooth Application Vitesse réglable 1 0 16 KM H Inclinaison 0 15 automatique Poids maximum d utilisation 100kgs Puissance 2 0HP LCD écran Couvercle de protection du moteur Tapis de course Embout de protection CLE DE SECURITE Barre de maintien BASE Protect...

Страница 6: ...e 1 quantité No Vis écrou quantité No outils qté M8 20 6 Clé de 6mm 1 M8 45 2 Clé multiple 1 ST4 15 2 Huile silicone 1 M8 écrou 2 Manuel d utilisation 1 Rondelle plate 8 11 Cable MP3 1 Clé de 5mm 1 12 Clé de sécurité 1 NOTICE L assemblage requiert 2 personnes 2 Plastic cover 1 Main frame ...

Страница 7: ... et le moniteur écran conformément à la photo veillez à ne pas appuyer sur le cable de sécurité 2 Une personne tient le moniteur écran fermement et l autre personne met les vis 4PCS M8 x 20 et 2PCS M8 X 45 et les fixe sur le tube de support avec des rondelles plates étape 2 Utilisez les vis 2PCS M8 20 et les rondelles pour visser le tube de support gauche et droit avec le moniteur ...

Страница 8: ...re équipement est équipé d un détecteur de pouls vous devez garder à l esprit que ce n est pas un instrument médical Plusieurs facteurs peuvent varier sur la précision des interprétations de la fréquence cardiaque Le détecteur cardiaque est simplement une aide pour les séances d entraînement déterminant les tendances générales de la fréquence cardiaque PROGRAMME AVEC DES EXERCICES D ECHAUFFEMENT É...

Страница 9: ...re souffle FIN D ENTRAINEMENT terminez par des exercices d étirement pendant 5 à 10 minutes Les étirements augmentent la flexibilité de vos muscles et vous aident à éviter les blessures après les séances d entraînement FRÉQUENCE DE L ENTRAÎNEMENT Afin de rester en forme ou d améliorer votre forme effectuez trois séances d entraînement chaque semaine avec une journée de repos entre les séances d en...

Страница 10: ...MONITEUR MODE MANUEL LCD ECRAN BOUTON RAPIDE POUR CHANGER LA VITESSE BOUTON RAPIDE pour CHANGER INCLINAISON MODE Démarrer Vitesse Inclinaison Programmes Arreter ...

Страница 11: ...MODE PROGRAMMES ...

Страница 12: ... 3 6 5 4 2 INCLINE 0 2 3 4 5 6 7 7 6 5 4 3 2 1 1 2 3 4 5 6 P06 SPEED 2 4 3 4 5 4 8 7 5 7 8 3 6 4 4 2 5 4 3 2 INCLINE 0 2 3 4 5 6 7 7 6 5 4 3 2 1 1 2 3 4 5 6 P07 SPEED 2 3 3 3 4 5 3 4 5 3 4 5 3 3 3 6 6 5 3 3 INCLINE 2 3 4 5 6 7 8 9 9 9 9 9 8 7 6 5 4 3 2 2 P08 SPEED 2 3 3 6 7 7 4 6 7 4 6 7 4 4 4 2 3 4 4 2 INCLINE 0 3 3 5 5 7 7 9 9 7 7 5 5 3 3 3 3 5 5 7 P09 SPEED 2 4 4 7 7 4 7 8 4 8 9 9 4 4 4 5 6 3 3...

Страница 13: ...MP3 MUSIC TEST DE LA FORME PHYSIQUE 01 Sex 01 M 02 F 02 Age 10 99 03 Height 100 240 04 Weight 20 160 05 FAT 19 Underweight FAT 20 25 Normal weight FAT 25 29 Overweight FAT 30 Obesity APP G ...

Страница 14: ...nt en parfait état Les câbles électriques doivent être éloignés des surfaces chaudes VIS ET CÂBLES DE RACCORDEMENT Vérifiez et serrez les vis régulièrement car en raison de la vibration les vis et les écrous ont tendance à se desserrer LUBRICATION La lubrification correcte du tapis de course avec de l huile de silicone ou de téflon est vraiment importante Cette lubrification doit être effectuée ré...

Страница 15: ...rectement alignée SERREZ LA CEINTURE si la ceinture glisse sur le tapis de course en marchant Démarrer le tapis de course et augmenter la vitesse à 4km h À l aide de la clé de 6 mm tournez les deux boulons d un quart dans le sens des aiguilles d une montre Si la ceinture est correctement serrée pour marcher vous devez pouvoir tirer chaque côté de la ceinture à 5 ou 7 cm de la plate forme Soyez pru...

Страница 16: ...t pas être jeté avec les déchets municipaux Pour préserver l environnement ce produit doit être recyclé après sa durée de vie comme l exige la loi VIIl ERREURS FREQUENTES CODE d erreur RAISON COMMENT RESOUDRE LE PROBLEME PAS D AFFICHAGE A Appareil non connecté à l electricité Brancher le cable d alimentation B Le bouton n est pas en position ON Mettre sur On le bouton d allumage C Module de contrô...

Страница 17: ... du signal de vitesse ou changez le par un nouveau fil ou nouveau capteur B pcb cassé Changer la pièce E04 A Le fil du moteur d inclinaison n est pas bien branché Rebrancher le cable du moteur B Le moteur d inclinaison est cassé Changer la pièce cassée par un nouveau C pcb cassé Changer par un nouveau pcb E05 A Poids d utilisateur maximum atteint Eteigner le tapis et rallumer le B La position du t...

Страница 18: ...e site www sparraw com à compter de la date de livraison dans des conditions normales d utilisation Garantie commerciale de 1 an sur le châssis et le moteur et 6 mois sur les pièces d usures pour les produits fitness achetés chez l un de nos revendeurs à compter de la date de livraison dans des conditions normales d utilisation La garantie est limitée à l échange du produit ou à la livraison des p...

Страница 19: ...bligation de vérifier l état de la marchandise avant de signer le bon de livraison L emballage était intact et le produit présente un problème non lié au transport ou des pièces manquantes Merci d envoyer les photos du problème à contact sparraw com en y ajoutant la facture d achat Notre service client prendra en compte votre réclamation SERVICE APRÈS VENTE Notre équipe de conseillers et d experts...

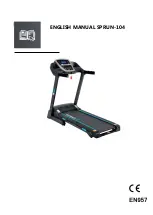
Страница 20: ...ENGLISH MANUAL SPRUN 104 ...

Страница 21: ...IRST USE YOU MUST PRESERVE THE ORIGINAL PACKAGING WITH ITS PROTECTIONS PURCHASE RECEIPT MANUAL AND COMPONENTS DURING THE GUARANTEE PERIOD In order to decrease the risk of suffering severe injuries read carefully all the important instructions and warnings regarding the use of a treadmill before using it Our company doesn t take any responsibility for personal injuries or property damages resulting...

Страница 22: ...end of the lace there is a clamp which should be attached to the clothes The treadmill will start working only if the key is placed in the display THIS IS ESSENTIAL 13 If your unit works thanks to a power supply don t put it into operation while you are on the belt The motor would be unnecessarily loaded The right way is placing yourself with open legs each one on a side of the belt and sit up onc...

Страница 23: ...s you will avoid injuries 25 Drink water before during and after the workout 26 If you start feeling pain or dizziness while training STOP IMMEDIATELY 27 YOU MUST PRESERVE THE ORIGINAL PACKAGING WITH ITS PROTECTIONS MANUAL AND COMPONENTS DURING THE GUARANTEE PERIOD 28 The accessories can be different to the other models 29 This electronic product can t be thrown under any circumstances into the mu...

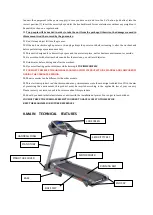
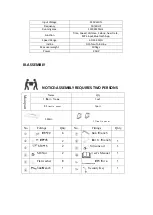
Страница 24: ...1 M8 Nut 2 User s Manual 1 Flat washer 8 11 MP3 Wire 1 5mmWrench 1 12 Security Key 1 Input Voltage 220V 10 Frequency 50 60 HZ Running area 1230X420mm Function Time Speed distance Calorie heart rate MP3 input Bluetooth App Speed Range 1 0 14 KM H Incline 0 15 auto incline Max user weight 100kgs Power 2 0HP NOTICE ASSEMBLY REQUIRES TWO PERSONS 2 Plastic cover 1 Main frame ...

Страница 25: ... tube and electronic watch according to the picture make sure not to press the signal wire 4 One person hold the electronic watch steady and the other person puts 4PCS M8 20 and 2PCS M8X45 screw and fix them onto the stand tube with FLAT WASHERS STEP 2 Use 2PCS M8 20 screws and FLAT WASHERS to screw up the left and right stand tube with the electronic watch ...

Страница 26: ...eart rate interpretations The pulse sensor is just a help for the work outs determining the general tendences of the heart rate PROGRAMM WITH WARM UP WORKOUTS WARM UP Start stretching and slightly activating the muscles between 5 and 10 minutes The warm up will increase your corporal temperature your heart rate and your blood flow making you ready for the workouts WORKOUT FOCUSED ON THE TRAINING A...

Страница 27: ...o avoid injuries after the workouts FREQUENCY OF THE WORKOUT In order to be fit or improve your shape complete three workout sessions each week with a rest day between the workouts After some moths of regular training you will be able of completing up to five workouts a week V TREADMILL OPERATION HOW TO FOLD AND MOVE THE TREADMILL ...

Страница 28: ...COMPUTER MANUAL LCD DISPLAY QUICK SPEED QUICK INCLINE MODE START SPEED Incline PROGRAM STOP ...

Страница 29: ...MODE PROGRAM ...

Страница 30: ...5 4 3 3 6 5 4 2 INCLINE 0 2 3 4 5 6 7 7 6 5 4 3 2 1 1 2 3 4 5 6 P06 SPEED 2 4 3 4 5 4 8 7 5 7 8 3 6 4 4 2 5 4 3 2 INCLINE 0 2 3 4 5 6 7 7 6 5 4 3 2 1 1 2 3 4 5 6 P07 SPEED 2 3 3 3 4 5 3 4 5 3 4 5 3 3 3 6 6 5 3 3 INCLINE 2 3 4 5 6 7 8 9 9 9 9 9 8 7 6 5 4 3 2 2 P08 SPEED 2 3 3 6 7 7 4 6 7 4 6 7 4 4 4 2 3 4 4 2 INCLINE 0 3 3 5 5 7 7 9 9 7 7 5 5 3 3 3 3 5 5 7 P09 SPEED 2 4 4 7 7 4 7 8 4 8 9 9 4 4 4 5 ...

Страница 31: ...CONSTITUTION TEST 01 Sex 01 M 02 F 02 Age 10 99 03 Height 100 240 04 Weight 20 160 05 FAT 19 Underweight FAT 20 25 Normal weight FAT 25 29 Overweight FAT 30 Obesity APP G ...

Страница 32: ...E THE POWER CORD REGULAR MAINTENANCE OF THE TREADMILL STORAGE Keep your equipment in a enclosed place away from dust or humidity Don t store it neither in a garage or in a indoor backyard or near the water Humidity dust and water could damage it and have an effect on its functioning ELECTRIC CABLE Make sure that the cable and plug are in perfect conditions ...

Страница 33: ...he belt has moved to the left start treadmill and increase the speed to 3MPH Use the 6mm Wrench to turn the fixed left bolt clockwise or turn the fixed right bolt counterclockwise Don t tighten the belt too much in order to be able to walk Repeat this procedure until the belt is properly aligned TIGHTEN THE BELT if the belt slips on the treadmill when walking Start treadmill and increase the speed...

Страница 34: ...lippery anymore CLEANING Don t use abrasive products A damp cloth is enough LEVELING If your unit is provided with leveling wheels please adjust them in order to avoid vibrations and therefore malfunctions KEEP THESE MAINTENANCE ADVISES FOR FUTURE REFERENCES VII RECYCLING INFORMATION if the running belt slips use 6mm wrench turn both sides bolts 1 4 clockwise Repeat this procedure until the belt i...

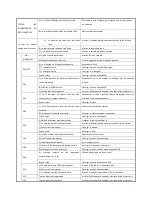
Страница 35: ...t the belt tension C pcb torque too big or too small Ajust torque to right position OR OR E00 E07 A safety key off Put on safety key B magnetron not fixed well Fix magnetron to right position E01 E13 A signal wire not well connected Re connect signal wire B signal wire broken Change new signal wire C signal wire broken Change new computer D pcb broken Change new pcb E02 A motor wire not well conne...

Страница 36: ...ubrication of the treadmill with silicon oil or teflon is REALLY IMPORTANT This lubrication MUST BE PERFORMED REGULARLY DEPENDING ON EACH PERSON EVEN BEFORE ITS FIRST USE YOU MUST PRESERVE THE ORIGINAL PACKAGING WITH ITS PROTECTIONS PURCHASE RECEIPT MANUAL AND COMPONENTS DURING THE GUARANTEE PERIOD IX WARRANTY We have one year quality warranty to the frame and engine and 6 month to the wearing par...

Страница 37: ...nder 72 working hours However if you have accepted the parcel without checking the product inside and without expressing reservations we deny all responsibility in the matter Intact packaging but the product has a problem not linked to the transport or missing parts Please send justifying photos and product invoice to contact sparraw com under 72 working hours and don t sign the delivery slip e ma...

Отзывы: